I love baking. A big part of that enjoyment is the analysis and thinking about what I’ve made and how it could be done differently and better. Of course, I love eating what I produce, too, but really I like to learn how to make things better and better.
Some people think that this analysis takes away from the enjoyment of the effort and product, but for me the analysis is part of the enjoyment and takes away nothing. Yes, I’m thinking about ways that something can be better, but for me this is a positive and hopeful process, and in no way is it negative or discouraging.
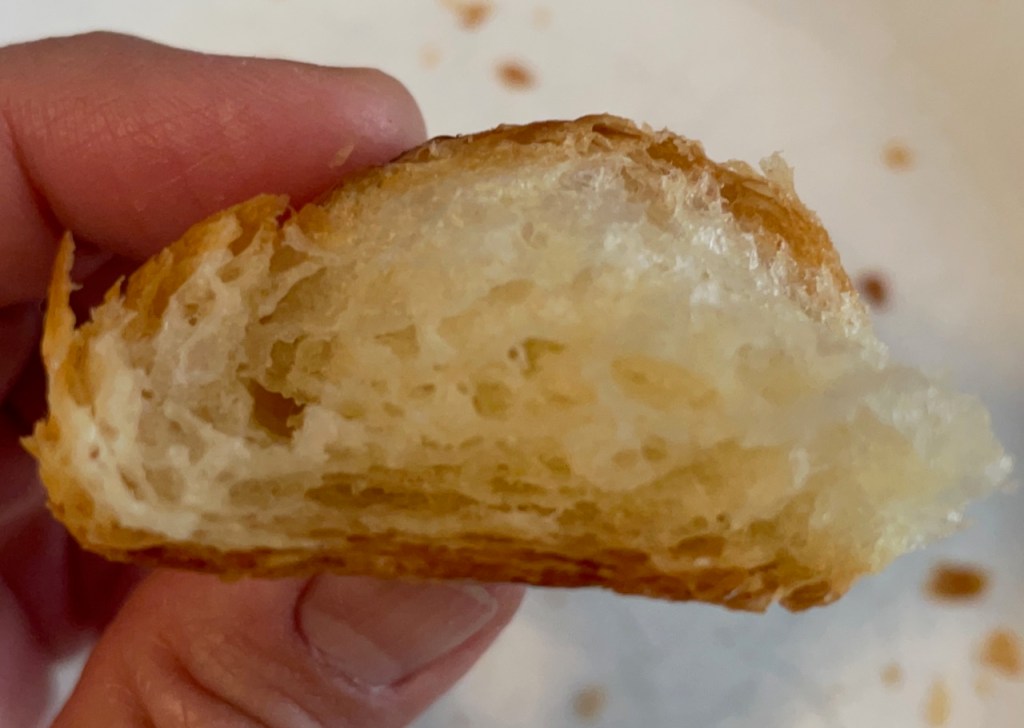
I can happily scarf down a croissant (or two!) while making a long mental list of all the things I want to try to do better with the next batch. Most people will want to just enjoy the croissants without the analysis. A very few people might want to think about these things with me. This blog is for us.
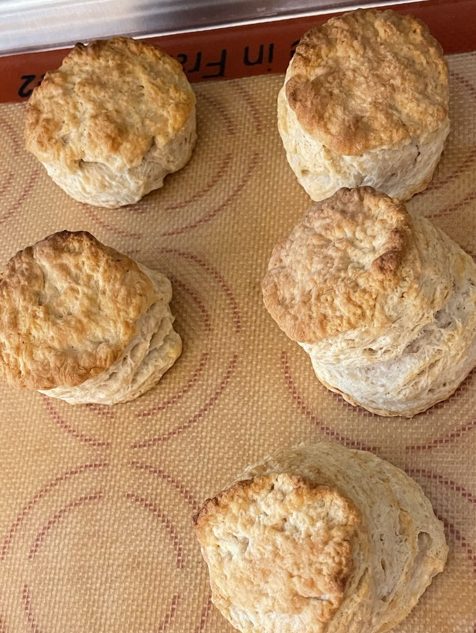
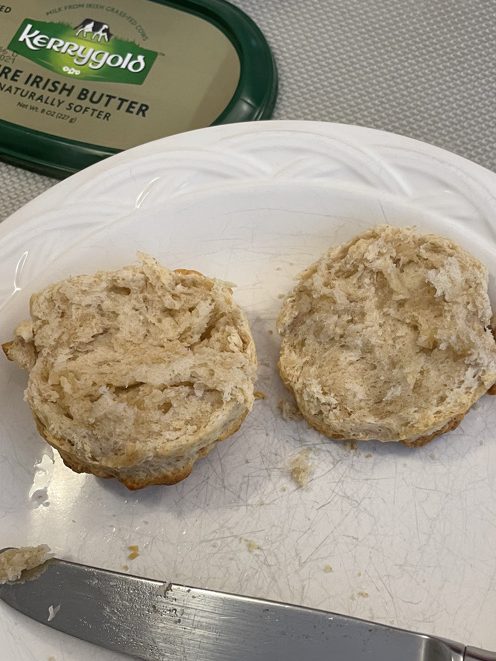
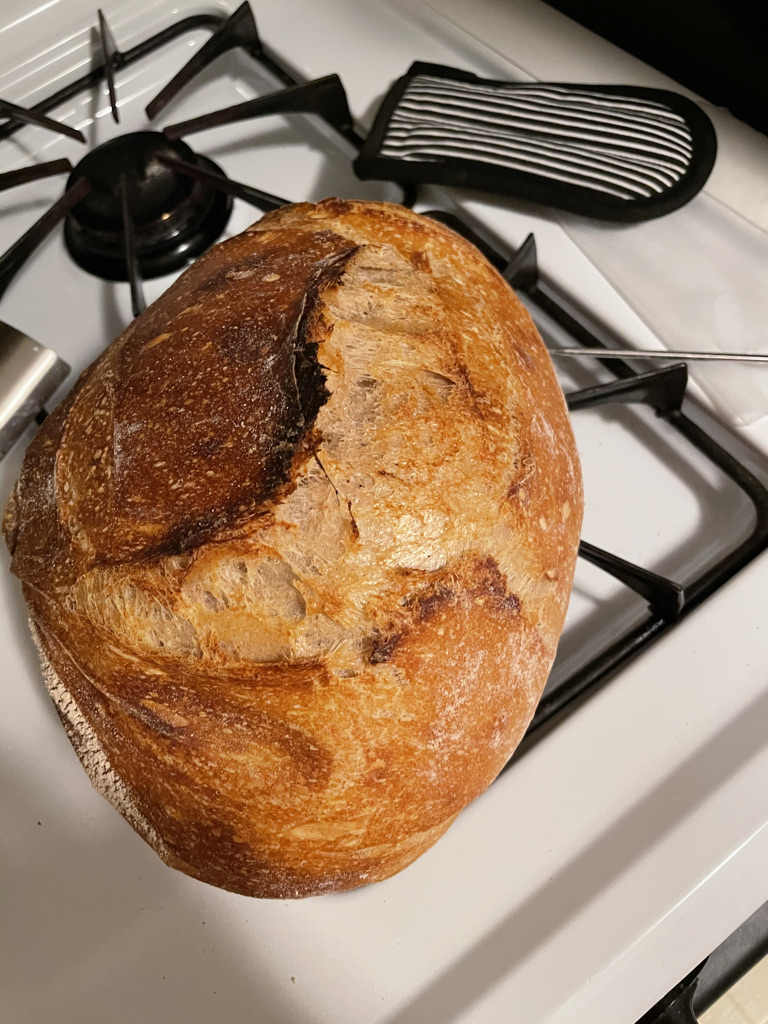
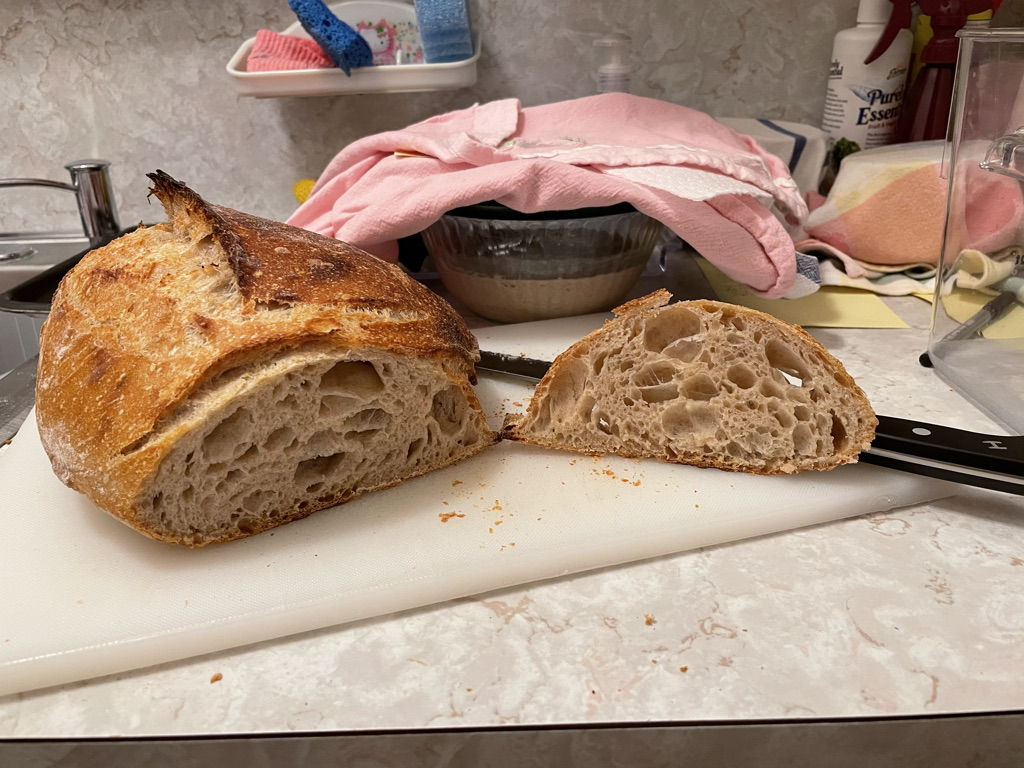
I previously mentioned my initial attempt at these sourdough butter biscuits, but wanted to dedicate a post to them, and I just baked a double batch this morning. They’re that good, and very easy.
The Leavenly website is a goldmine of useful information, and I’ve always had great results from her recipes that use sourdough discards. For this biscuit recipe, the starter doesn’t have time to really offer anything other than great flavor, but that’s definitely a welcome contribution!
While visiting friends in L.A. recently, I enjoyed reading much of Kenji Lopez-Alt’s beautifully written and photographed book, The Food Lab, in which he offers a couple of (non-sourdough) biscuit recipe versions: Basically, one that’s more flaky (and more work) and one that’s more tender (and has more fat in the form of cream). I’ll get to his recipes eventually, but for now I’m obsessed with the sourdough version from Leavenly.
These do involve work, in that there’s some folding (or mild lamination), but it’s really easy lamination, since the dough doesn’t have to remain perfectly lined up or rectangular, and the dough is very easy to work with.
I happen to be someone who likes Bisquick, so my idea of a great biscuit kinda starts from the tender, salty, wonderful biscuits you get from following the recipe on the back of the box. Even at this moment, there are some Bisquick shortcakes in my freezer, just waiting for my next purchase of fresh strawberries and fancy heavy cream.
While perusing the Flour Bakery website, I found out that, during the lockdown stage of the pandemic, Joanne Chang produced a bake-at-home instagram series (look for the “Flour❤️ Wk#” videos on her instagram feed). Included in the weekly series was an episode on croissants, including her recipe! I found the series on her instagram account, and here is the video episode showing the wonderful Ms. Chang, herself, making beautiful croissants.
I have been following her recipe for croissants rather exclusively, but seeing her do it really helps to answer some questions I’ve had, and reassures me that I’m going in the right direction. It’s also comforting to know that the problems I have making these roll out into rectangles isn’t just me. (BTW, their secret: Just cut off the parts that make it not square!).
I’ve also been wondering alot lately about the final shaping and whether I’m forming mine correctly. I haven’t been getting the fat, round, super-puffy results that she gets, and I wondered whether it had to do with my technique. I also struggle with butter leakage during baking.
My conclusion from watching her video is that it isn’t about how I form the final croissant; it’s about how they rise. I haven’t figured out the best way to let the formed croissants rise to optimize loftiness without letting the butter get too soft. I’m thinking the answer is a cooler environment than I’ve been using, but for a much longer amount of time. She suggests a room temperature of 78°F for 2-2½ hours, but this hasn’t been working for me.
Maybe it’s my yeast, or the humidity level, or something. But, I suspect I’ll have better luck with a cooler rise for a longer period of time. I think that will be my next experiment, anyway.
One other minor thing to mention: The recipe on the website (on this page, search for “croissant”) differs slightly from the recipes in her first cookbook and in Pastry Love — this version uses a bit of cake flour (as opposed to a bit of bread flour, or a bit of spelt flour), and this version puts a bit of butter into the dough itself (Pasty Love doesn’t do this). I’m guessing none of these variations makes a big difference.
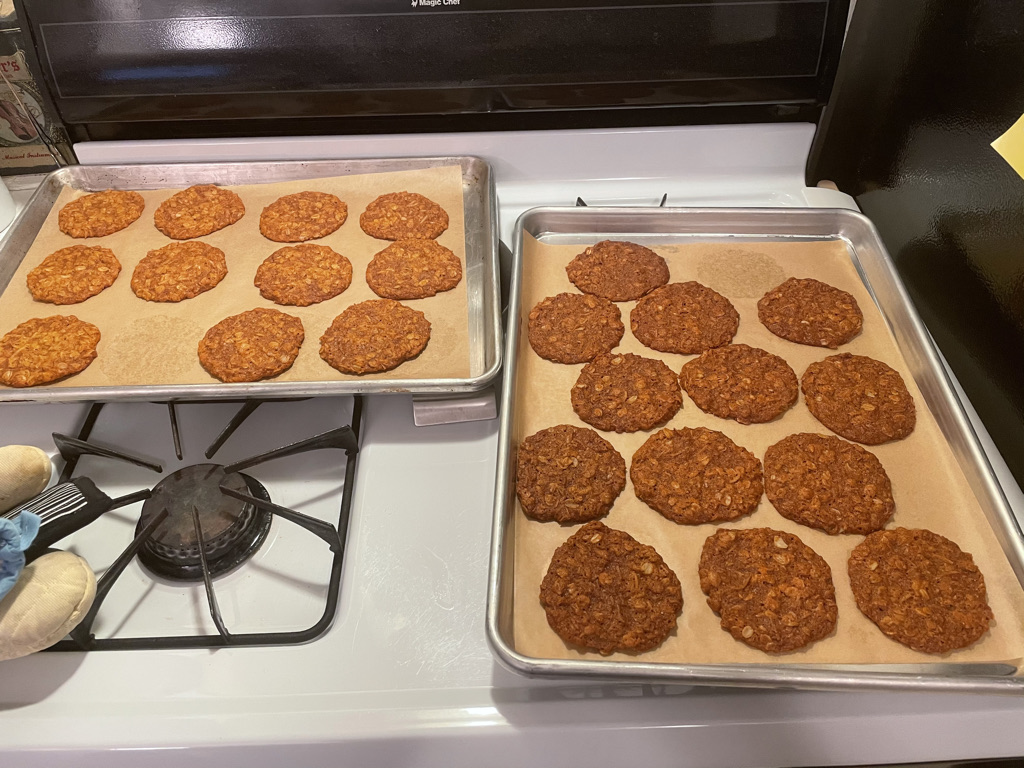
If you’re wondering what I’ve been baking lately, mostly just a rotation of my usual things… sourdough loaves, sourdough pita, and a mini-obsession with oatmeal-cherry cookies, which I’ll post about soon.
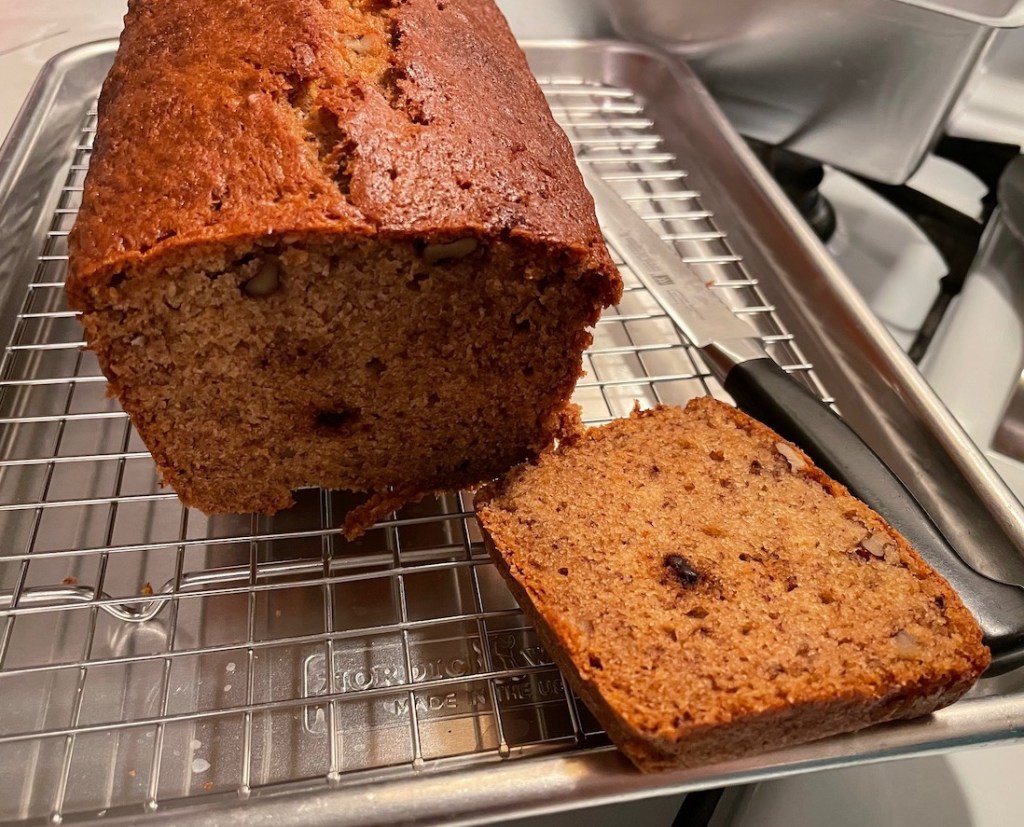
When I wrote this previous post about Dad’s Banana Bread (and the messed-up grocery order), I hinted at my intention to make this recipe from Smitten Kitchen: Ultimate Banana Bread. Because I already had the requisite 510g of mashed banana in the freezer, I only had to thaw it and was good to go.
This is a completely different banana bread, at a different scale, and is wonderful. This version is moister, darker, and sweeter. More leaning towards cake than bread, but still less sweet than a typical cake. I thought I’d miss the walnuts, and almost added them off-recipe. I think it wouldn’t be bad to throw some in, but I think I agree with the recipe… this is really nice without the nuts, maybe because of the leaning-towards-cake thing.
The headnote in the recipe makes a point of the loaf pan size. The author describes a specific size (9″x5″ at the top and 8″x4″ at the bottom) and volume capacity (6-cups) to get a loaf with a nice dome that grows beyond the pan. But, I suspect her measurements were taken to the outsides of a pan with a rolled edge, because the pan I have that came the closest is a half-inch shorter in each dimension (8½”x4½” at the top and 7½”x3½” at the bottom, measured from inside edge to inside edge*), yet came out to the exact right capacity (key recipe information: The batter “should come to just over ½-inch from the top rim”).
Normally, I just try to make sure my pans have at least as much volume capacity as a recipe calls for with whatever pan size they specify, and approximately the same shape. I don’t usually worry that much if my pan varies somewhat from the recipe. But, this recipe seemed specific for a reason, so I went with the closest thing I had. I think this wouldn’t have worked quite as nicely with the longer, thinner loaf pan that I have, and I like the loaf shape for this recipe.
The recipe insists on two tablespoons of turbinado sugar to contribute to the nice, crunchy top, but for me it was too much. I used sparking sugar (because I like the crunch of the big crystals), and next time I will cut this in half to one tablespoon, or just enough to sprinkle over the whole top. [Chris reports that she doesn’t think there was too much sugar on top!]
I still have one more 510g bag of mashed banana in the freezer, so the gift of the mis-delivered groceries keeps on giving!
*footnote: I wrote – and then decided to spare you from – a several-paragraphs geeky digression about pan dimensions. The bottom line is that pan dimension should be measured on the inside, because that’s where the baked product will be. Thick pan walls or rolled edges shouldn’t increase a pan’s baking capacity, right? But, of course, no normal person or company measures this way (I am, if not patently obvious to you by now, not normal). Smitten Kitchen already charmed me by providing both the dimensions at the top of the pan and the dimensions at the bottom, which very few recipe authors bother to do, so I forgive her the inside vs. outside measurement thing. ❤️☺️
I’m very happy with my pie crust, which combines the ingredients of the New York Times All-Butter Pie Crust with Joanne Chang’s Pâte Brisée technique. Her technique has an important step called “fraisage”, which she describes well in the Atlantic article linked above (she doesn’t use the word in the article, but she does in her cookbooks; it’s the step where you smear the shaggy dough on the counter). Here’s a 15-year-old video in which she very clearly explains and demonstrates the technique. It’s basically fool-proof. I love that the flavor is buttery, and that it has the flakiness of a shortening crust (but without the shortening).
I had the great privilege of baking this apple pie for George’s 94th birthday. George is a wonderful person, and the dad of my dear friend Teresa. What an honor to be part of this auspicious occasion with these people whom I love dearly.
Another really fun online class with King Arthur Baking Company, courtesy of Christine and Mike!
This time, it was potato gnocchi with a simple tomato sauce, mozzarella, and basil. Their blog post here has basically the same gnocchi recipe, but the recipe in class used just egg yolks rather than whole eggs. Chris also made a lovely roasted red pepper pesto, shown as my next-day leftovers on the right.
Mike did the work of making the mashed potatoes in advance. So, the recipe itself was very easy. Chris has a gnocchi board, which produced the lovely, finely-ridged gnocchi you can see in the left-hand photo. I used a fork, and the result (which isn’t obvious, but is just visible in the right-hand photo) was gnocchi with fewer, deeper ridges.
We were happy to have the teacher demonstrate the technique of forming the gnocchi. Photos and words wouldn’t be enough information. Their blog post has a video, but it’s broken, so I found this video that matches our instructor’s technique, using a gnocchi board. The technique is the same with a fork. The part that’s hard to describe with words is that you have to kinda “schmear” the dough piece along the board as opposed to just rolling it. The schmear creates the ridges, but also causes the piece to kinda roll on itself, creating a concave, curled shape. It’s not log-shaped, concave and somewhat curled.
We had some trouble with the gnocchi sticking to themselves and the parchment, causing their nice shape to collapse before being cooked. Following the instructions of the teacher, we held back some of the flour to avoid making dry gnocchi, but we wished we had used recipe’s the full flour amount, theorizing that a slightly drier dough would have allowed the gnocchi to hold more of their shape and ridges.
It’s also a fair bit of work to form each piece (“gnoccho”? “gnocche”?), sort of like forming fussy cookies (who would do that?!?). We enjoyed imagining the Italian grandmas making these very quickly and beautifully in their kitchens while gossiping together.
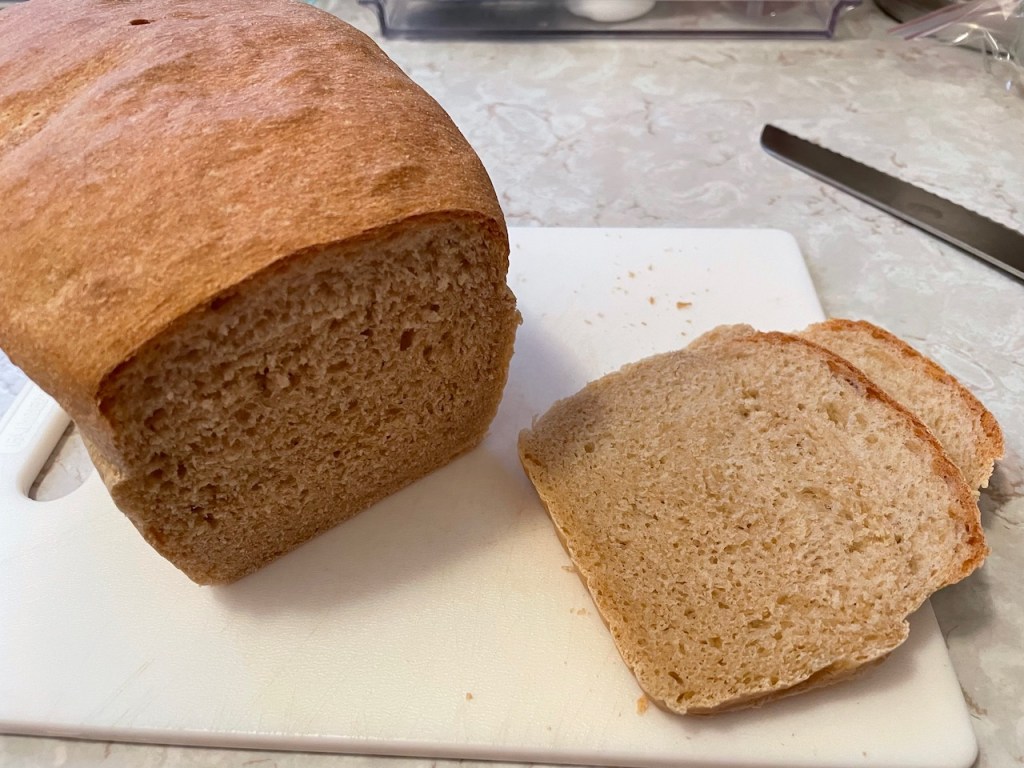
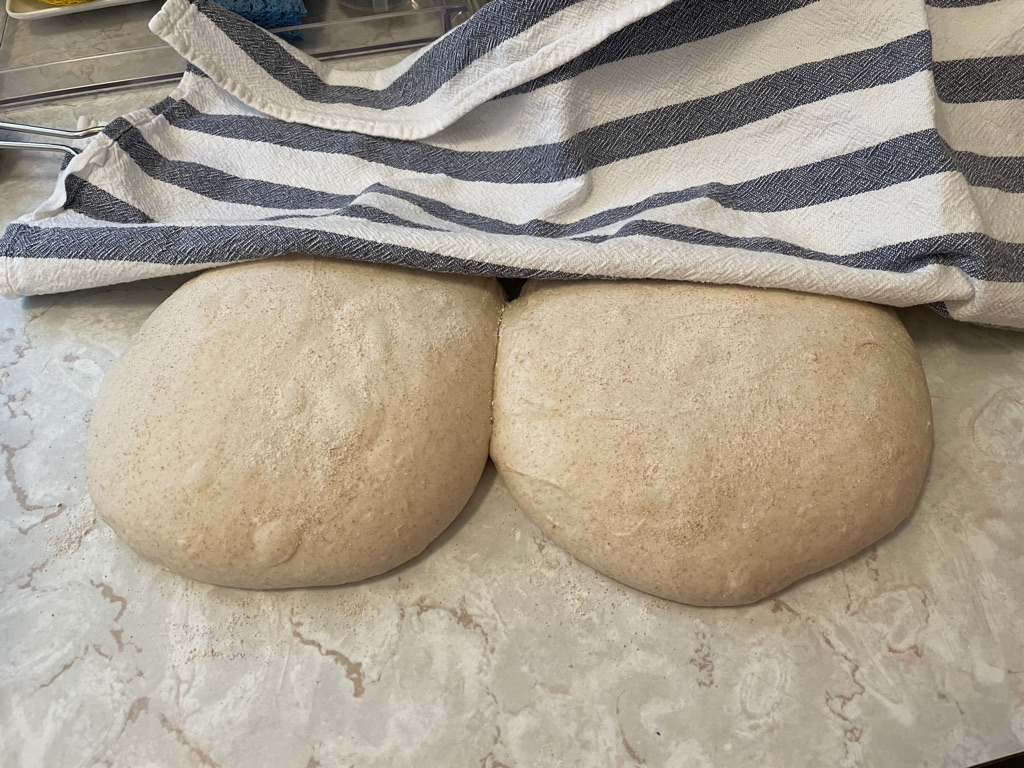
I have been feeling, in general, that I prefer the flavor of bread made with sourdough over that made with yeast. So, I’ve been experimenting with replacing yeast with sourdough in some recipes, and here are a couple of attempts.
The basic idea for both attempts is to make half of the King Artur pita recipe from the class I took last week with Chris and Mike, but replace the yeast with a couple of tablespoons of sourdough starter. The rising time was extended as long as was necessary to get the dough to double. Everything else was the same as the recipe.
The first set was challenged primarily (I think) by the fact that my sourdough starter hadn’t been used in at least three months, so it was pretty “sleepy”. I left the dough to rise for 12 hours, and it did rise, but I didn’t get the impressive pillowy puffing-up that we got with the yeast version. It had air bubbles, but not one big pillowy pocket. It was soft, airy, and wonderful, and did have much more flavor than the yeast variety.
Second try, March 23
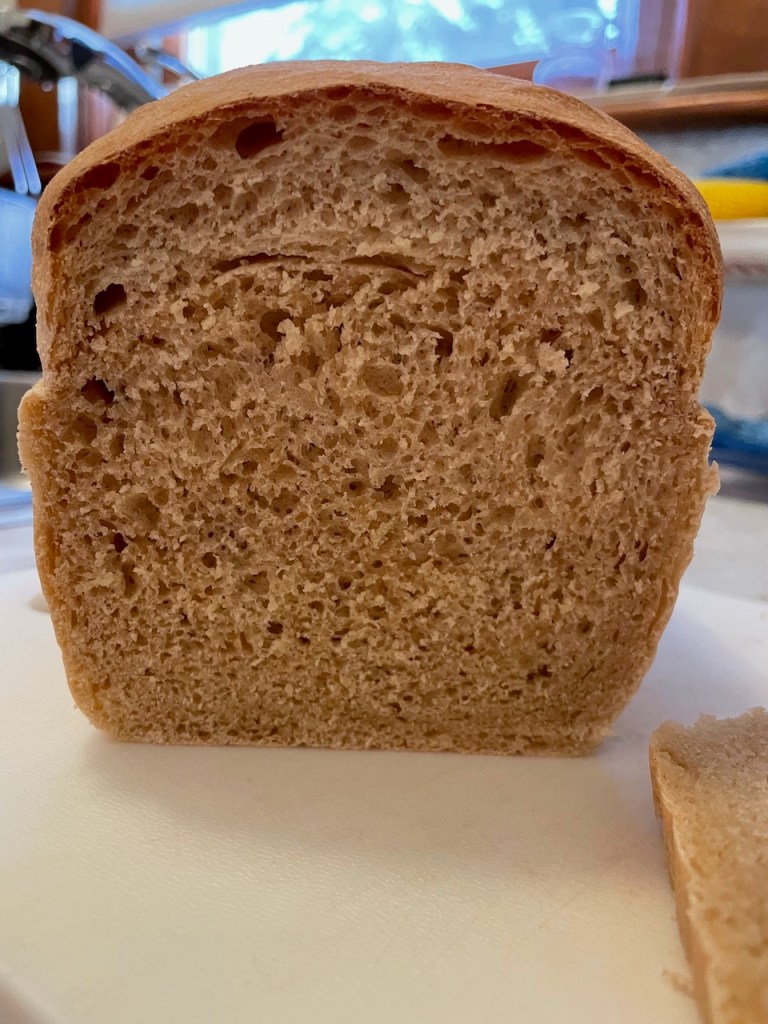
Then I tried again a week later and got the pillowy result I was hoping for!
This time, I let the dough rise for 6 hours (I think?). The only difficulty I had was that the big air pocket inside didn’t happen evenly between the top and bottom layers of the pita. You can kinda see it in the photo on the right side… the top layer is thin and the bottom layer is thicker. Some research on the interwebs seems to hint that this could be because of a temperature differential between the top and bottom (baking stone) in the oven. I dunno, maybe?
Last thoughts on these:
Because i feed my sourdough starter with 50% whole wheat flour and 50% white bread flour, I wonder if part of what I prefer about sourdough bread flavor is the whole wheat (in addition to the flavor that the sourdough itself provides). In this recipe, the sourdough starter was just two tablespoons, but you can see that the color of the resulting bread shows some flecks of whole wheat.
This recipe really is easy, and the results really are better than store-bought. But, I have to put in a plug for the pita from Cafe Barada. I don’t know for sure that they make it themselves, but I think so. It’s wonderful, and during the pandemic they were selling it in large quantities as a grocery item. Anytime I order their hoummos (which is the best hoummos I’ve had, anywhere, ever) I always buy extra pita.
I got to take another online baking class with Christine and Mike, and it was really fun and yielded much yumminess! The basic recipe was similar to this one, but without the “dough improver” (what’s up with that?) and replacing the sugar with honey. The same dough was used for both the pita and the man’oushe.
The difference was only whether the dough is baked plain (and allowed to pillow) or baked with toppings, like a Lebanese pizza. You can see in the first two photos above that the pita is popped onto the baking stone completely flat, then it puffs up in the hot oven (500°F) — like magic! It’s really fun to watch that happen.
For the man’oushe, the dough is also rolled flat, but it is then topped with za’atar mixed with olive oil, and whatever additional toppings you like. The class recipe suggested mozzarella cheese and also an egg, so you can see both options in the photos.
A beautiful meal (pitas under the purple towel)!
Chris and Mike made a lovely ground pork dish and carrot salad (I think both from an Ana Sortun cookbook), and it all went perfectly with the freshly-baked pita bread. All of the results were amazingly yummy. As Chris said: It makes one never want to buy another pita in the grocery store. The recipe is very easy and very fast. She has a point!
This is one of those recipes that comes across my inbox and is just irresistible. First, there’s the photo. I mean, isn’t it amazing? I see something like this and I am just dying to learn how to make it. You can see photos of mine below. It doesn’t look quite as “woolly” as the original, but it’s pretty close!
The name is because the loaf should look like a skein of yarn. I think I made my “yarn strands” too thin (this will surprise absolutely no-one who has been reading this blog), so the result was a loaf with less definition in the yarn effect.
One key change I made was to make this a savory loaf rather than sweet. The recipe allows for this. Instead of cream cheese, sugar, and raspberries, I went with sharp cheddar and crumbled bacon. It was basically wonderful, and I happily ate every bit of it. It was easy to make the woolly strands, and the effect was pretty.
One thing that I noticed with this loaf, though, is that making regular yeast-raised bread (as opposed to sourdough), while faster and easier, is just not as flavorful. My sourdough isn’t particularly sour, but it just has a more interesting dimension to it that I miss when it’s not there. That realization is motivating me to try using sourdough as the leavening in some recipes that call for yeast. I basically don’t know what I’m doing, but it’s fun to try.
I wonder if this loaf would have benefited from throwing some spices into the dough… cracked pepper, cayenne, something… ?
As Christine likes to say, though, “I managed to choke it down”. 😋
(click to view mochi machine video)mochi slabmochi pieces
In the few weeks since my last post, my primary food-generating focus has been on mochi. I suspect that this post will essentially not make sense to, or have meaning for, anyone other than my sisters, but… I also suspect that my sisters comprise a large percentage of my overall readership, so this is probably OK! 😬
yummy arare!
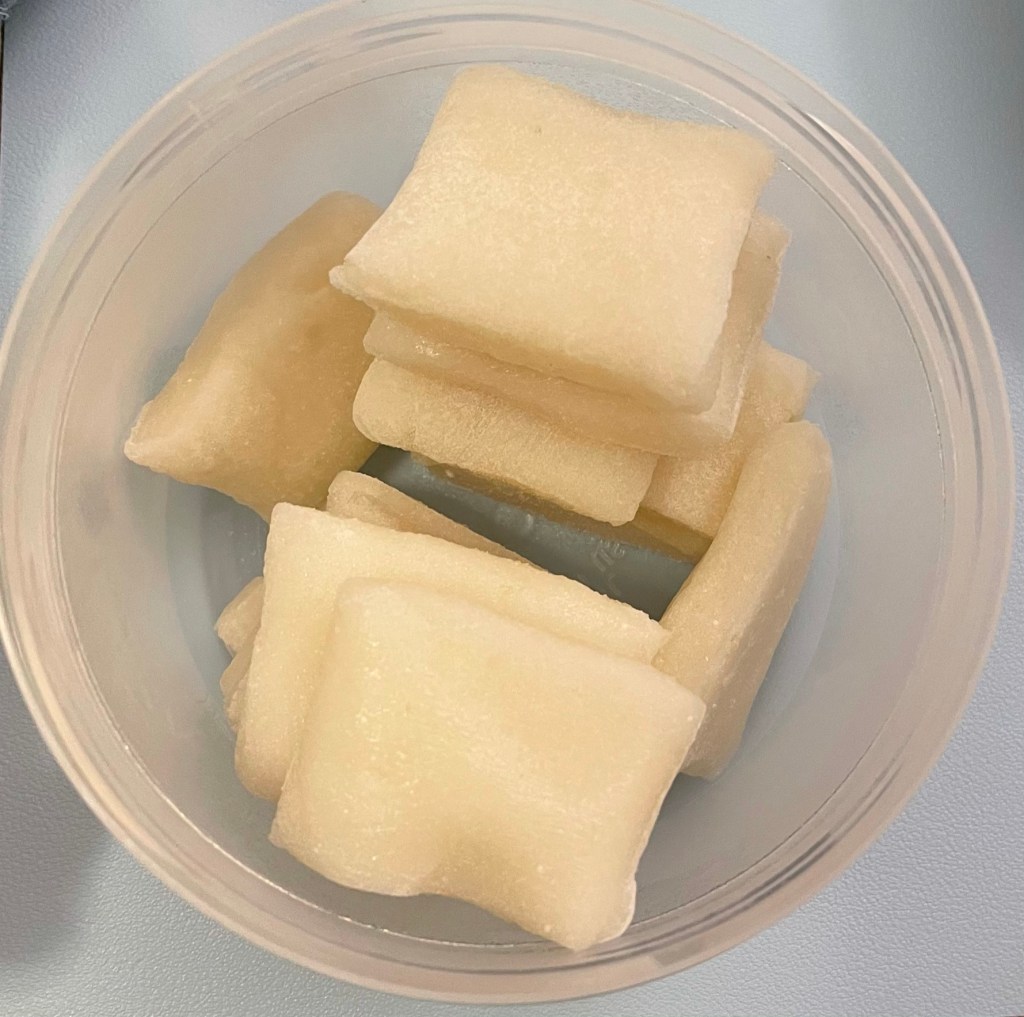
I have been making mochi at home since 2017, when I acquired this miraculous invention (a mochi machine). For many years, growing up in Westport, CT, our parents purchased the annual New Year’s fresh mochi at a Japanese market (Nippon Daido) in White Plains, NY. Their trips to this market were always a happy event for us, as it meant that we’d get to have fresh mochi (if around New Year’s) and arare (Japanese rice crackers). These are the kinds of treats that we loved so much they needed to be rationed out to us.
toasted mochi
Many people think of mochi as the pink, orange, or green ice cream filled stuff, but for us “mochi” was always the simple, white slabs of still-warm, just-pounded sweet rice that came wrapped in plastic from Nippon Daido. Mom or dad would cut the slabs into little rectangular pieces and we’d try to grab bits of it out from under their noses. When just-made, eating plain and still-warm mochi is a very special treat. Later, as the mochi dries out a little, or is frozen to keep it from getting moldy, a few minutes in the toaster oven produces wonderfully puffy, oozy, gooey blobs of yumminess.
We had a couple of favorite ways of eating mochi. My favorite was always coating the little squares of mochi in soy sauce then wrapping each one in a piece of seasoned nori. Another favorite was making a syrup by stirring sugar into soy sauce, then dipping the mochi in the syrup. Another was immersing the mochi in warm milk.
When I moved to Boston, I sought out the markets where I could buy fresh mochi, but was distressed to learn the fresh mochi was all frozen. Then, the Japanese markets gradually closed or stopped carrying the fresh stuff at all (instead opting for a shelf-stable version, blah). Meanwhile, my parents had started spending winters in Florida where it was also not easy to find fresh mochi. So, Louise got them a mochi machine, and our lives were transformed! The machine is a blast… first it steams the rice, then it agitates/pounds it into a big, sticky blob. Mom would make big batches of it and give packages of it to each of us to take home. Nom nom nom.
Eventually, of course, I got my own machine. I’ve had various adventures making the mochi. There was this time (last year) when the machine’s agitating caused stuff to crash off my table. Then there were issues I had because the stuff is SO STICKY. My first attempt at making mochi resulted in this quote in my notes: “They are NOT KIDDING when they say to handle the mochi ONLY with wet (or floured) hands. I screwed this up and the result basically looked like a murder scene, but with mochi and flour instead of blood.”
My recent process improvements are:
I wear (FDA food-rated) vinyl gloves to handle the hot mochi so there’s no sticking to my hands
I use a silicone pan liner on the counter with a generous dusting of rice flour to avoid sticking to the counter
After spreading out the hot mochi into a slab of the desired thickness (about ½”) on the silicone liner, I wait a few minutes for the mochi to cool a little and form a bit of a “skin” on top, then very lightly dust the top surface with rice flour and flip the slab onto a lightly dusted cutting board for chopping into the rectangular pieces
Any amount that I’m not eating the same day gets immediately put into the freezer, portioned into containers of about 10-15 pieces. I’ve found that thawing a container takes about an hour on the counter, and then the mochi tastes and feels just like the freshly-made stuff… no baking required
Those who know me well know that I’m not a big vegetable eater. I’ve at least evolved to the point where I do happily eat some vegetables, but they’re still not the most-coveted items on my grocery list. One illustration: I recently signed up for a local meat share, but don’t imagine that I’d ever enroll in a farm/vegetable share. I suppose if there were such a thing as a flour share I might consider that, but I’ve been happily buying King Arthur all-purpose flour in 25-pound sacks at Costco and storing it in an 18-quart bin.
So, I had a very small taste of what I imagine it must be like for people who are in a CSA: A couple of weeks ago I did a curbside-pickup order from a nearby supermarket (for Bonne Maman preserves, Hershey’s milk chocolate bars, and Jet-Puffed marshmallows — yes, s’mores were part of the plan, and yes, this was a ridiculous grocery order) and the person who picked my order mixed up mine with someone else’s order. They had loaded the bags in the back of my car and I drove off, so I didn’t figure this out until I got home and looked in the bags. Of course, I called the store right away and they promptly delivered my stuff, but they didn’t want me to bother bringing back the wrong stuff. That left me with a couple of bags of someone else’s food order.
Let’s end this already too-long story by saying that the wrong order had actual fresh fruits and vegetables in it, including two bunches of bananas. I actually can’t stand eating bananas. I spent my first couple decades of adulthood buying bananas and trying to convince myself to eat them, but at some point I accepted that it was futile. I just don’t like them. I happily eat my way through apples, oranges, peaches, pineapples, and grapes, but bananas are just non-starters for me. This meant that I needed to do some banana-based baking.
Here’s the first installment. The recipe (provided below), from a 1965 cookbook published by the Salisbury, NH Congregational Church, was made frequently by my mother. It was so popular in our house that I had to check with my sister, Jennifer, to find out if the recipe name (“Dad’s Banana Bread”) came from us or from the cookbook (answer: the cookbook).
It couldn’t be easier. My mom simplified the steps so that much of the work is done by a food processor, and the whole thing comes together in minutes. I’ve been using parchment for everything lately, even things baked in loaf pans and springform pans, and this was no exception. I’m glad I did. The loaf slipped easily out of the pan and I very much like the crust that formed.
This bread is delicious. Spreading butter on it makes it even more delicious. Apparently, this is the way to get me to eat bananas!
I have two baggies in the freezer, each filled with 510g of mashed banana in anticipation of making this recipe (“Ultimate Banana Bread“) from Smitten Kitchen, possibly twice. I wanted to start with the OG banana bread that mom always made, but I am interested in comparing it with the SK version. So now you know the fate of the unexpected two bunches of bananas.
Here’s the recipe for Dad’s Banana Bread, from the 1965 Salisbury, NH Congregational Church Cookbook:
1 stick of butter, softened (I used salted) 1 C sugar (200g) 1 egg 3 ripe bananas (I used 3½ which came to 440g, not including peels) ¼ C chopped walnuts
2 C all-purpose flour (I used 260g of King Arthur All-Purpose) 1 tsp. baking soda 1 tsp. salt (I used fine sea salt)
In a food processor, process the butter and sugar, then add the egg and process. Add the bananas and process, then add the walnuts and process. Whisk the dry ingredients together, then fold the wet mixture into the dry mixture only until blended. Pour the batter into a buttered loaf pan (I used a parchment-lined 4″ x 10″ x 3″ pan, which is just under 7 cups). Bake at 350°F for 45 minutes (see note below). Remove promptly from pan and let cool on a rack.
Note on bake time: It took me 65 minutes to get a clean cake tester inserted into the center of the loaf. The bread was not overbaked, so maybe the bake time is just low on the recipe. I would use a cake tester to decide when it’s finished, and also lightly press on the top of the bread in the middle to see if the middle feels as stable as the ends. I used an unusual loaf pan size (4″ x 10″) that is slightly narrower and longer than a typical loaf pan, so it’s possible that this impacted the baking time. Anyway, the cake tester method worked.
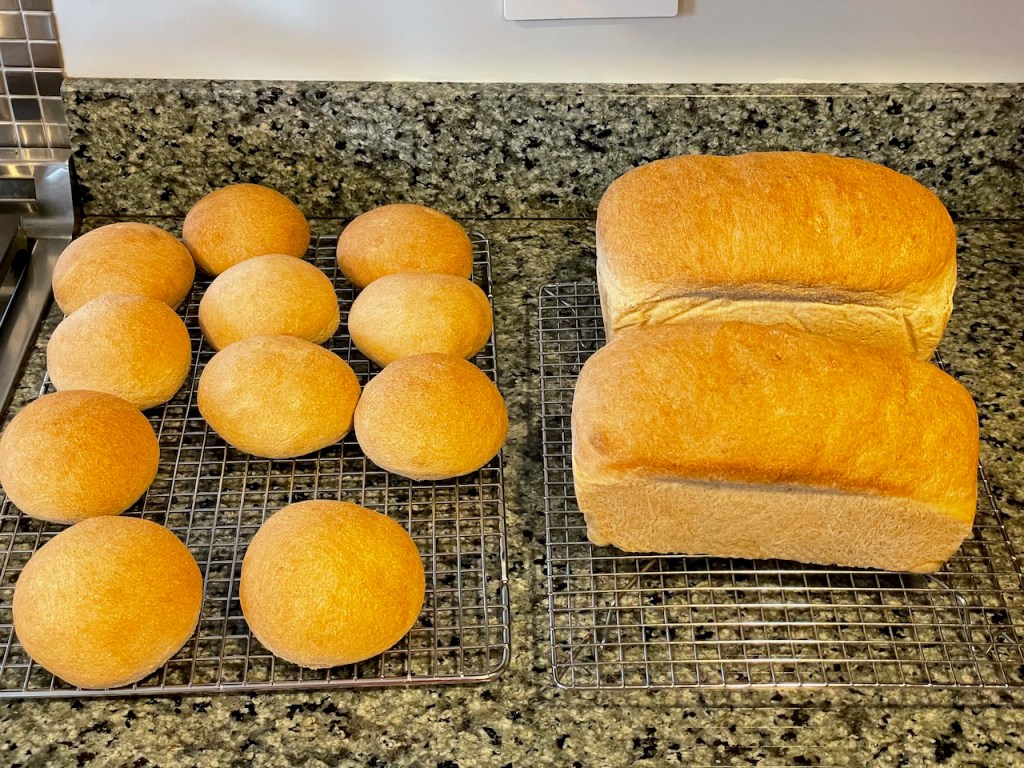
I got to participate in another King Arthur online class with Christine, this one about Honey Whole Wheat Bread and Rolls. The recipe was easy and good, and we got some nice results. I suspect that there was some issue with my proving, since the crumb is uneven. You can see in the third photo above that it’s more open in the top two thirds of the loaf and more dense in the bottom third.
I also wish I had been able to get a browner crust on the sides and bottom, so that’s something to tinker with in the future. The top crust was very nice, but the bottom and sides didn’t match it. The sourdough boules that I make are not baked in a pan, so I’m not used to that particular aspect. I bake the sourdough in a preheated pan and never have problems with it browning on the bottom. For this whole wheat sandwich bread, I’m assuming I have to put the pan on a preheated baking stone and/or keep it lower in the oven to get more bottom browning.
It’s a nice bread: soft, easy to make, easy to cut, and with an unassertive flavor; very well-suited to sandwiches.
It’s been fun and educational to gain more experience baking yummy bread!
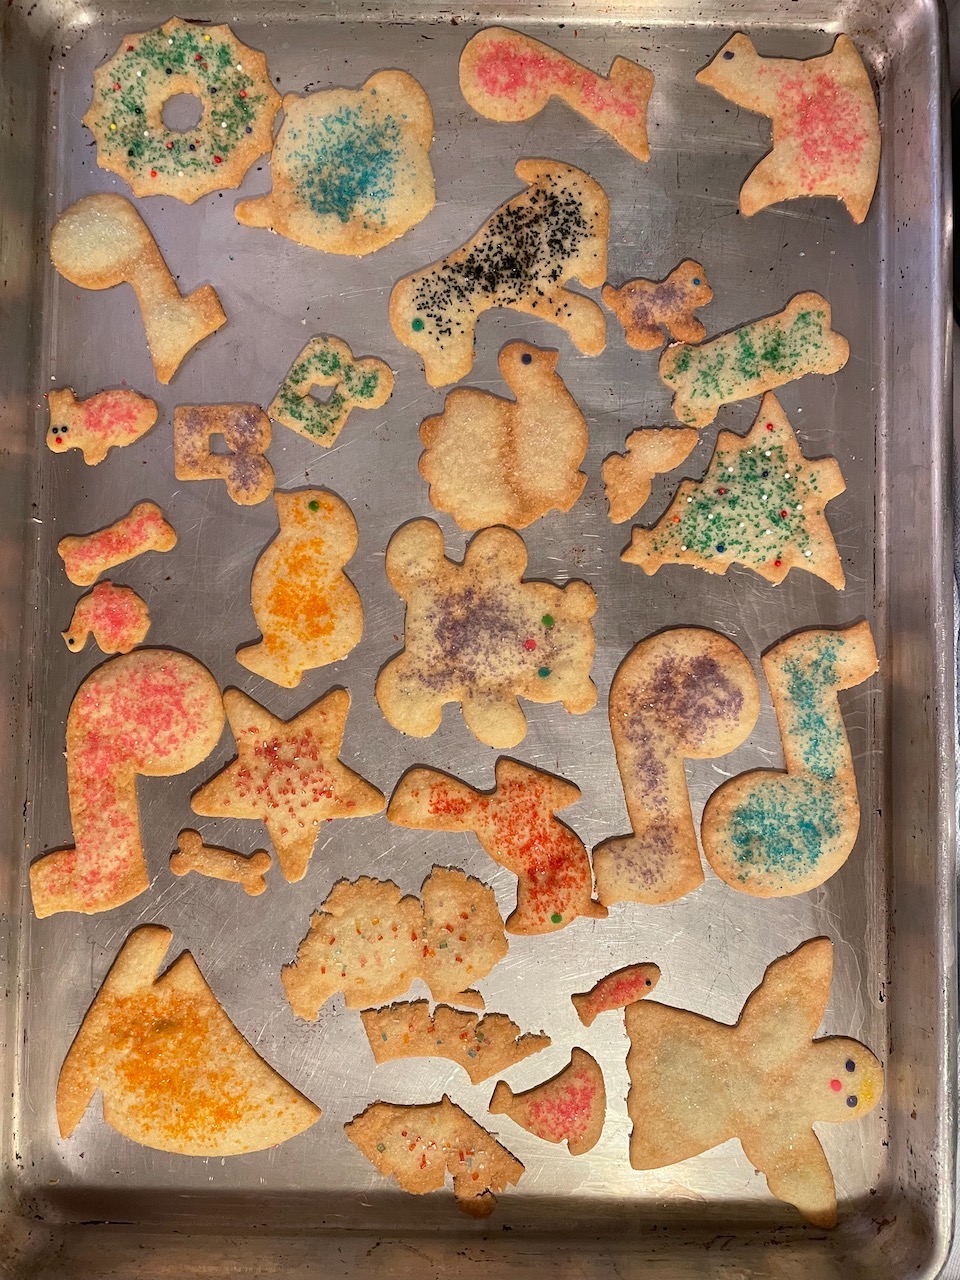
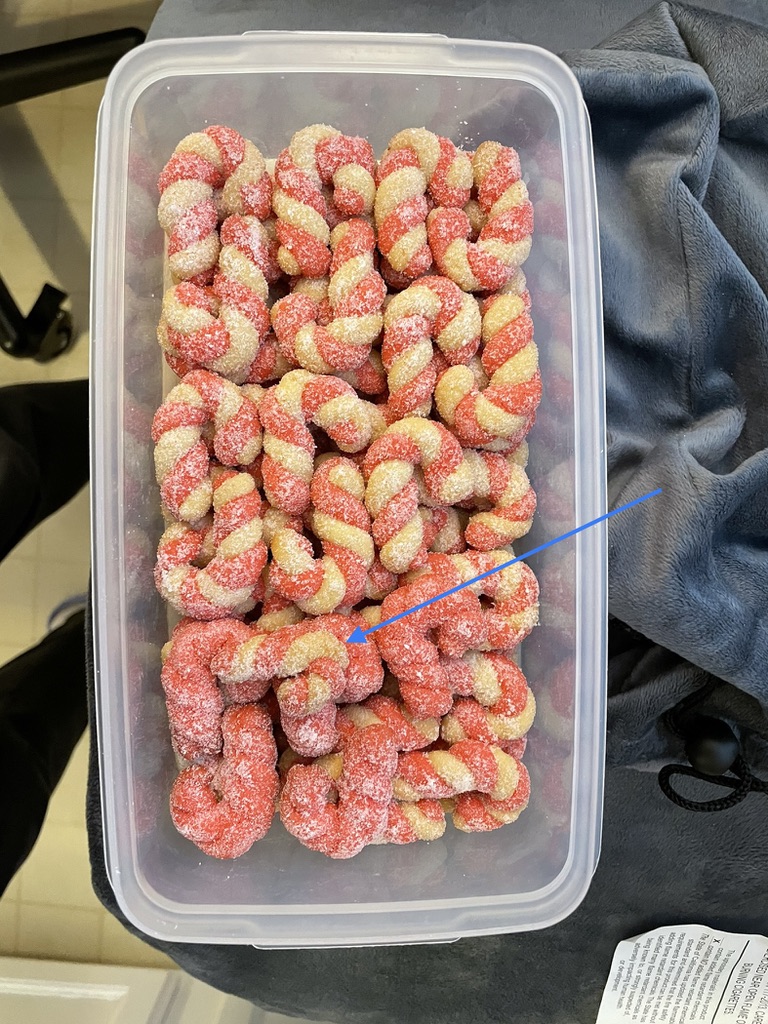
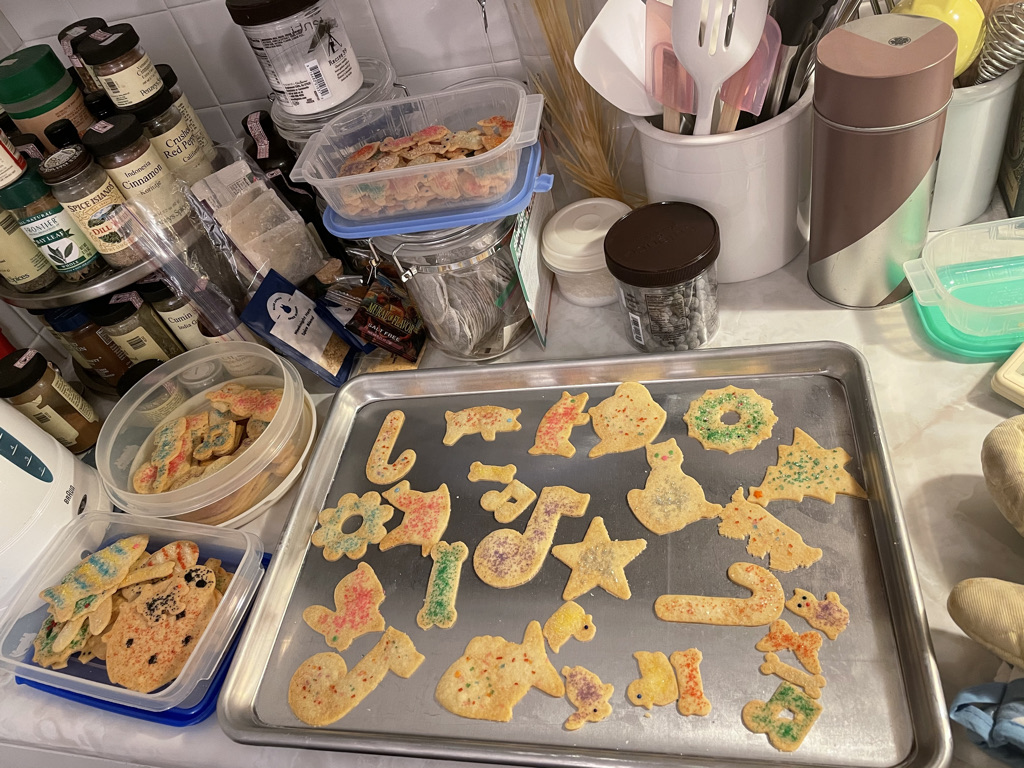
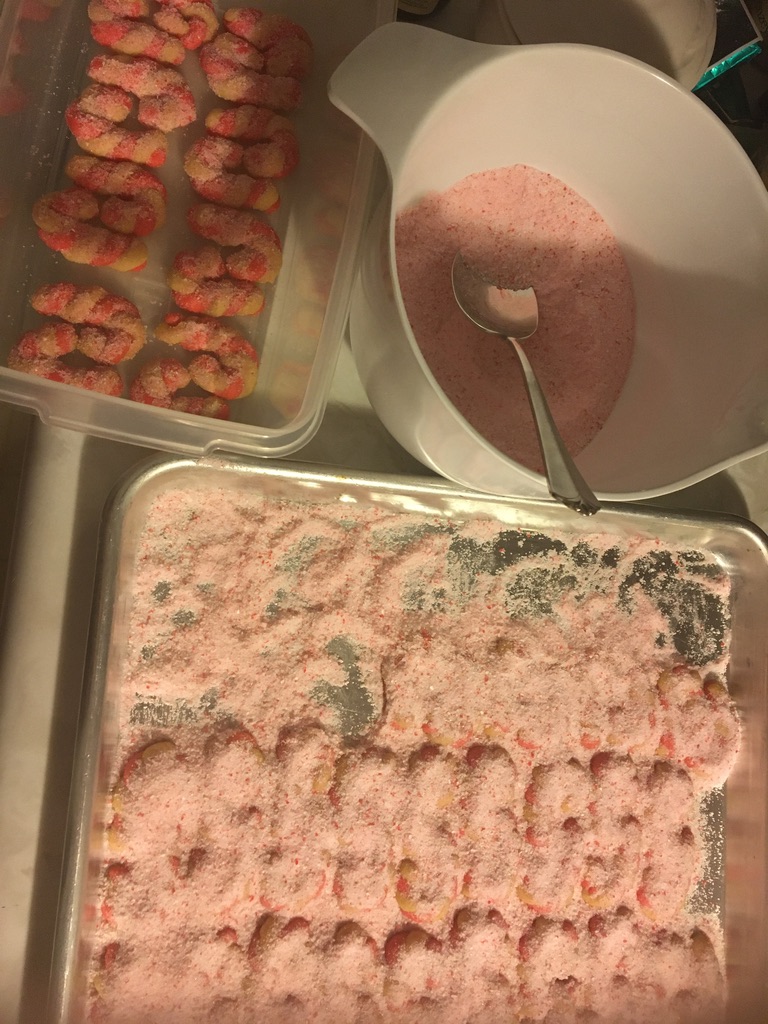
By Ikeda Christmas Cookie standards, these sugar cookies are the OG. And, my mother, Akiko Ikeda, was the OG of our family. My mother passed away peacefully on December 30th in Wisconsin, after a long illness. The full obituary is here, and Dan Woog wrote a very nice reflection on her as part of a group of people who made notable contributions to our hometown.
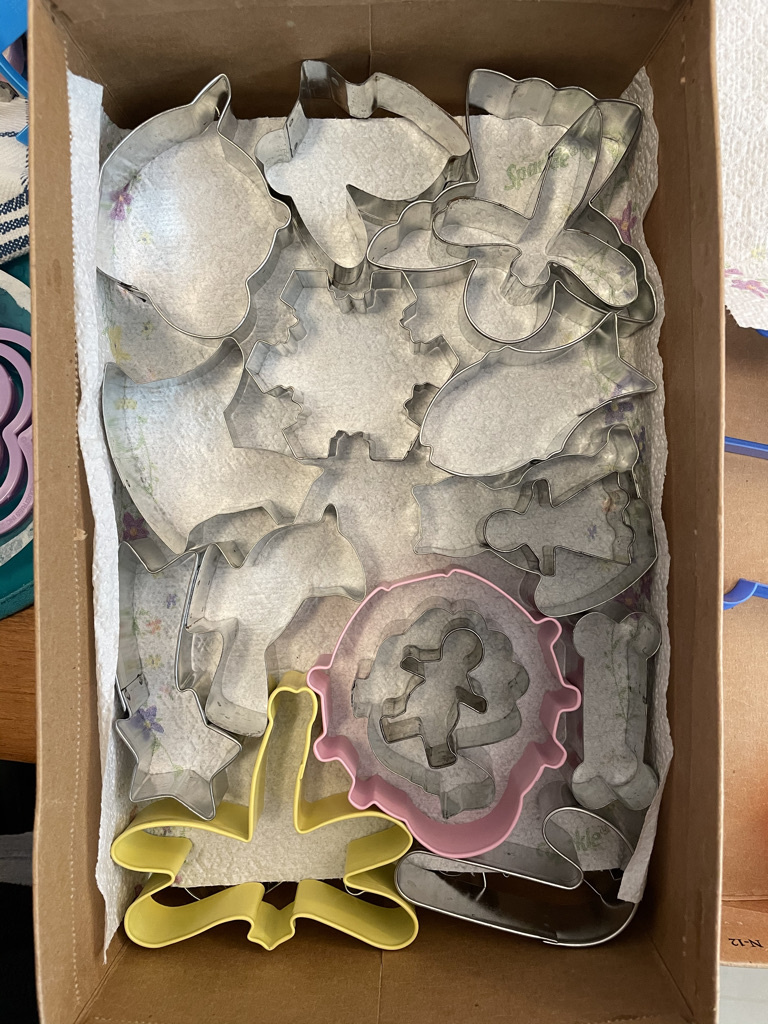
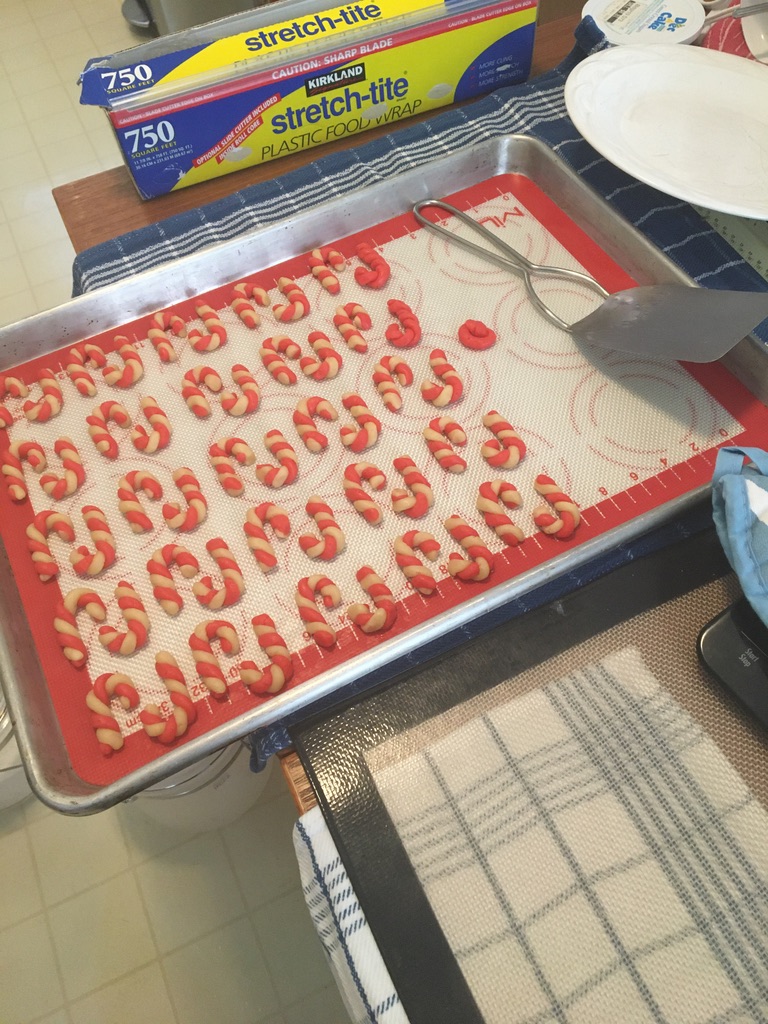
For me, the Ikeda Christmas Cookies are a major dimension of my childhood connection to my mom. She taught me how to make these sugar cookies (and the Viennese crescents and rainbow wreaths, shown here), and every bit of my sense for how these cookies should be comes directly from her.
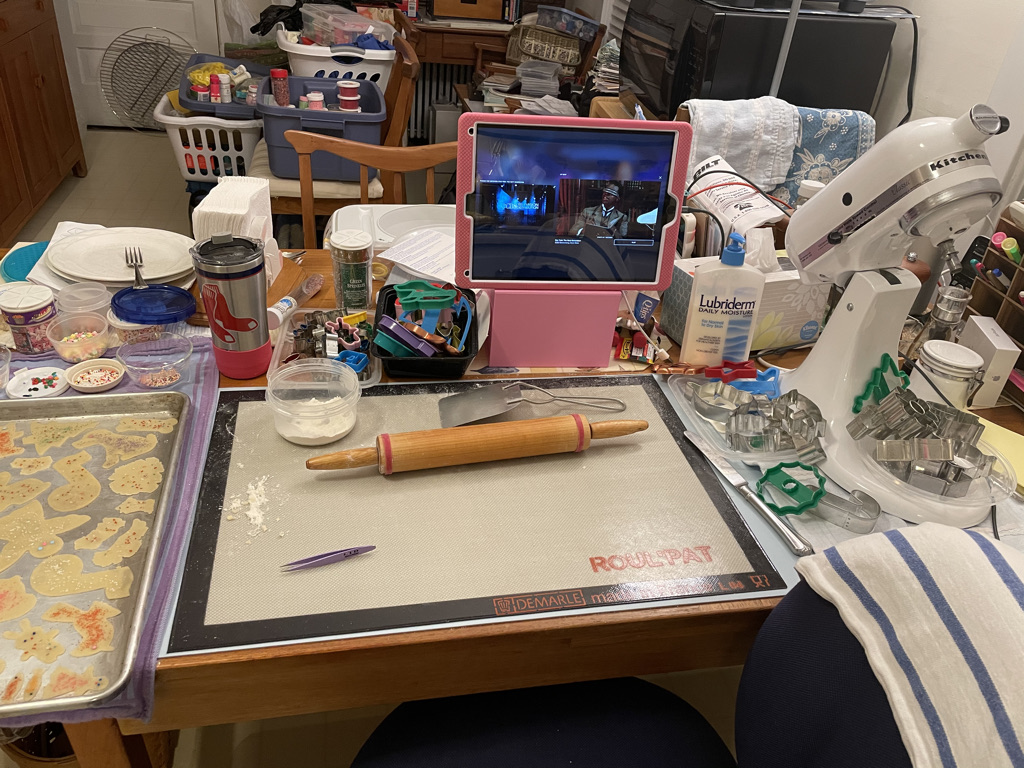
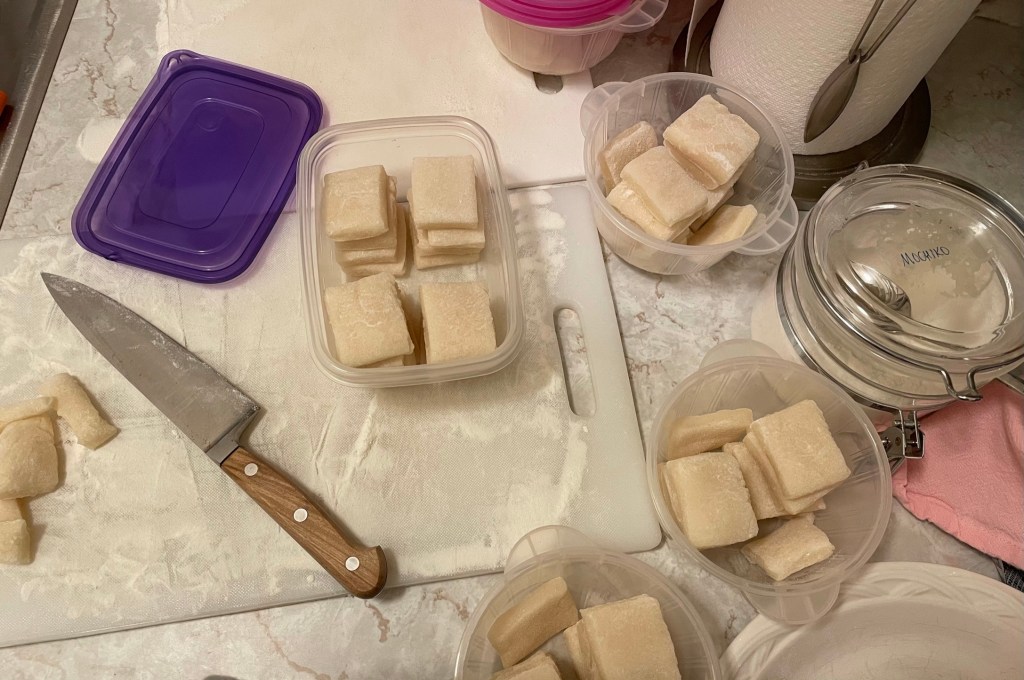
To begin with, the sugar cookies are rolled unbelievably thin. About a millimeter. Baked in a 400°F oven, they can turn from raw to burnt in seconds. They’re almost like baked potato chips, but made out of cookie dough. To facilitate the rolling (and re-rolling) without the dough becoming tough, my mom learned (from somewhere?) that the counter must be dusted not with flour, but with a mixture of flour and sugar.
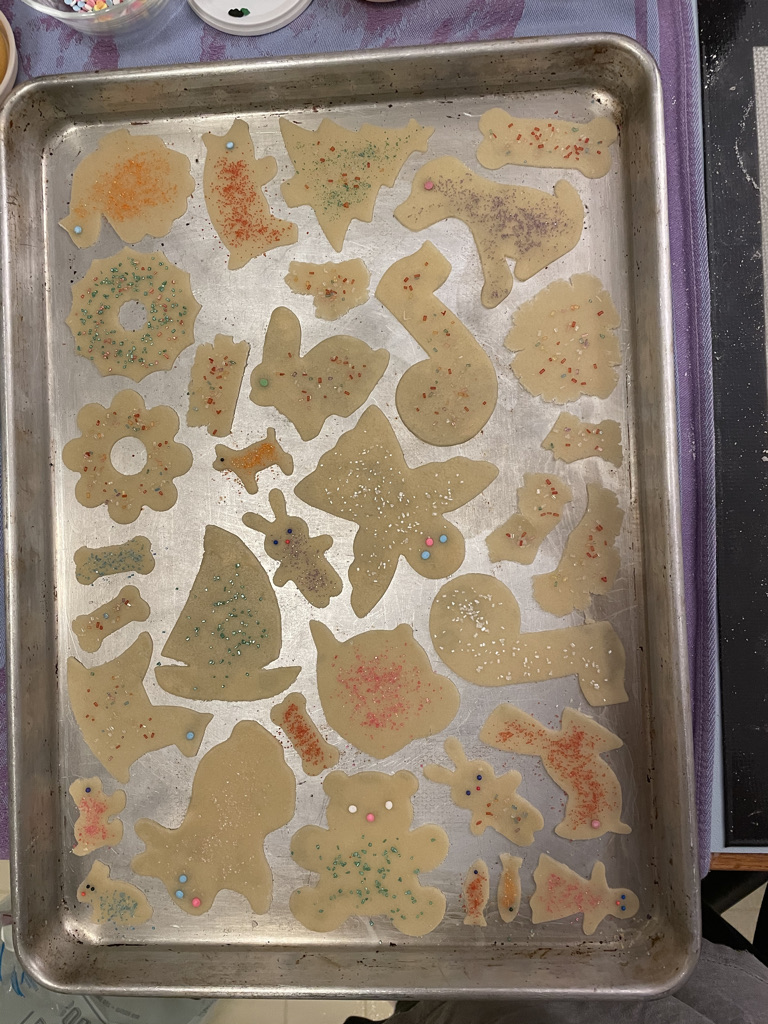
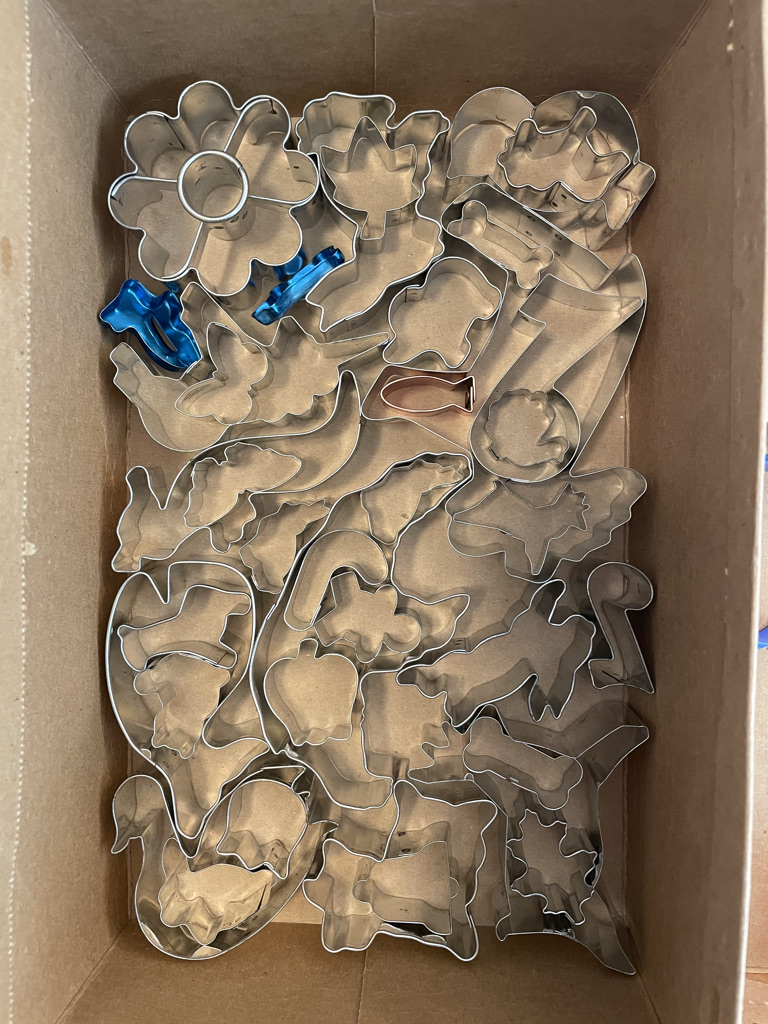
Many of my cutters come from her collection, and she and I both have always loved little tiny cutters that can be used to get more cookies out of one rolling of dough.
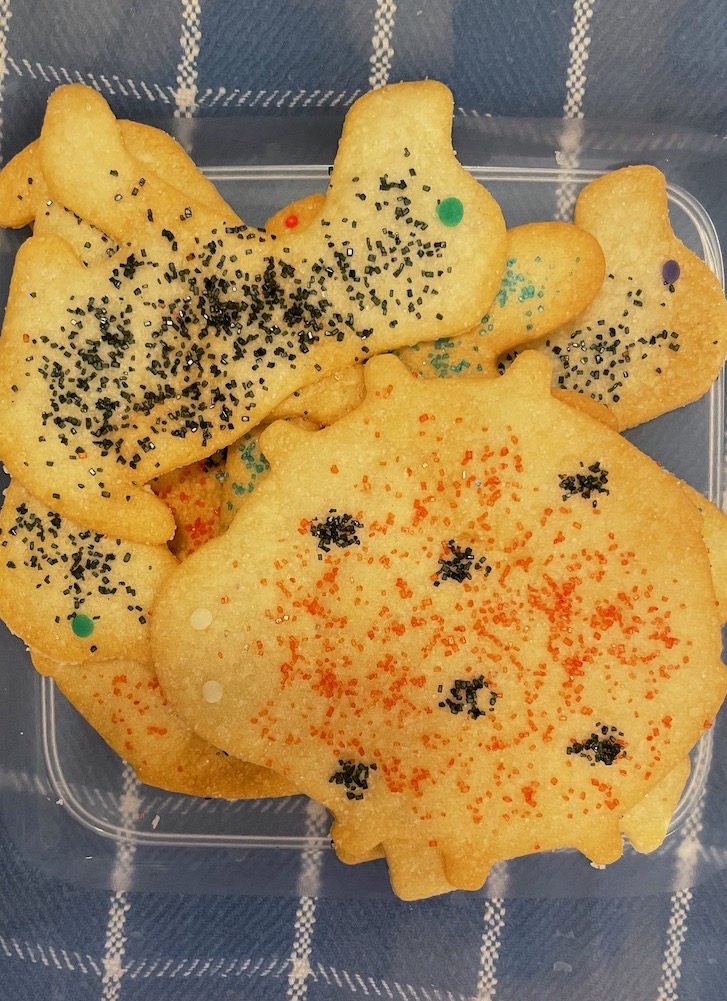
The forbidden silvery balls
In my family there is a silly (but true!) story of a little glass vial of silvery sugar balls that my mother kept in her cookie decorating box for our entire lives, but which we were never allowed to use. These miniature, shiny jawbreakers were deemed too hard on the teeth, so despite being very pretty, were never actually put on anything. If any innocent friends happened to join in for the decorating and reached for the vial, they’d be promptly set straight. But, there the silvery balls lived, tantalizingly, in the box alongside other decorations. For decades. And, out of sheer sentimentality, that very vial now sits in my own cookie decorating box.
My mother liked to give us gifts that were “themed”. Music notes and bunny rabbits for me. Sailboats, labrador retrievers, and dragonflies for Jennifer. Ladybugs and cats for Louise. You can see these themes in the variety of cutters that I have now.
My mother would spend many hours making hundreds of cookies, candies, and fruitcakes every December, and she would assemble saran-wrapped paper plates laden with assortments, then send us around the neighborhood delivering them to family friends.
My mom was generous, loving, dedicated to working hard for others, and exquisitely exacting. She wouldn’t come out and tell me that I was doing something wrong, but she might instead take over a task from me if I wasn’t quite doing it right. It gave me pride when I became skilled enough to be able to share in more and more of the steps myself. Eventually, as her eyesight, dexterity, and energy declined, I took on the mantle for the cookie production in the family. As my first blog post explains, I’ve had to take years-long pauses from them, but every time I come back to making these cookies, I’m immediately at my mother’s elbow again, endeavoring to make cookies that would be mom-approved.
If you know me at all, you’ll recognize that striving for “mom-approved” isn’t limited to Christmas Cookies.
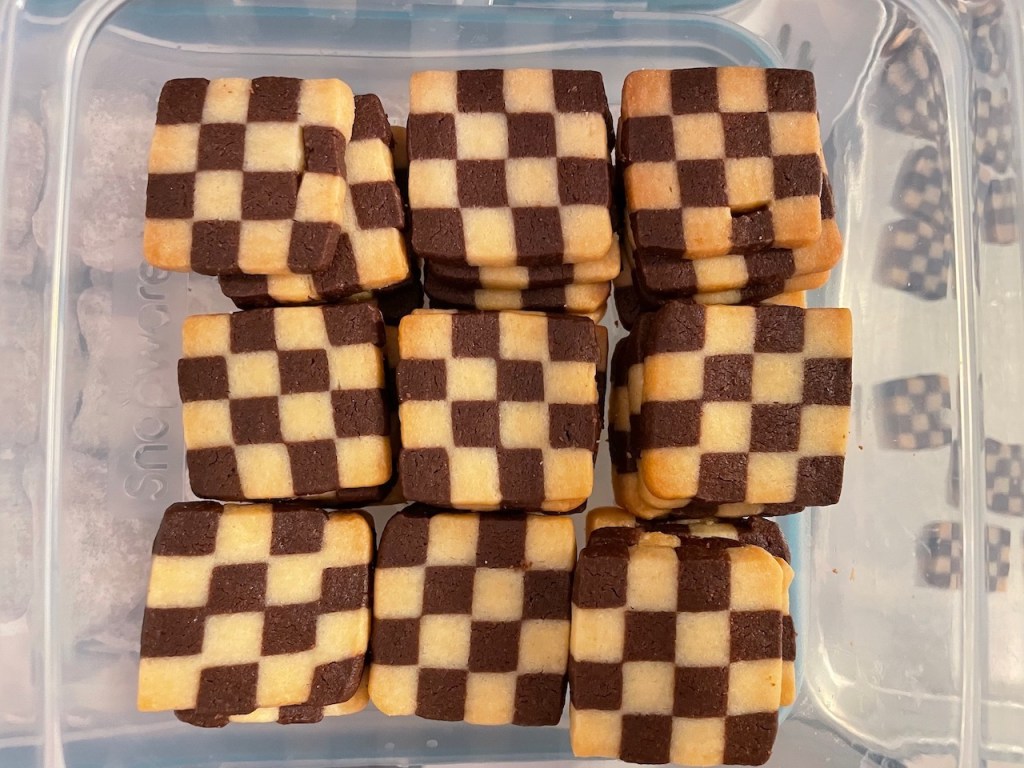
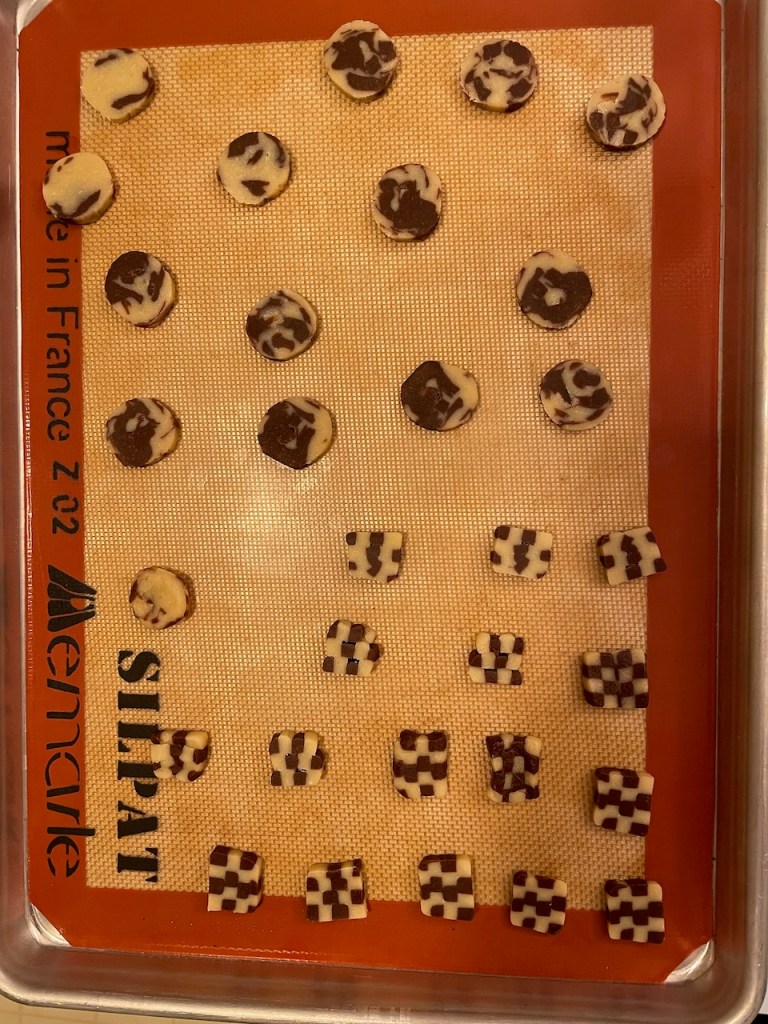
I’m getting a very late start on Christmas Cookies, and I’ll post more about them later, but I wanted to post about this year’s addition to the rotation: Checkerboard Cookies! I don’t mess with the cookie lineup lightly, but these are a complete winner and have permanently replaced the previous Zebra Icebox Cookies (from Jann Johnson’s The Art of the Cookie).
I have had good luck with Smitten Kitchen’s Apple Crumb Cake recipe, so when I read this cookie article, I knew I wanted to give it a try. Also, her photos are great!
I decided to make a double batch, and you gotta love a cookie project that involves starting with a pencil and paper to work out the math of doubling the recipe. It was complicated by the very smart twist in the recipe to hold back some of the flour so that after the dough is divided in half (to make the chocolate part by adding cocoa powder) the vanilla part gets an analogous addition of flour — so that the consistencies remain the same. (The issue of unequal consistencies was the biggest flaw in the Zebra cookie recipe, btw.)
Having worked it all out (answer: 2C of flour for the vanilla, 1½C of flour + ½C of cocoa powder for the chocolate) it was a relatively simple dough to make. The recipe describes this as a “sable” cookie, which includes a raw egg yolk. Also, this recipe uses both granulated and confectioner’s sugar, which I’m guessing contributes to the lovely, fine-grained, melt-in-your-mouth texture. These really are lovely-looking and lovely-tasting cookies!
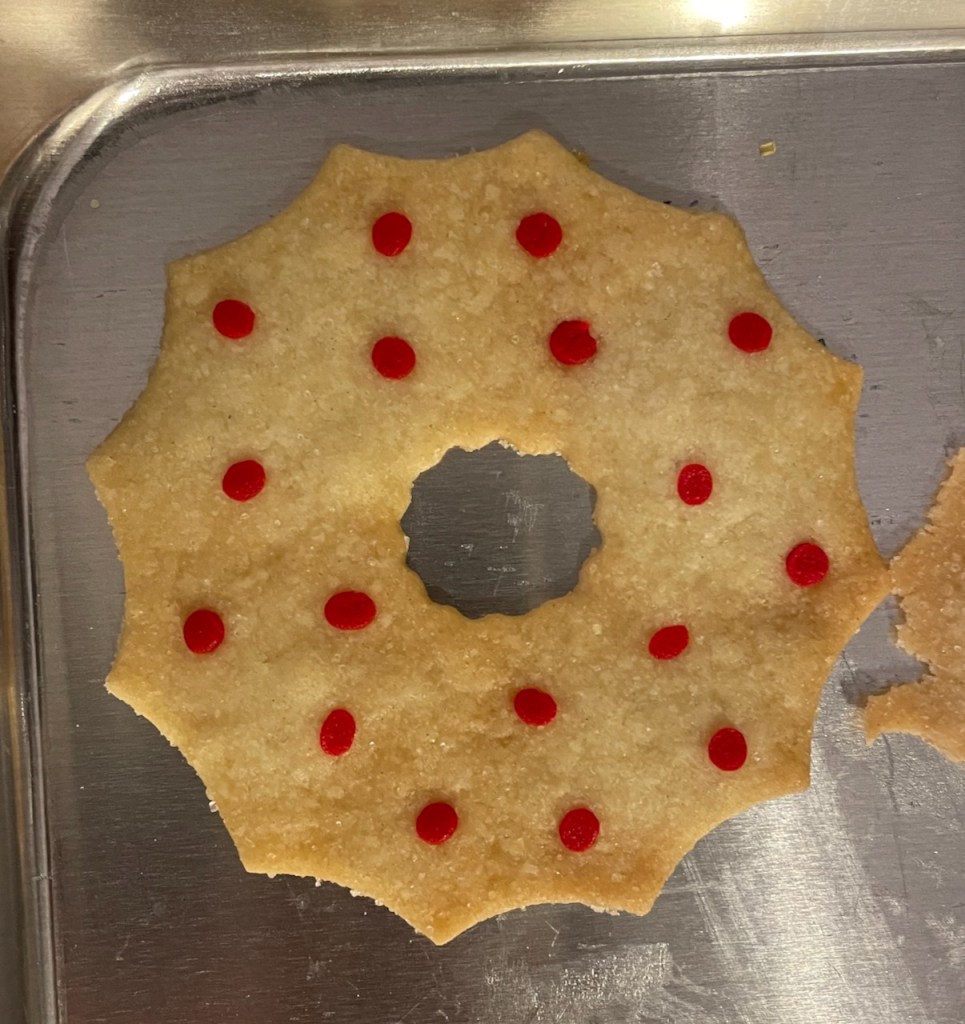
Rainbow Wreaths
I have to confess that I described these to my sister as “fussy”, but she’s right that anyone who spends the hours that I do making these (→) diabolical cuties (using a lab-quality balance to make them consistent in size; 3.4g each, if you’re curious) has no right to call any cookie “fussy”. I mean, really. I think what I meant, rather than “fussy”, was: “I have no earthly clue what I’m doing with these”. One illustration of this statement: My ratio of “presentable” checkerboard cookies to ones that are “just for the cook” was about 2:1, so there’s definite room for improvement!
I tried to form the checkerboards in two rounds, and there were big improvements between rounds 1 and 2, so this seems like something I can get more comfortable with over time. Basically, there couldn’t be a more perfect addition to the Ikeda Christmas Cookie lineup: A delicious and beautiful cookie that requires maniacal and compulsive perfectionism to get just right — and takes a lifetime to master. Uh huh. Guilty as charged.
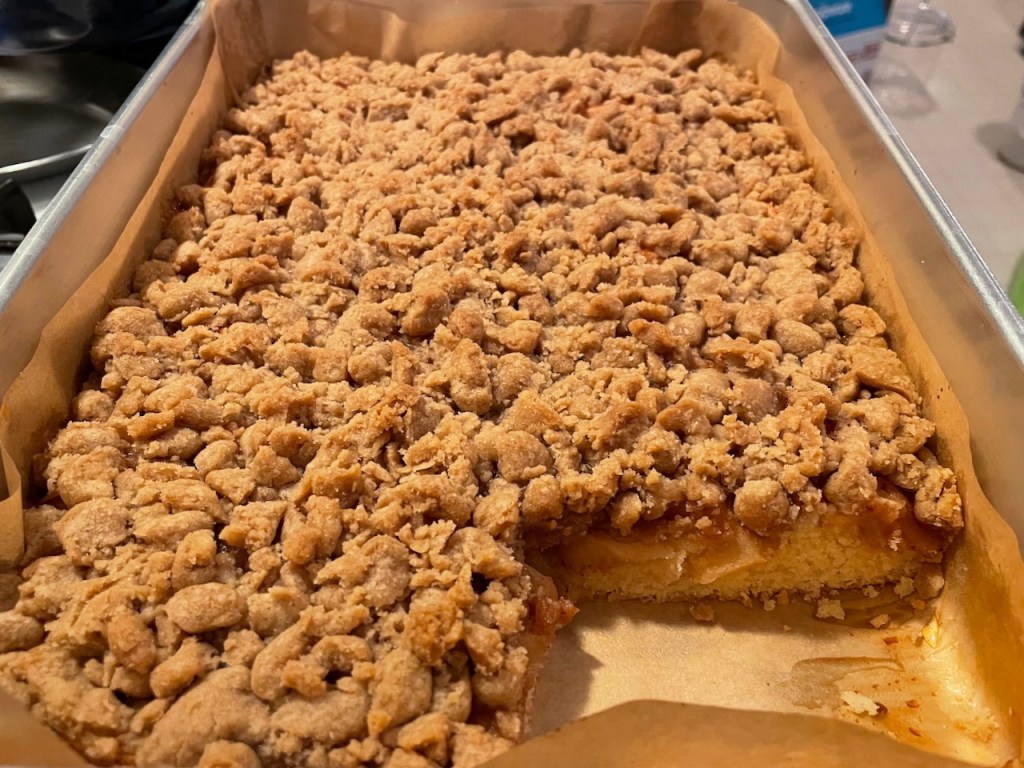
This was my third go at this cake, but this time I decided to completely follow the Smitten Kitchen recipe. I’d been gravitating in this direction, so it made sense. The first attempt was made using the Milk Street Plum Cake recipe, but altered to work for apples. The second attempt tried to walk a middle ground between the two recipes. Those were fine, but this is better. As the Smitten Kitchen description says, the cake has a wonderful crumb-to-cake ration (essentially 1:1), and this makes all the difference.
The only significant change that I had to make to the recipe was to scale it up for a 9″ x 13″ pan rather than 9″ square. This meant increasing everything by ~50%. Of course, I didn’t want to deal with 1½ eggs, so I used the biggest egg I could find in my fridge, and upped the sour cream by a few grams to add some extra moisture.
The other change I made was to invoke Milk Street’s recommendation to freeze the crumb topping before applying it to the cake. The idea is that this helps to make the topping be “pebbly” rather than melting in and/or being more granular or sandy. Smitten Kitchen said just to squeeze the topping into blobs, and I wonder if that would have worked just as well. The freezing method adds extra work, because it’s fussy to have to break apart the frozen topping into various pebble sizes and scatter them about the cake. Next time I want to try comparing the two methods.
I also baked this in a parchment-lined metal 9″ x 13″ pan rather than the Pyrex I had used the previous times. The metal pan had the major downside of not letting me see how the bottom was doing, but I think the cake baked more evenly, overall. The doneness check in the recipe is to make sure the apples don’t have any more crisp spots. But, because of my history of overbaking this cake (and everything), I worried about what was going on “below decks”. I did bake at the recipe’s advised 325°F for 60 minutes, which is what it took to get all the apples to be soft, but for the final 10 minutes I put the cake on the AirBake cookie sheet to protect the bottom.
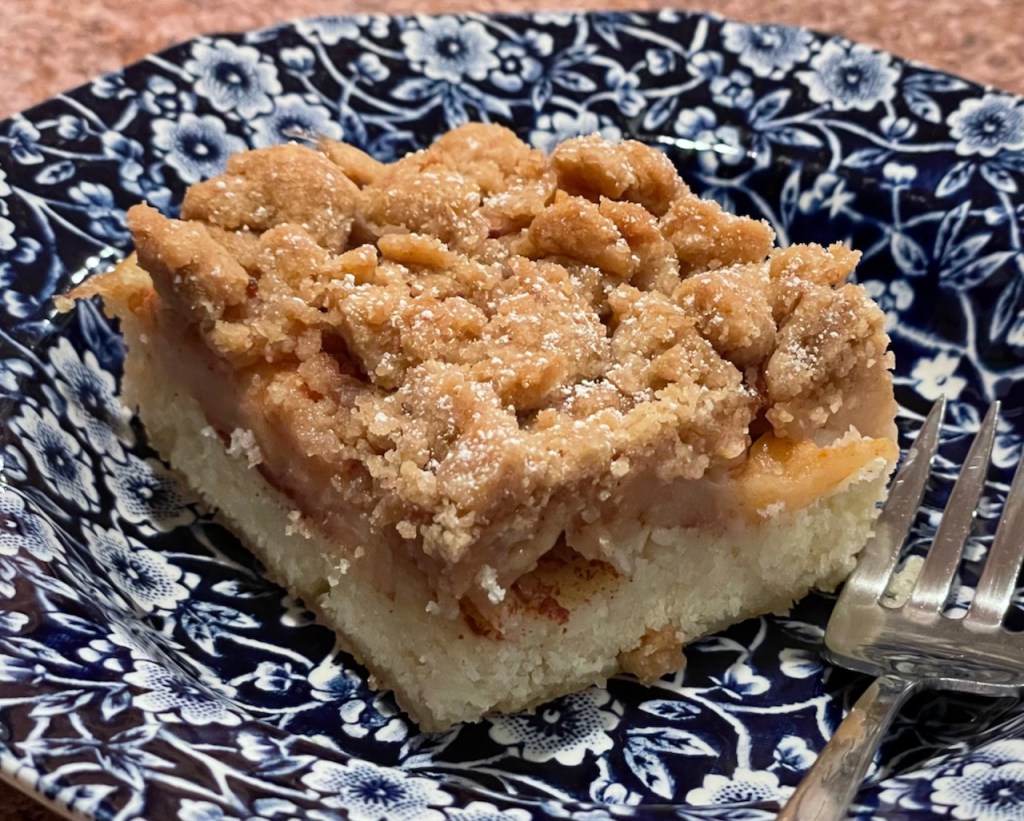
As soon as I took the cake out of the oven, I removed a corner piece to check for doneness, and it was perfect. There was just a bit of browning on the bottom and sides, the cake was light and fluffy, and the apples were nice and soft. I’m not sure how one is supposed to do this without taking a chunk out of the cake, but at least this worked! (And, yes, I proceeded to eat quite a large corner of the cake… as you can see above 😬)
Overall, this cake was a big success and I’m very happy with it (I don’t think I’ve ever written these words before!). My only complaint is that it took me several hours to make, though it seems like it should be easy to throw together (I mean, it’s just cake, apples,and a topping). I know I tend to be a rather slow baker, but this felt especially time-consuming.
I used up some of the lovely apples that I got in October at Shelburne Farm. I included some Winesap, Macoun, and Pink Lady apples. I didn’t love any of these as eating apples, so I think the cake was just the right use for them.
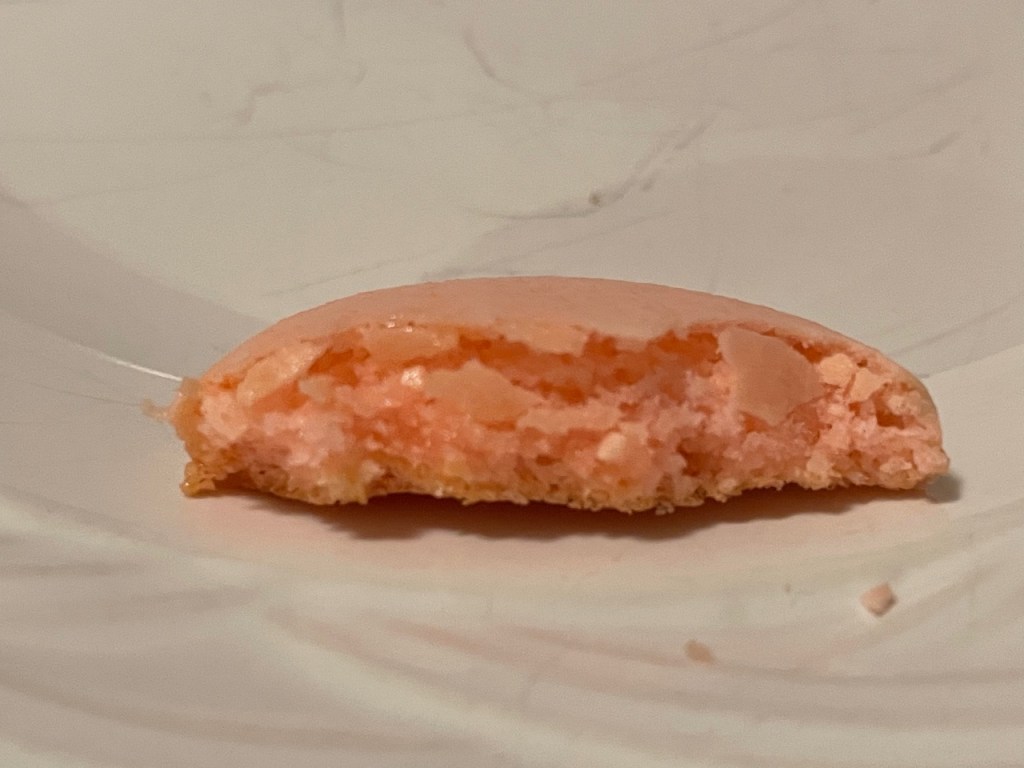
I had some leftover egg whites, so I decided to try something I’ve had my eye on for a while: French Macarons. It’s another one of those things, like choux pastry, that the Great British Baking Show makes you want to try. The contestants on that show knock these out like they’re nothing!
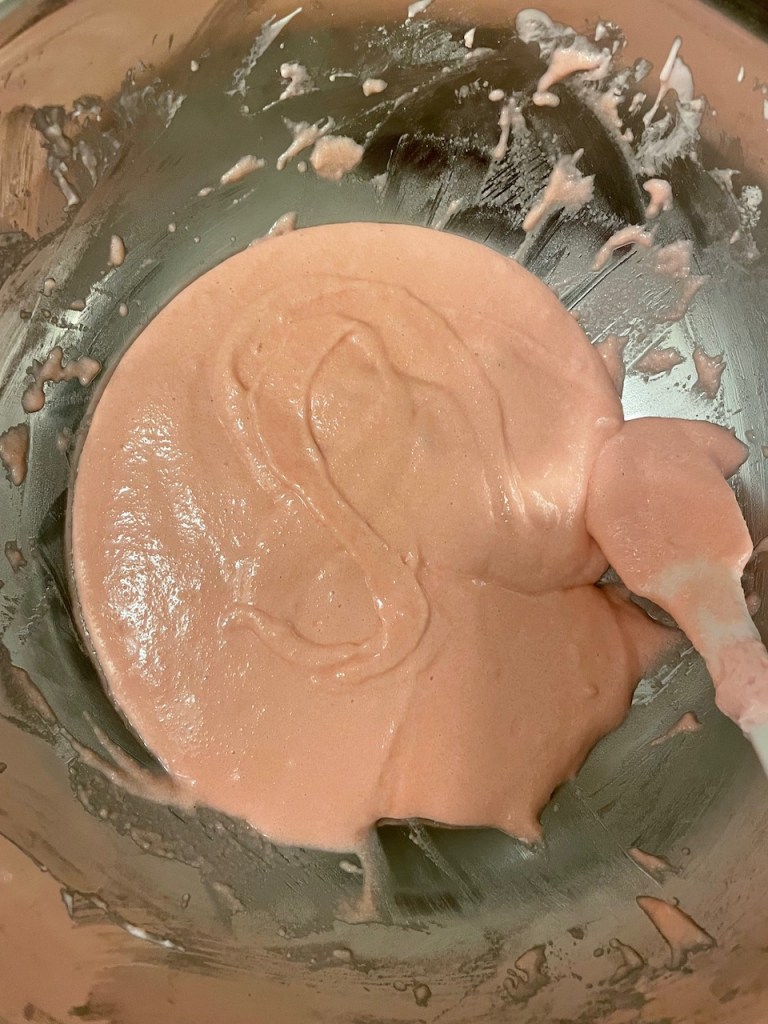
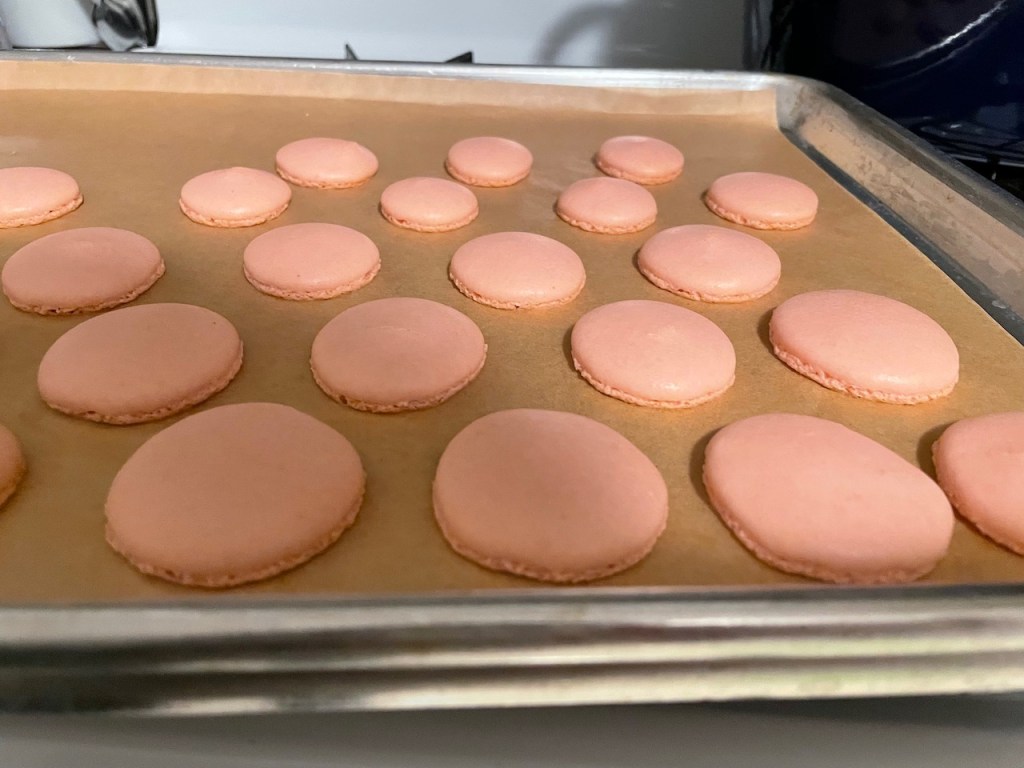
I liked this recipe from Preppy Kitchen, and followed it completely. I appreciated all the supporting advice, photos, and video. I also appreciated having a chance to break out my carefully curated piping kit (this tip set, these tips for the range of sizes, these bags, these couplers), which I basically haven’t used since I acquired it all during the pandemic (because of the eclair project). I was only piping one thing, so I didn’t use a coupler, and I was happy to have the larger plain tube tips that I bought. I’m definitely a piping bag noob, but I could tell as I went that it was a technique/familiarity thing, and it did get easier and better as I went.
I am also not an expert at what the final result is supposed to look, taste, and feel like, but I did achieve the necessary fringe-y “foot”, and for the most part I think I avoided the big gap/bubble at the top. I flavored these with a little almond extract and colored them a pale pink. I opted not to take it to the buttercream filling sandwich step. These seemed quite sweet enough already. I already had red food coloring on had because of my Christmas Cookie Candy Canes (see header photo), so pink is what we got.
Oh, also: The almond flour that I bought was the Whole Foods brand. It seemed to be less finely ground than was ideal for this, but in the end I think it was OK. I did follow the instructions to put the flour through a fine mesh sieve, but this was actually quite difficult to do. In the end I gave up on forcing about 1/4 cup of it through. I dumped that last pile of flour out of the sieve (saved for some other use, I guess?) and put some more flour through the sieve to yield the right amount. Anyway, it took a long time.
My last thought on this rookie attempt: There’s something that feels weird about going through all the steps to yield stiffly whipped egg whites only to then deflate them almost entirely. Getting to the point where I could even draw the “figure 8” with the egg+flour+sugar batter took quite a bit of deflating. Since the “feet” on my macarons were not very high, I’m guessing I over-did the macaronage, but honestly, I have no idea. More investigation and experimentation needed!
I saw this recipe for lemon macarons that looked very interesting. Maybe next time?
(The crust isn’t as thick is it looks here… there was a bit of raised edge at the sides.)
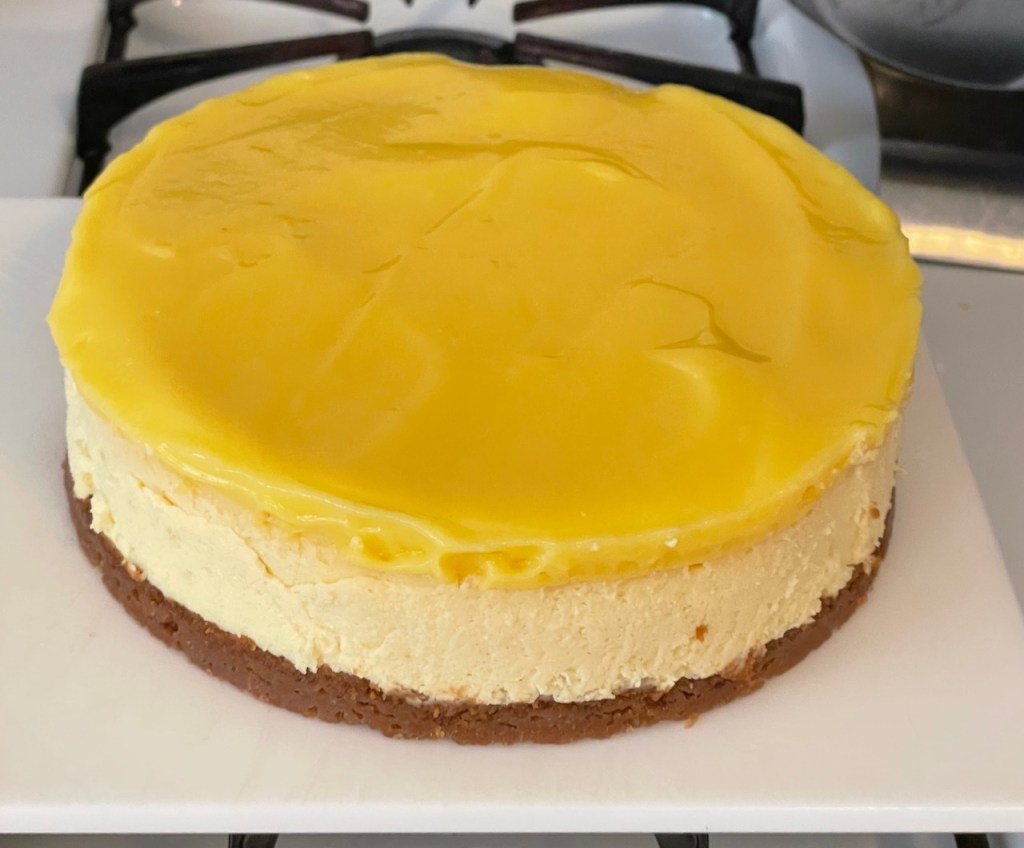
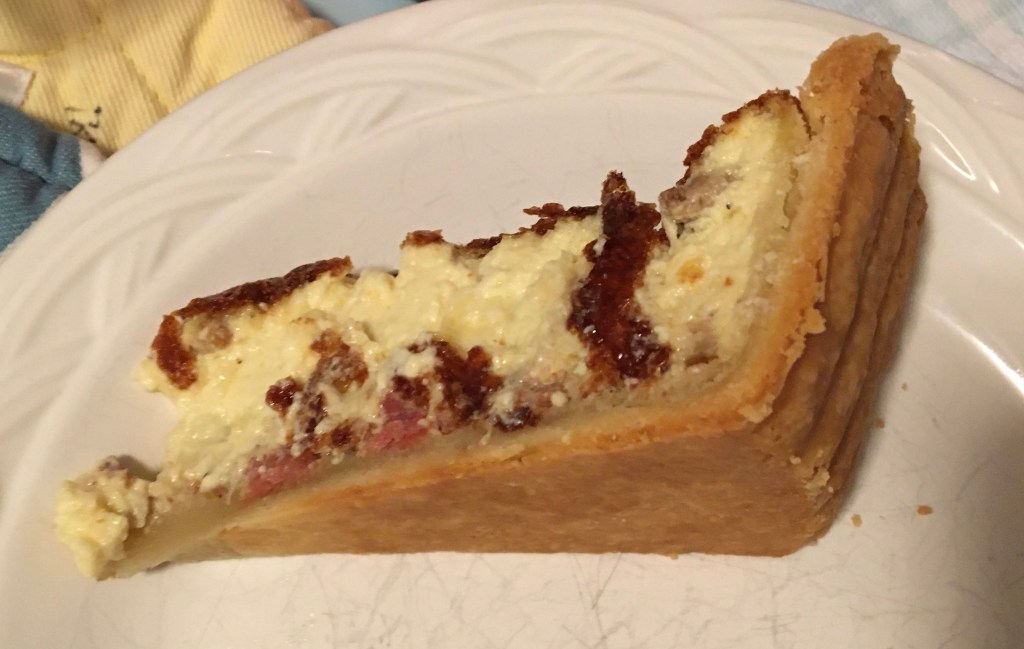
This lovely recipe comes from Cook’s Illustrated, and I’ve made it one time before, probably way back when the recipe came out (May/June 2003). It was nice to give it another go after a mere… 18 years (!). This isn’t really the season for lemon-y things, but I have a fridge full of lemons and this felt like reason enough. (I bought all the lemons because I had a fallback plan of making a lemon meringue pie for Thanksgiving.)
I had to mess with this a little, and have some improvements/notes that I’d like to remember for next time (which really shouldn’t wait another 18 years):
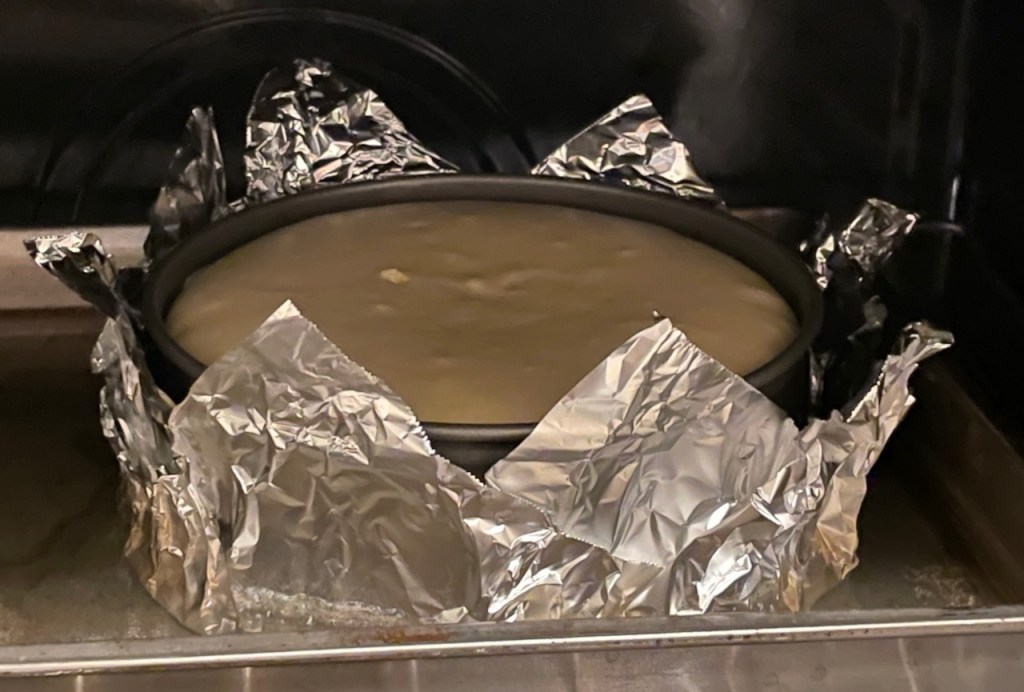
The recipe is for a 9″ springform, but I only have 8″ and 10″, so I used the 8″ and made a little baby cheesecake in a small pyrex dish to use the extra stuff that I didn’t need (you can just see the baby cheesecake in one of the photos above). I covered the base of the springform pan with parchment and crimped it on with the springform sides. The idea is that this will allow me to lift the finished product off of the springform base to put it on a cutting board for serving. It doesn’t seem like it’s ever a good idea to slice on the springform pan’s base, right? I can report that this did work well, so I think I’ll go with this approach, in general.
I feel like this recipe lays things out in a particularly difficult-to-read way, making it much more time-consuming and challenging than it needed to be. For instance, the instructions are written in long paragraphs (a paragraph for the crust, a paragraph for making and baking the filling, a paragraph for the curd) rather than in a more step-by-step layout. I kept losing my place in the long paragraphs and having to read each paragraph over again to make sure I was working from the right step. The paragraph for the filling was especially unwieldy. I will lay this recipe out myself in a more user-friendly way before making this again!
It was annoying to have to use the food processor for two successive steps that required cleaning in-between. That’s a huge time-sink, and is actually somewhat dangerous because washing (and then drying) the food processor blade is, well, you know. I wonder if it matters if there’s a little bit of trace animal cracker crumbs in the machine when blitzing the lemon zest with the sugar. I also considered for a moment whether blitzing the zest was even necessary, but I do think that it’s better not to have stringy zest in the cheesecake filling. Next time I’ll just try to scrape out the processor well and just use it for the next step without cleaning.
When making the curd, the lemon juice can be heated in the microwave (rather then on the stovetop). This adds another thing to clean, but pouring from pyrex is way easier than pouring from a saucepan. I did overheat the juice a little, which then caused a tiny bit of cooked egg. I should have just waited for it to cool off some before combining with the eggs. I was impatient. The curd gets sieved at the end, so it was fine, but it was also avoidable.
There’s chatter in the recipe’s comments about the instructions to wrap the springform pan with foil before putting the whole thing in a water bath. The issue is that the foil leaks, resulting in a water-logged cookie crust. I expected mine to have this problem, but it came out fine. The various solutions offered online include: better/bigger/stronger foil, roasting bags or slow-cooker liners, putting the springform into a cake pan and then into the water bath, buying some sort of silicone product to replace the foil, or using a cake pan rather than a springform pan (requires flipping the cake out of the pan). Normally, I’d reject a plan that involves implementing a triple-pan bottom (springform pan inside a cake pan inside a roasting pan), but in this case there’s no need to cook the base; the cheesecake is in the oven only to cook the filling. So, maybe this is the best solution — without having to buy anything? Anyway, I did order heavy-duty and wider foil for next time.
This cheesecake was deliciously rich, but also somehow light. It made us feel as if it weren’t as calorie-laden as it actually is. it’s a bit of a project, but well worth it!
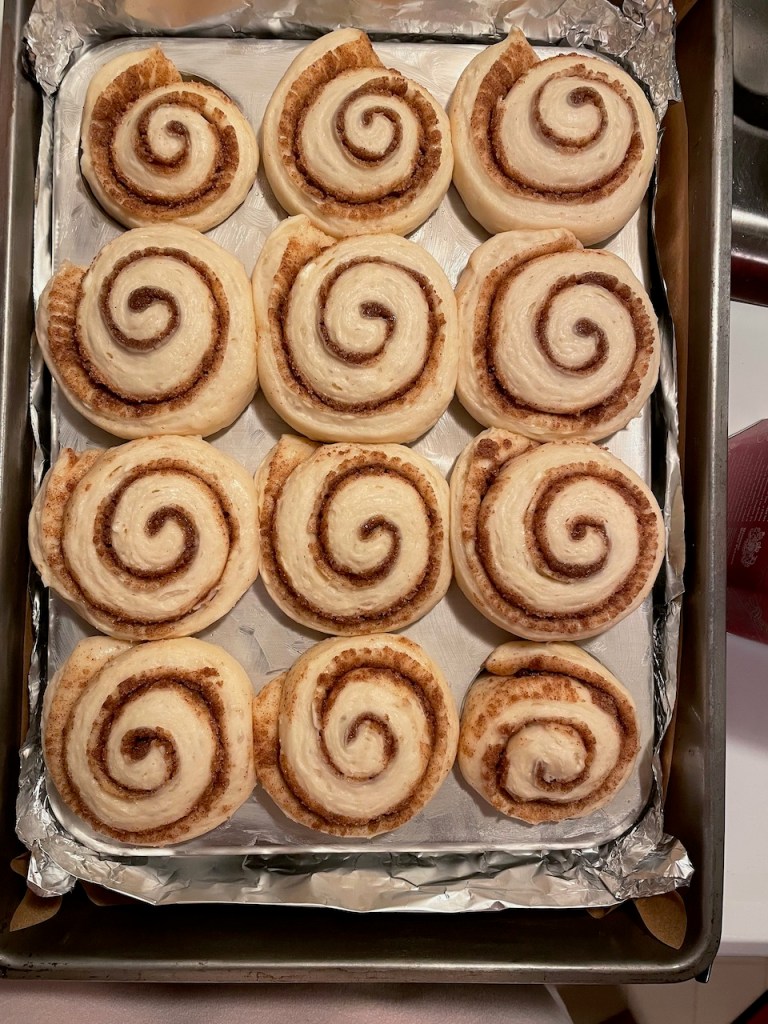
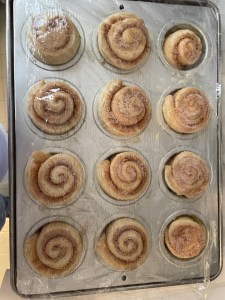
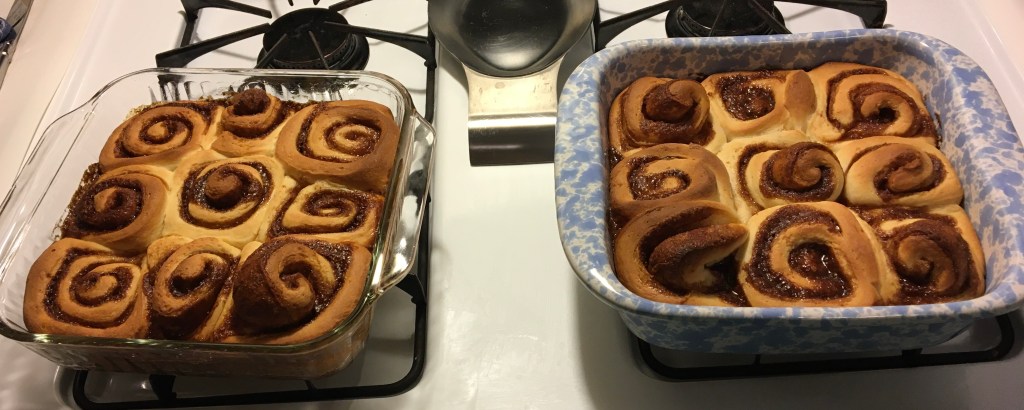
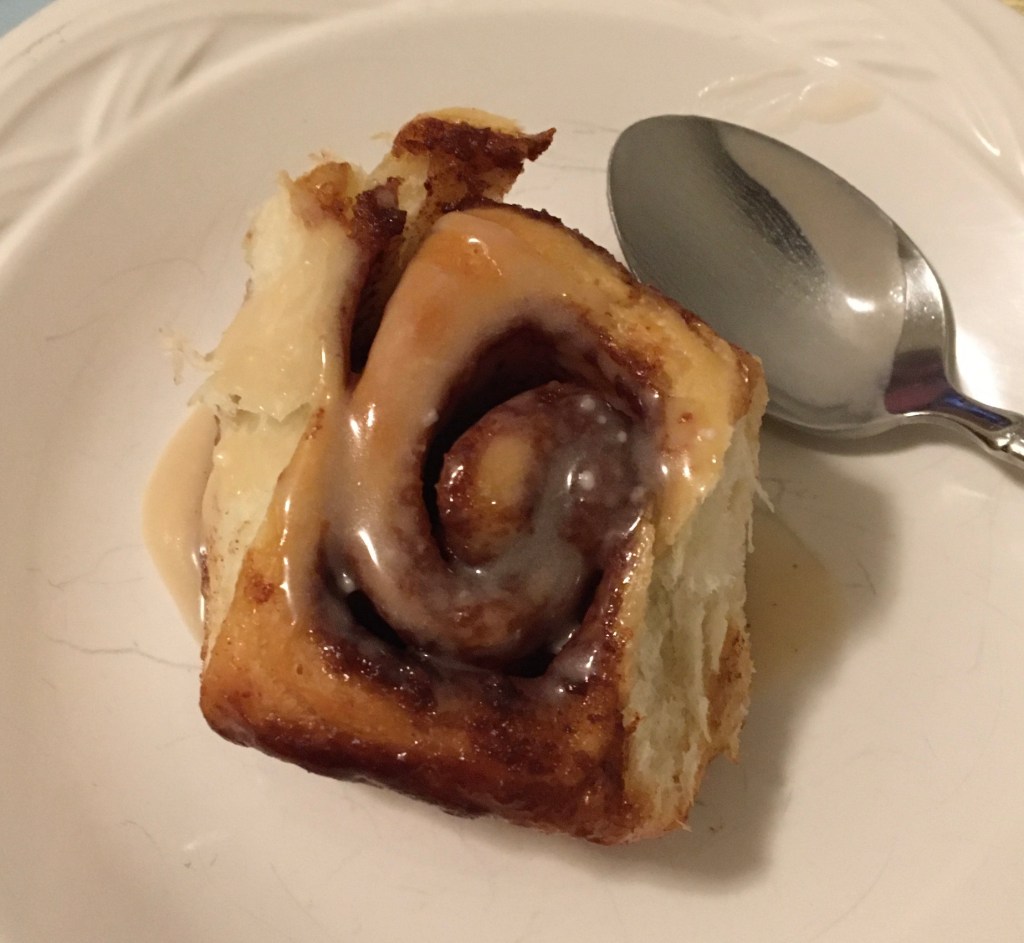
I used a different muffin pan that pushes the buns closer together (I wanted the square-ish shape that the Tartine ones have). It’s a behind-the-scenes benefit that this pan, in addition to being sturdy and inexpensive, is far easier to clean because it doesn’t have any seams (yay!).
The recipe calls for melting a stick of butter (8 Tablespoons) to brush on the pastry before spreading the filling and rolling up the spiral. As I noted in my prior post, I think the recipe omits the instruction to put some of the melted butter into the filling mix (sugar, cinnamon, orange zest). So, I went ahead and put half of the melted butter into the filling. I also swapped out a quarter of the white sugar for dark brown sugar and amped up the cinnamon a wee bit. The result was a darker filling, resembling wet sand, and matching better the photo from the recipe (in prior post).
The Tartine recipe calls for too much filling for the amount of croissant dough that I’m making, so I cut everything by about 30%.
I reduced the oven temperature to 375°F from 400°F, and did some relatively active (read = fussy) foil tenting to try to stave off burning the tops.
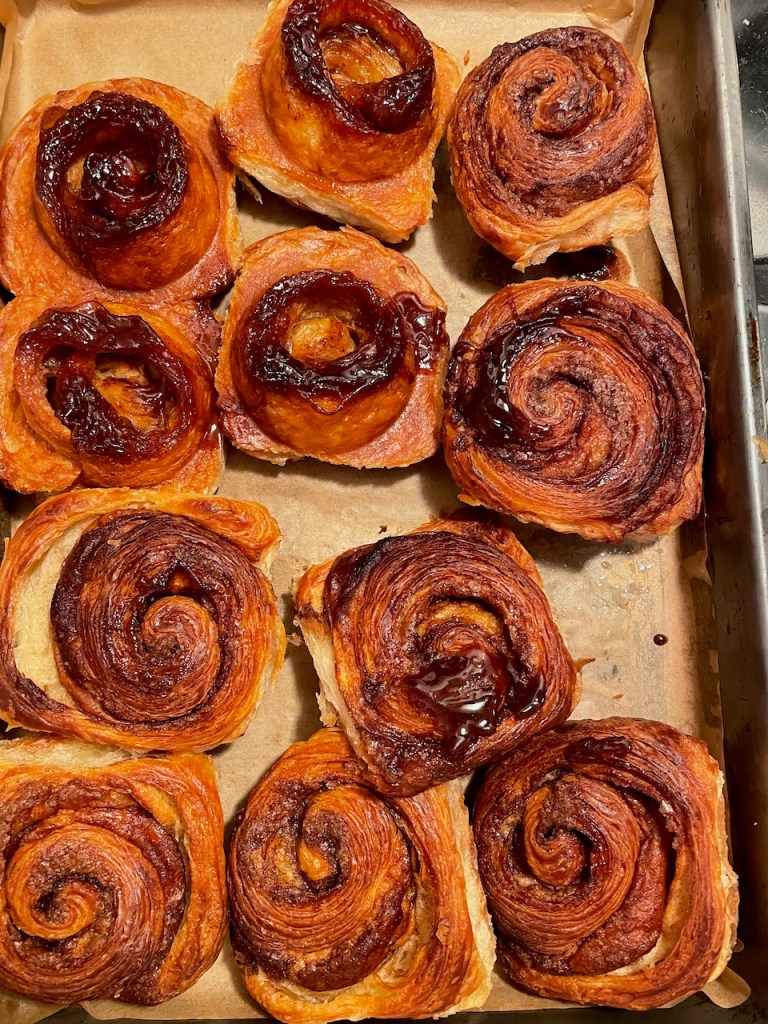
Overall, this batch was an improvement over my first attempt. It was good to not have the burnt tops, but I definitely haven’t solved this. The issue is that I tried too hard to darken the bottoms. What I mean is: I left the buns in the oven too long (yes, shocking) because I was concerned about the bottoms being somewhat pale last time. However, the lower heat plus the extended bake time caused the melted sugar that intentionally pools in each muffin well to go too far in the cooking process, producing a little bit of chewy candy at the bottom of each bun. Ick.
One of the people I enjoyed these with said, “but, what’s the downside of having chewy candy on the bottom?”. She makes an excellent point, but I think even she agreed that it wasn’t quite the right texture for this particular bun. 🙂 My thinking for next time is to go back to 400°F, but very loosely tent the tops for the last 10-15 minutes to avoid burning, and take the buns out as soon as the tops are well done (“bien cuit”).
i think I’m getting better at the croissant dough part. It just felt easier, and the lamination in this batch just seemed more consistent and flakier.
I also made changes to the icing. I again started with a half portion of this recipe, but I reduced the vanilla further in half and I chose the heavy cream option (rather than milk or half-and-half). I was much happier with this result and feel like this is now my preferred morning bun icing.
Just in case anyone is wondering: These buns are incredibly yummy! Yes, there are things I want to tweak in order to optimize them, but that’s just how I roll (🙄 🤣). Much enjoyment was experienced, too!
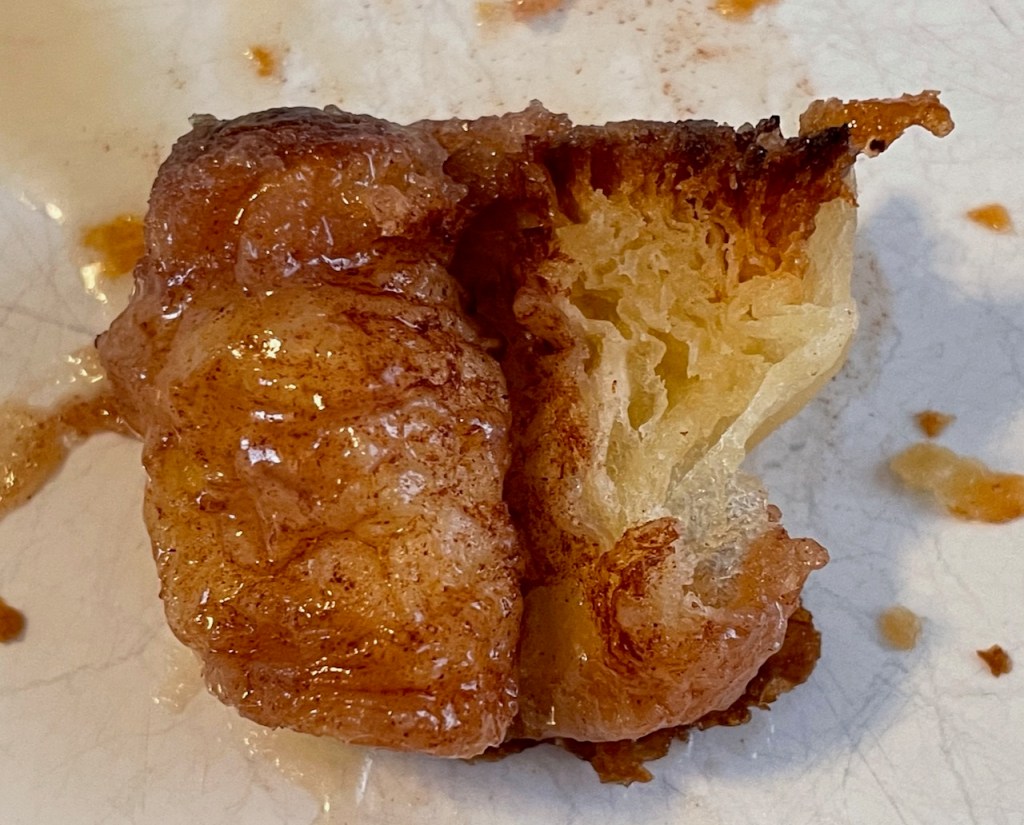
Unrolling as I eat (doesn’t everyone do this?)The best part (the gooey center!)
Question: What do you get when you cross a croissant with a cinnamon roll?
Answer: A Morning Bun!
Other acceptable (also right) answers:
A rather messier kitchen
Contentedly pudgier than you were before
I tried an experiment last week with adding sugar and cinnamon to the Joanne Chang croissant butter block. This was successful in only one way: They tasted great. In every other way, they were a failure. It was basically impossible to contain the butter/sugar for the lamination turns, Stuff was bursting out all over the place. Also, the sugar massively leaked out during baking, so the croissants were basically stewing in syrup on the baking sheet. Not that this is necessarily a bad thing, but the croissants weren’t pretty, and they didn’t retain enough sugar to be the sweet treat I had imagined.
So then I googled “laminated cinnamon rolls” and found myself staring, mouth agape, at another Chad Robertson recipe (found via this article and shown in this video). His morning bun recipe is in their book “Tartine: A Classic Revisited“, which I found available as a Prime Reading title on Kindle (free for Prime members). I had not been familiar with the term “morning bun” before this, but apparently it’s “not a big thing on the East Coast.” Well, it should be!
I used Joanne’s croissant dough and then Chad’s morning bun recipe from there. The only other changes I made were:
I didn’t have oranges to zest, so I put 1.5 teaspoons of Penzey’s orange extract in the filling. It’s amazing how nicely the orange flavor boosts these, even though it’s not evident that that’s what’s in there.
I need to note that after 35 minutes (well before the morning bun recipe’s 45 minute baking time) the tops were overdone and the bottoms weren’t quite done enough. Eating them, though, the textures felt right, so I wasn’t too far off the mark. I suspect that the bottoms didn’t brown as well because the muffin pan needed to be placed on a sheet pan to collect the anticipated overflow of butter, cinnamon, and sugar. Next time, I think it would help to shield the tops with a piece of loosely placed foil after maybe 15 minutes. Another possible step is to reduce the 400°F oven temperature to 375°F.
Another note is that in the video of Chad linked above and in the photo provided in the recipe itself (shown here), his filling looks totally different from the one I got from following the recipe. I checked it three times, and I’m reasonably sure that the recipe has an error. It says that the filling has only white sugar, cinnamon, and orange zest. No moisture. I substituted orange extract for the zest, but that wasn’t much moisture and the result was a pale brown sandy mixture. It was wonderful, but I noticed afterwards that the video and photo show a darker brown and lumpier mixture.
I think that the recipe omits stirring in melted butter and/or including some brown sugar. Melted butter is on the ingredient list, but is only called for as a brushed-on layer before spreading out the sugar/cinnamon filling. The large amount of melted butter is reasonable for spreading, as his croissant recipe yields a massive amount of dough (nearly 1,000g of flour compared with 410g in Joanne’s recipe) rolled out to a very large 1/4″ x 10″ x 32″ rectangle. But, I suspect that some of the listed melted butter amount was meant to be combined with the sugar and cinnamon. I did check for book errata and found one, but not this one.
So, next time I will put some melted butter into the filling until it looks like his photo.
I’m sad that I forgot to take photos, but here’s what I baked for Thanksgiving:
I made really terrible sourdough rolls. We ate them, and they didn’t taste terrible, but they really were a colossal failure. The primary issue was that I didn’t leave myself enough time, combined with my inexperience and ignorance about turning my usual Tartine sourdough recipe into rolls. The result was that the rolls looked OK, but inside were horribly dense and heavy. I mean, they had the density of bowling balls. I’d like to give this another go and see if I can make this work. This was definitely an example of my being unjustifiably cocky about what I can do with sourdough. I’m really still just a noob, and was robustly reminded of that with these rolls.
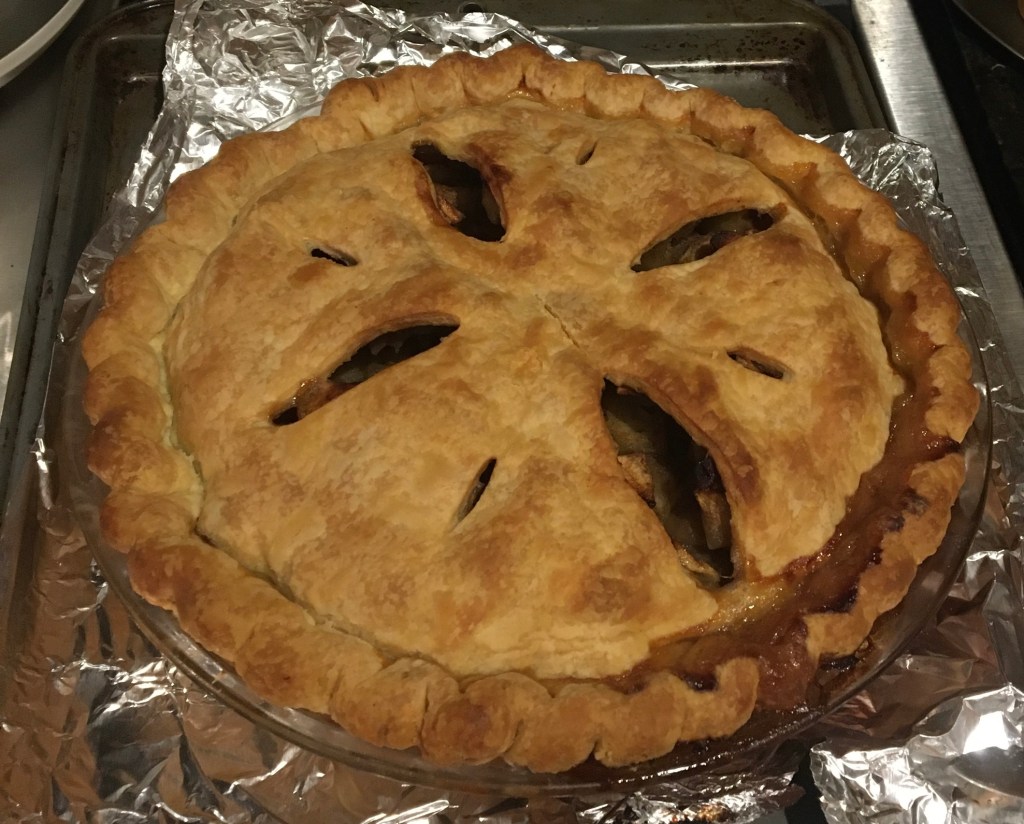
I made my classic apple pie, but this time I pre-cooked the apples on the stovetop. I think this helped with my usual problem of ending up with a gap between the apples and the top crust, but I changed another variable that also helped: I made a lattice crust rather than a solid crust. So, not enough data, but at least I didn’t have the gap.
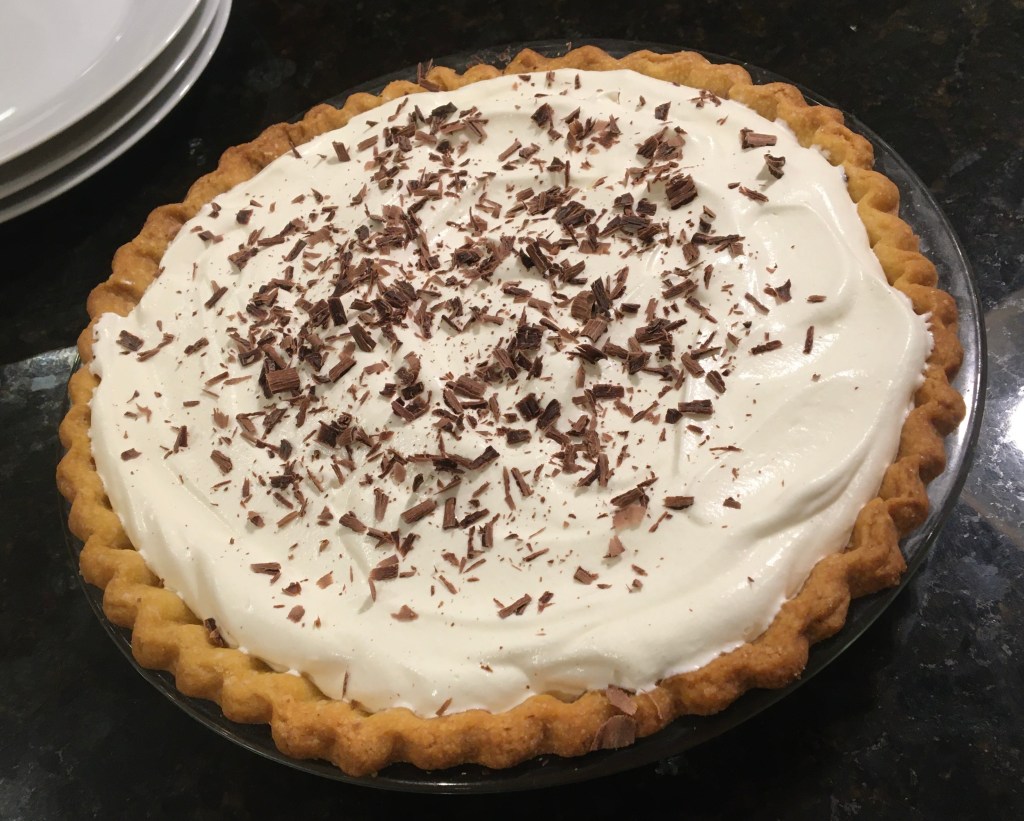
I made the Joanne Chang Rich Chocolate Cream Pie, and it was great. Following the instruction to chill before blind baking the crust seemed to really forestall any “slumping”. I did fill the thing up with foil and pie beads, and will continue to, but the dough seemed quite sturdy this time.
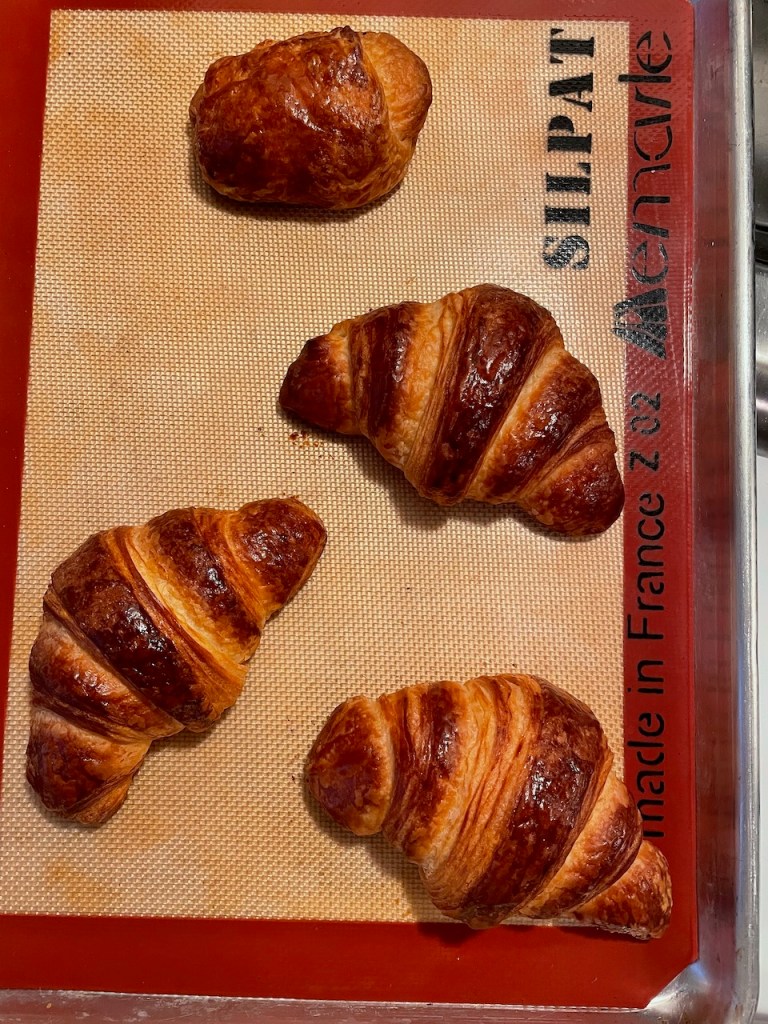
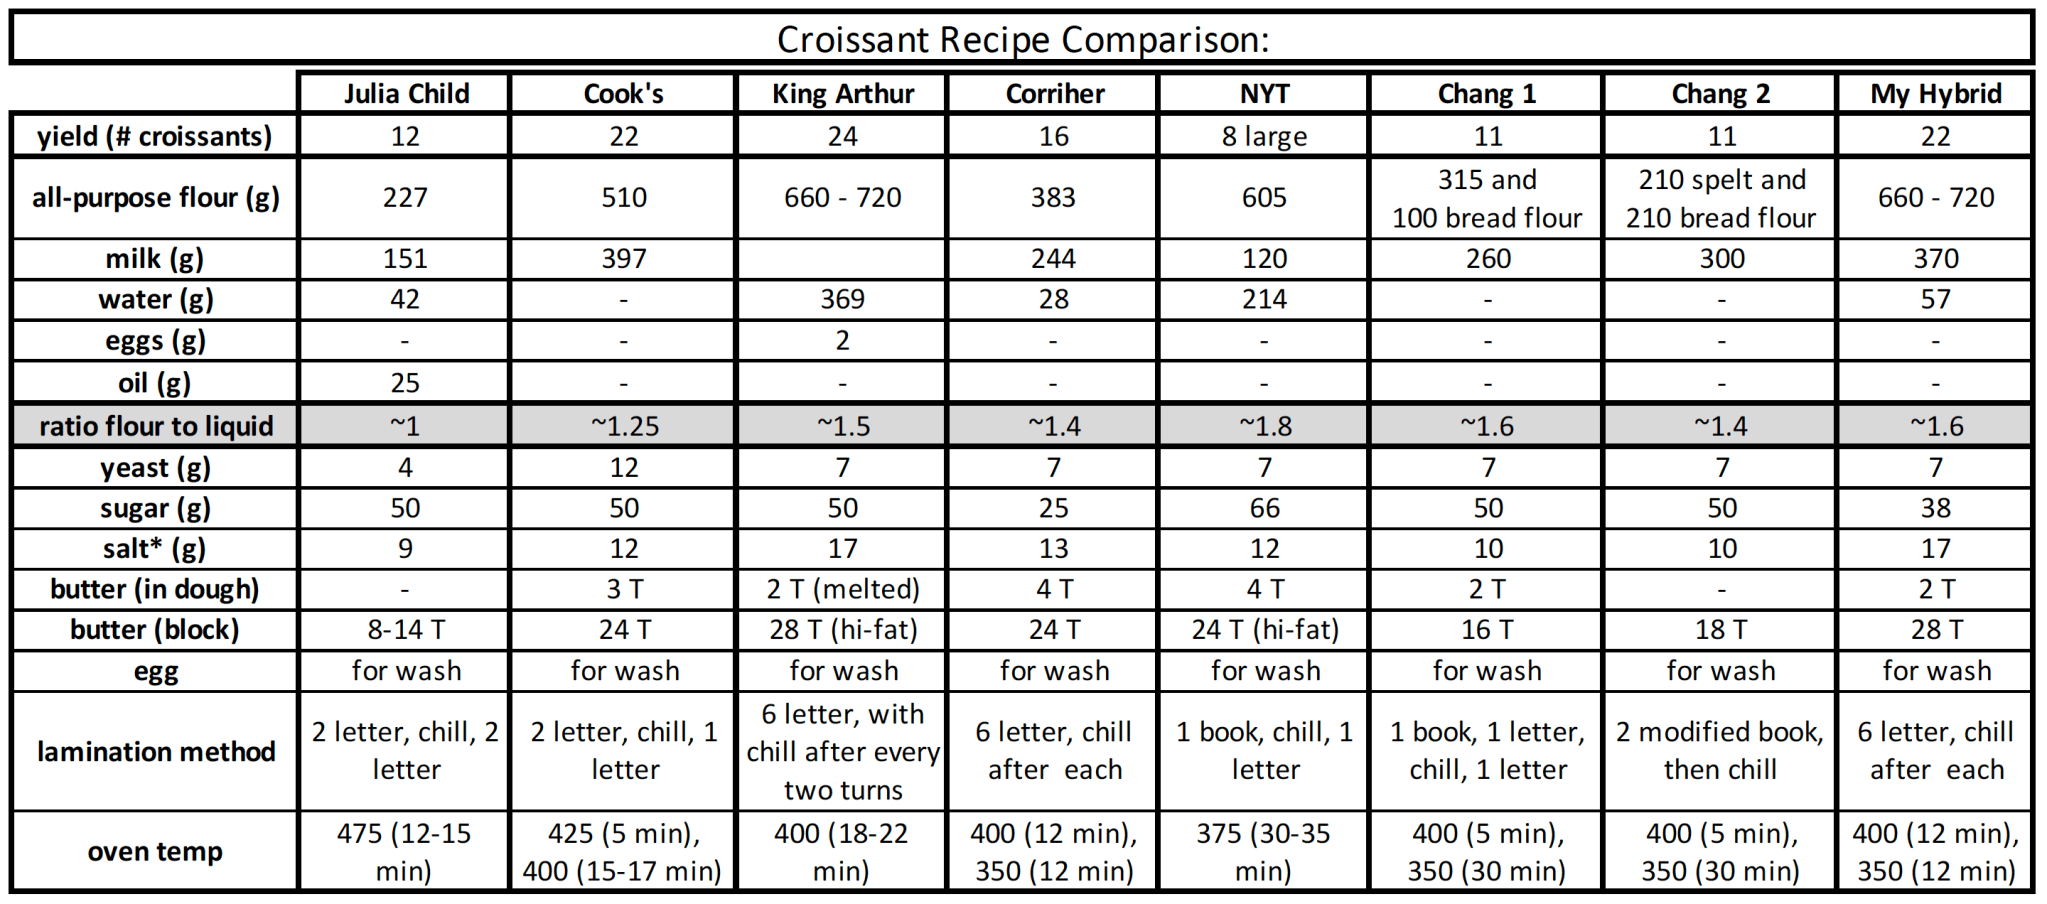
So, I wanted to try the updated croissant recipe that I saw in Joanne Chang’s newer cookbook, Pastry Love. In my comparison chart I refer to this as “Chang 2”. Here are the differences that I saw:
The newer recipe is for “spelt croissants” so the flour content is half spelt flour and half bread flour. Her original recipe is 3/4 all-purpose flour and 1/4 bread flour, but the overall flour volume is nearly the same, as is the flour to liquid ratio. I wasn’t interested in trying the spelt variation, but it seemed safe to stick with the original all-purpose/bread flour approach from the original recipe.
The newer recipe eliminates the step of mixing 2T of butter into the dough itself. That 2T of butter gets added into the butter block, so it’s not removed overall. It just doesn’t have to mixed into the dough. I appreciated the idea of saving some work, so I went with this change
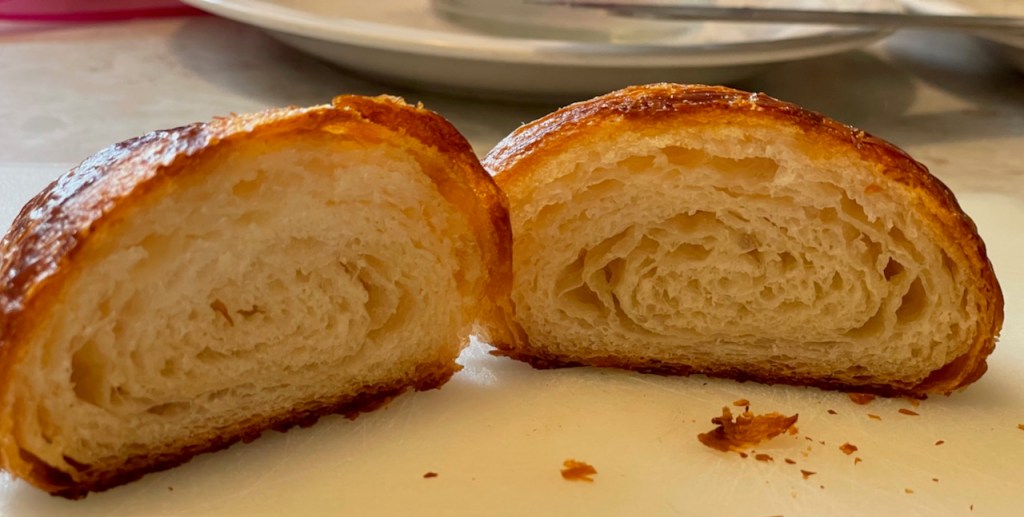
Her lamination method is notably updated. Rather than book-fold/letter-fold/chill/letter-fold, this recipe has only two book-folds and that’s it. No mid-lamination chilling! Because of my prior issues with the butter breaking up after being chilled mid-lamination, I am especially excited about this change. And, it reduces the overall duration of the effort (because it takes away one chill step and one fold step). We’re now down to 16 layers (having already gone from 729 -> 36), and I haven’t seen a deterioration in the flakiness of the end result.
I should note that Joanne’s newer lamination method isn’t a classic “book fold”. I think of it as a “modified book fold” and haven’t seen it described anywhere else. It is essentially the same, and still creates the four layers as a regular book fold. The only difference is that all the dough ends are not concentrated in the middle of the dough packet. She offsets the “seam” a bit, and I think this is another tweak that helps maintain the structural integrity of the desired rectangular shape. It’s hard to explain the difference without just sending you to her book (Pastry Love), which has very helpful instructions and photos.
I love the idea that Joanne Chang and her team at Flour Bakery are looking for ways to improve things – even very good things. The lamination method has nothing to do with the spelt change, so this seems to be entirely a process improvement.
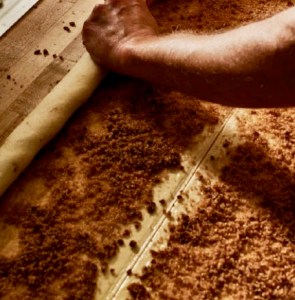
I think I haven’t explicitly mentioned that I make one Pain au Chocolat with each batch of croissants using any leftover bits of laminated dough. (You can see it in the first photo at the top of this post.) I mush the bits back together and roll them out into a rectangle, then roll up some dark chocolate batons and bake with the rest of the croissants. I have to say that these little treats, made from the “leftover bits”, have been such a delight that I think I will try to make more of an effort to allocate some proportion of the next batch to Pain au Chocolat – not just the scraps!
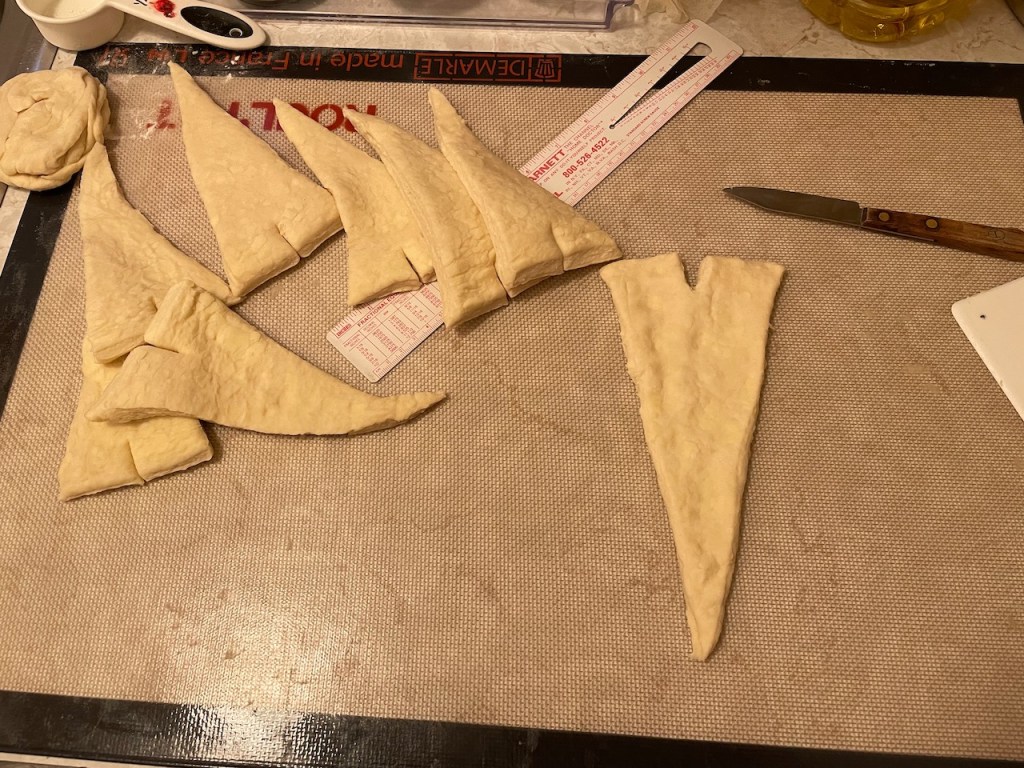
If you check out the comparison chart that I made to identify differences between various croissant recipes, you’ll see the wide variety in lamination methods (in the 2nd to last row). For my attempt last week, I wanted to try Shirley Corriher’s lamination method, because I figured: the more lamination = the more better. She also had this peculiar technique of brushing each rolled layer with ice water, and I wanted to see if this worked.
But, I wasn’t convinced by that experience. As I wrote in that prior post, I had big problems with the butter breaking apart after being chilled, and things just kinda went off the rails from there. Yes, I was able to do the 6 turns, and yes the results were great. But, I remained curious whether other techniques could solve some of the logistical problems.
For instance, I found it really hard to roll things out into rectangular form. The cumulative effect of a seemingly small issue of “roundness” (as opposed to “squareness”) was pretty horrible as the turns increased. It seemed that there were big blobs of unlaminated dough extending off the ends of the dough packet, and these appendages just kept getting bigger and bigger. And, it irked me that the scientific-minded Corriher hadn’t accounted for the butter breakage or rolling technique in her recipe.
So, I tried again, but this time I went 100% with the Joanne Chang recipe. This attempt faithfully follows the recipe from her first book, Flour, which is referred to as “Chang 1” in my comparison chart. Notably, this method has only three folds (or “turns”), where the first two (one book and one letter fold*) occur before any chilling, then there’s one more letter fold after chilling. This, compared with Shirley Corriher’s six letter folds, each interspersed with chilling!
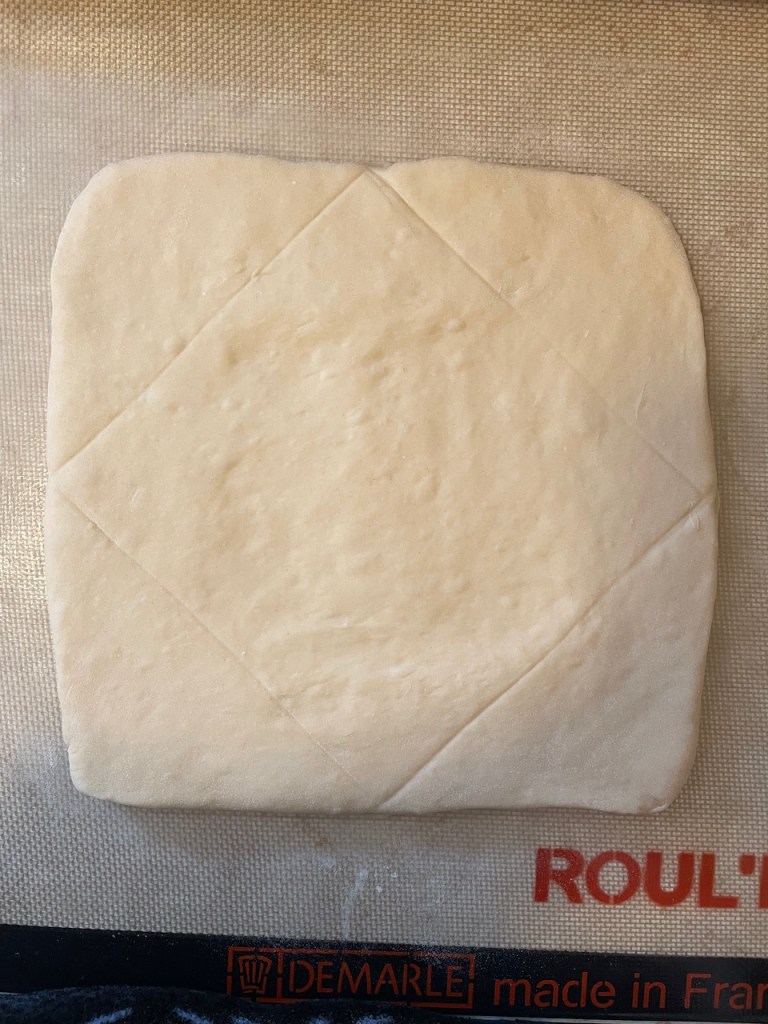
Another difference that I didn’t think would matter, but did, was the method that is used to encase the butter at the outset. I am now convinced that this makes quite a big difference. If you look at my first photo above you’ll see that I’ve marked the dough per Joanne’s instructions. Her technique says to place the butter block on the dough so that the dough’s corners are exposed (actually, so does Shirley, see this photo). The part that is really different is that Joanne says to then flatten out the four exposed dough corners – to the extent that each corner will fully cover the entire butter block. So, the butter is enclosed on one side by at roughly 3/4″ layer of dough and on the other side by four flattened out layers of dough (the parts that were the dough corners). Here’s mine after flattening and folding in the corners so that the butter is fully encased.
The reason this turned out to be better for me is that it helped to establish a shape and structure that rolls out to be more square than round. It avoids putting large blobs of unlaminated dough in the middle or edges of the dough packet, instead establishing a more even, rectangular shape from the beginning.
A few more notes to add:
Joanne addresses the butter-breaking issue by suggesting that you first use the rolling pin to press on the dough layers up and down the dough, and only afterwards roll out the resulting ridges. She explains that the goal is to get the dough and the butter to form even layers, without any one part extending beyond any other part.
I’ve taken to thinking of the lamination rolling step as, actually, rolling out the butter — where the dough is just along for the ride. The butter is really the important layer to get thinned and extended before folding.
I don’t think there was a loss with the fewer folds compared to last week’s attempt. Theoretically, six letter folds makes more than 700 layers where a book fold and two letter folds makes 36. In fact, this King Arthur article addresses why fewer turns actually makes a better result.
* If you’re not familiar with terms “book” and “letter” fold, you can see a primer here. The basic difference is that a book fold creates four layers and a letter fold creates three.
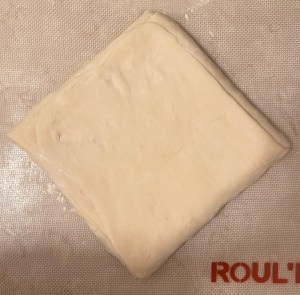
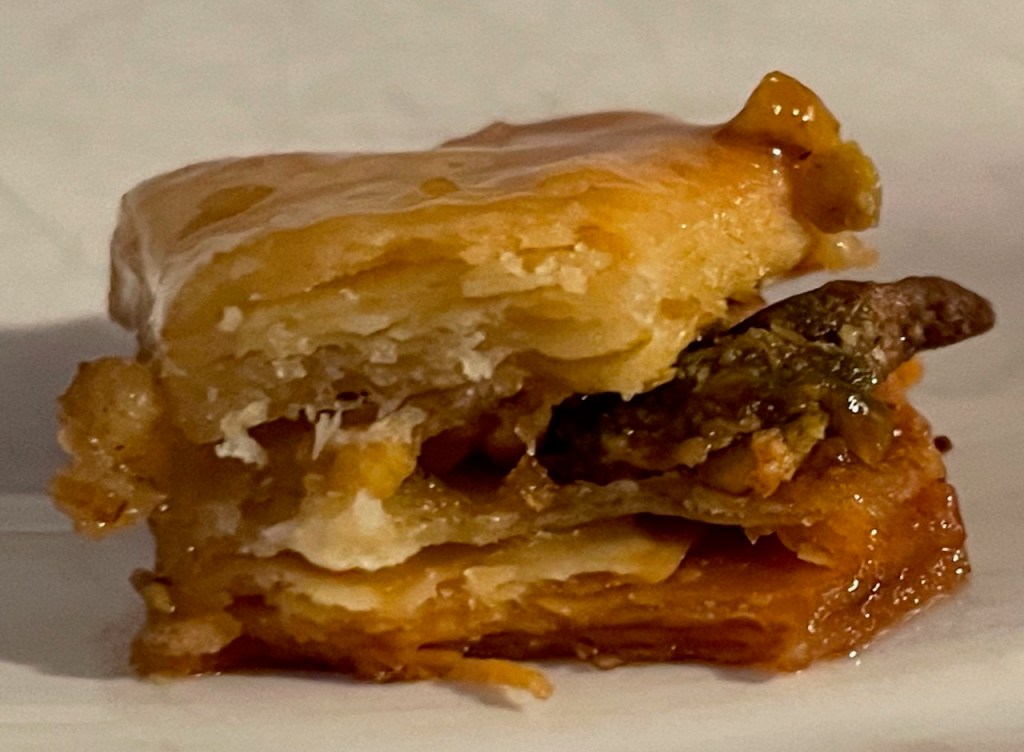
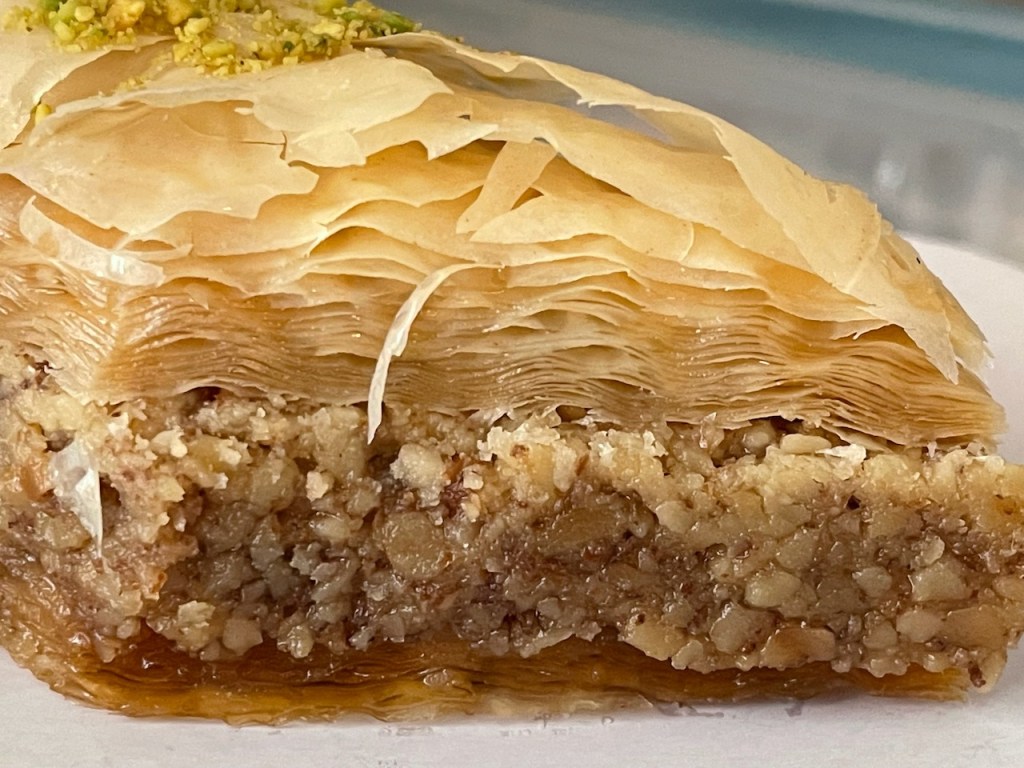
This is actually my third try at baklava. I didn’t take any photos of the first two, because they were generally awful. The whole process was awful, and apparently I didn’t want any evidence of their existence.
The problem with the first two attempts was that I tried to make it inside of a rectangular pyrex dish. Maybe for someone who knows what they’re doing this would have been fine. But for me, I had major problems getting the thinly-rolled dough to behave properly in the dish. It tended to contract or otherwise not behave when buttered, yielding an ugly mess. I think it was a mistake to trim the rolled dough before trying to place it in the dish? Maybe having extra would have helped. I don’t know
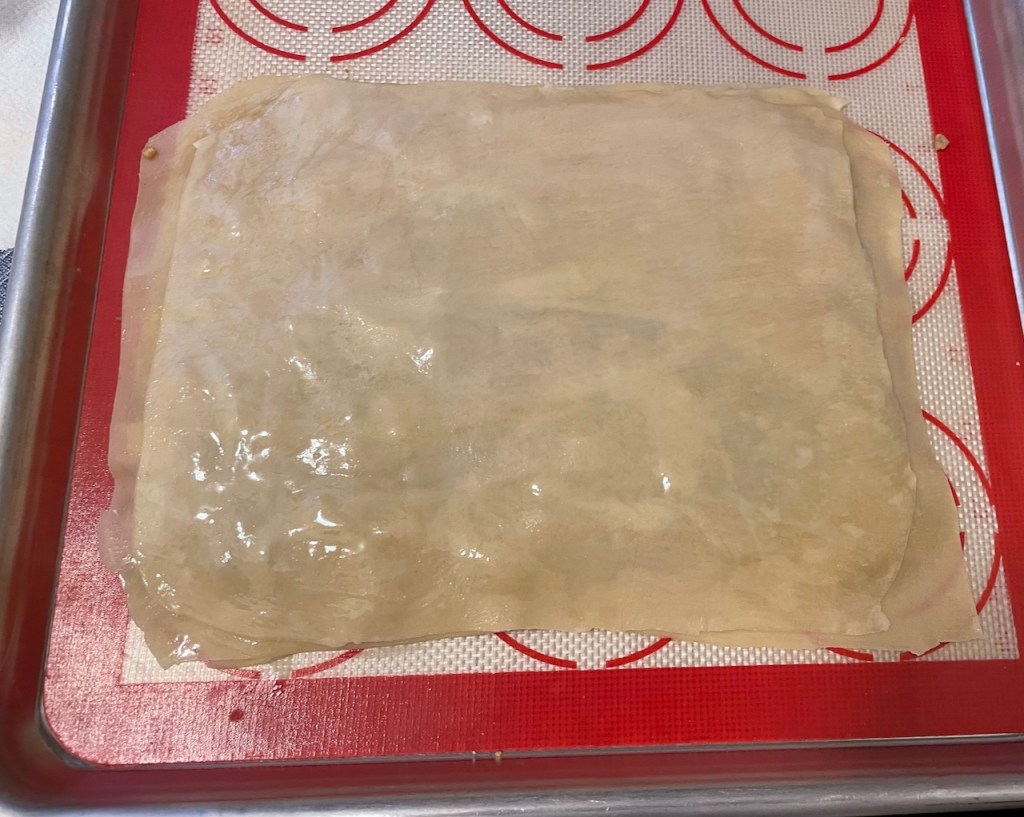
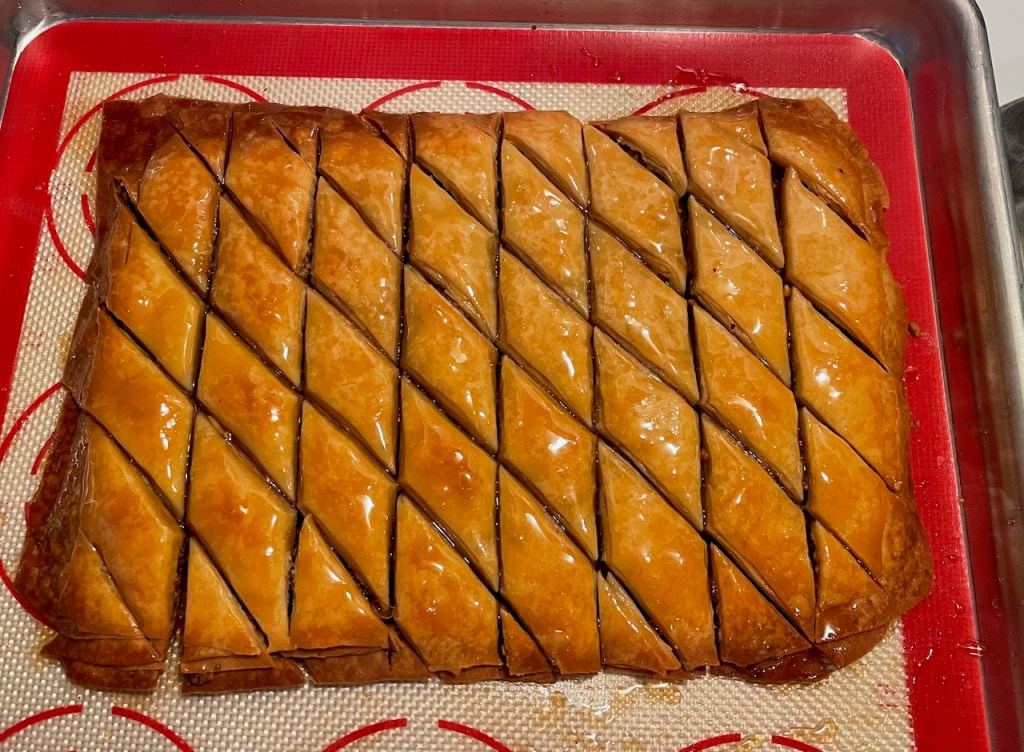
Anyway, this third attempt was more successful because I ditched the pyrex dish in favor of a sheet pan. I rolled the phyllo sheets out and just built the baklava layers on the pan. The dough behaved better and stayed thin, and I was still able to pour the syrup on and have most of it stay within the pastry. One downside was that I couldn’t use a knife to cut the diamond pattern, because I didn’t want to cut the silicone pad. Instead, I used my plastic bench scraper to make the cuts. In hindsight, I could have built the baklava on parchment and then used a knife.
TBH, my conclusion from all this is that, for baklava, I don’t think it’s worth making the phyllo dough. Baklava really needs the paper-thin sheets that you get with the bought stuff. No matter what, mine weren’t going to be that thin!
I do wonder if the Paul Hollywood cornflour method would work. I’m tempted to try, but maybe not motivated enough. Here’s why: I bought a piece of baklava from Cafe Barada a few days ago, and it was just sublime. I mean, it was light, delicate, only gently sweet. Just perfect. Why work hard to make something so inferior? This is Cafe Barada’s baklava. I mean, look at this thing of beauty…
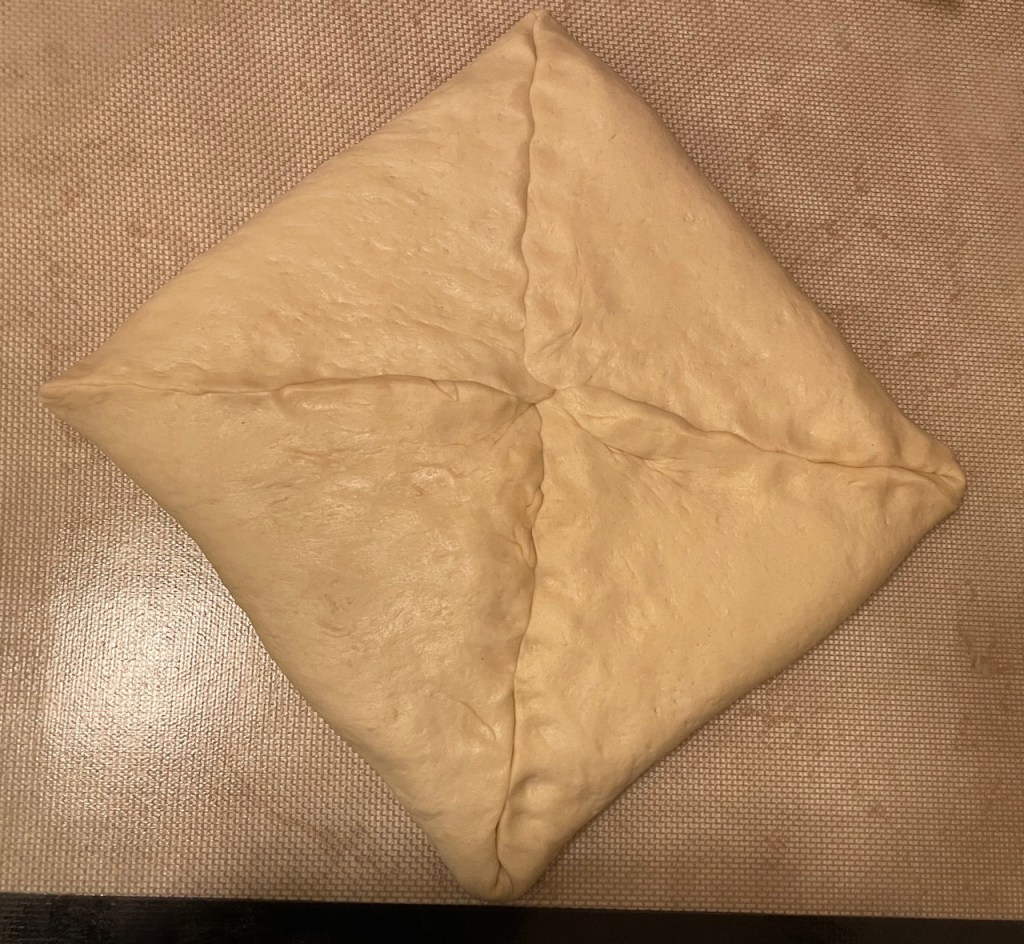
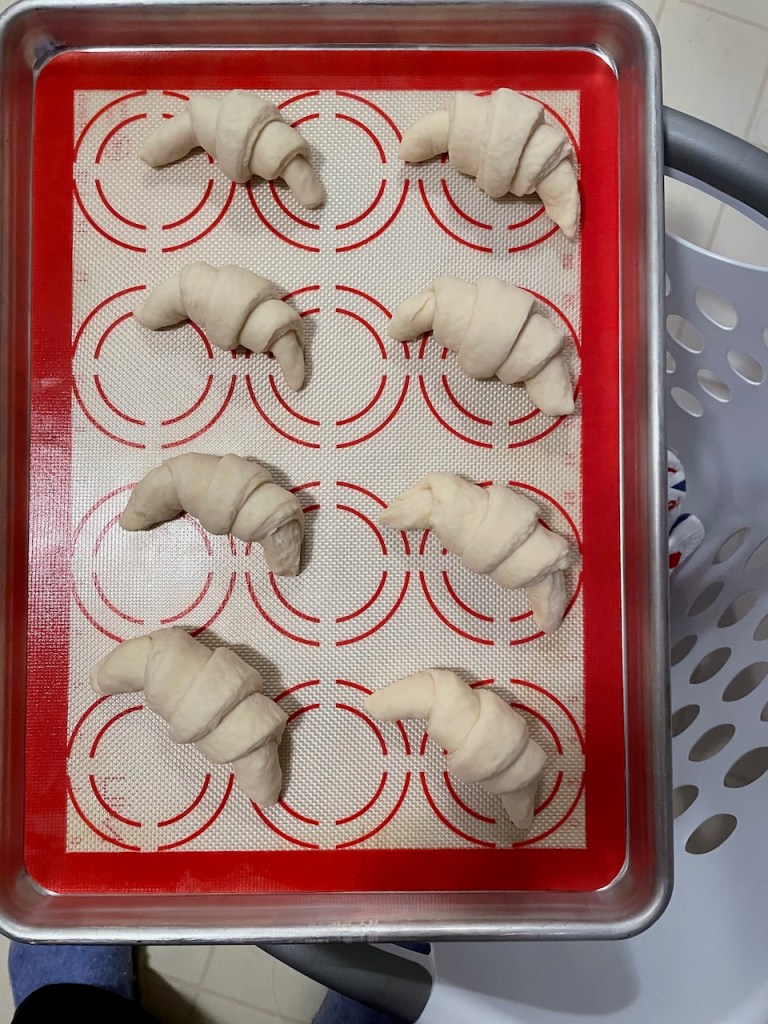
Making the Kouign Amann and the phyllo pastry pointed me towards making croissants. I have made them once (years ago), but I wanted to try again. I started by doing some research and comparing recipes and techniques from: Julia Child (Mastering the Art of French Cooking, Vol. 2), Cook’s Illustrated (Jan/Feb 2012), King Arthur Baking Company (Baker’s Companion), Shirley Corriher (BakeWise), The New York Times (recipe with link to helpful video), and two versions from Joanne Chang (one from her first cookbook, Flour, and another from a later cookbook, Pastry Love). It surprised me how varied these all were. I decided to try making a hybrid version, mostly based on the King Arthur proportions and overall volume, but using the Shirley Corriher lamination method because it had the most folds. [You can click on the table below to enlarge it.]
My biggest problem with this batch came with the second turn (after the first chill). As with the Kouign Amann, the butter got too cold and when I tried to roll out the “packet”, the butter inside broke into pieces rather than spreading out. I decided to let the dough sit and warm up before proceeding, and for the 3rd through 6th letter folds I did not chill the bundle between the folds. Instead, I let the dough sit on the counter in my cool (60°F) kitchen.
I think the lamination was OK, but that broken-butter 2nd turn wasn’t pretty.
Surprisingly, only Julia Child and Joanne Chang even raise the topic of the butter possibly breaking apart and how to avoid that. It seems to me that, given this and my previous experience with the Kouign Amann, this is a common problem. Or, is my fridge colder than most?
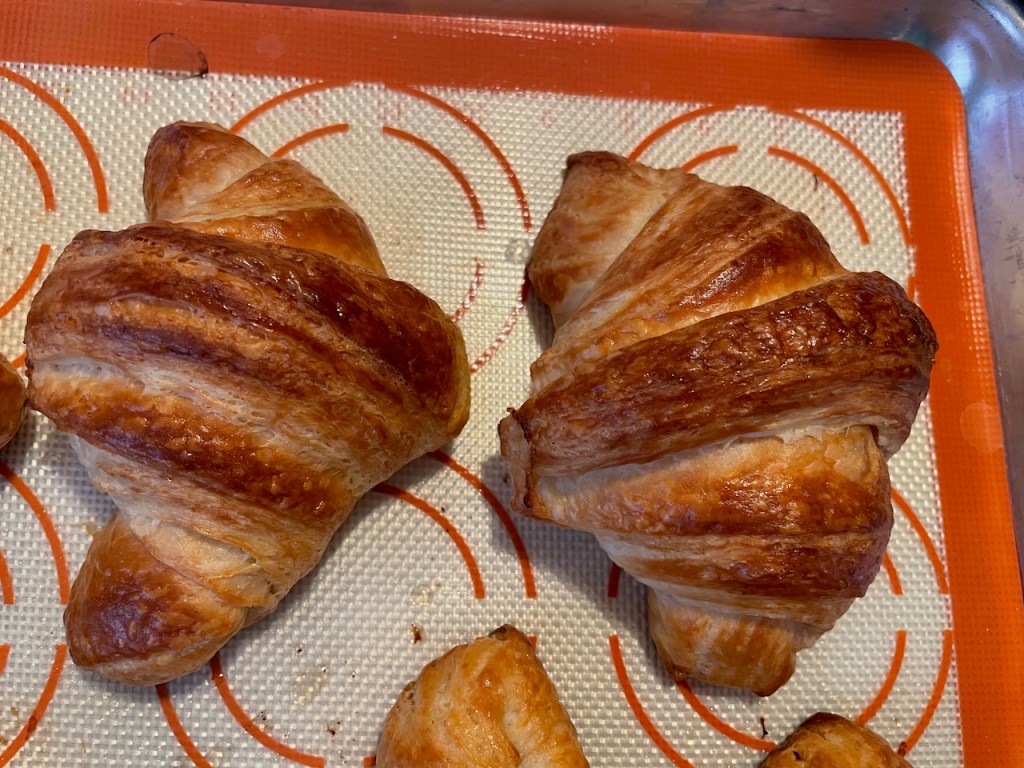
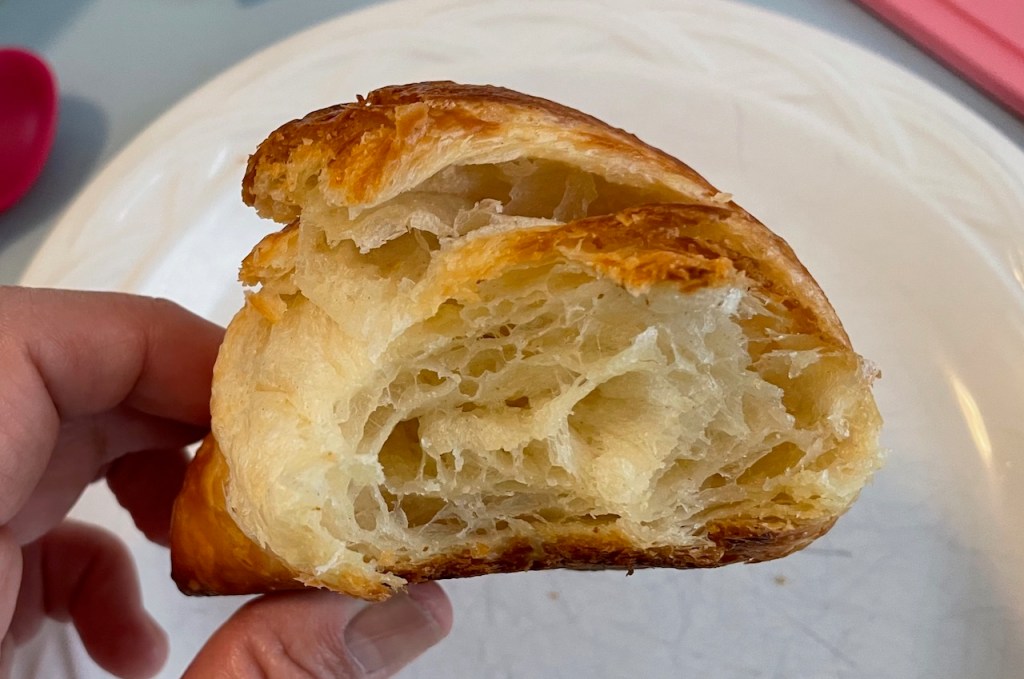
Anyway, the result was still wonderful. I ended up with a big pile of crispy, flaky, buttery croissants, and though my math says that each one was about 300 calories, I ate lots of them! I did freeze eight of them before the final proof, which worked well. The frozen ones just have to thaw and then rise, which means sitting out overnight (“Just like the Trader Joe’s croissants”, as Christine pointed out!), then bake them as with the others.
This experience made me want to make more croissants. Stay tuned!
[Yes, this is evidence that up to the posts in early December 2021, this blog was written far after-the-fact. I mean, during World War I, nobody referred to it as “World War I”, right?]
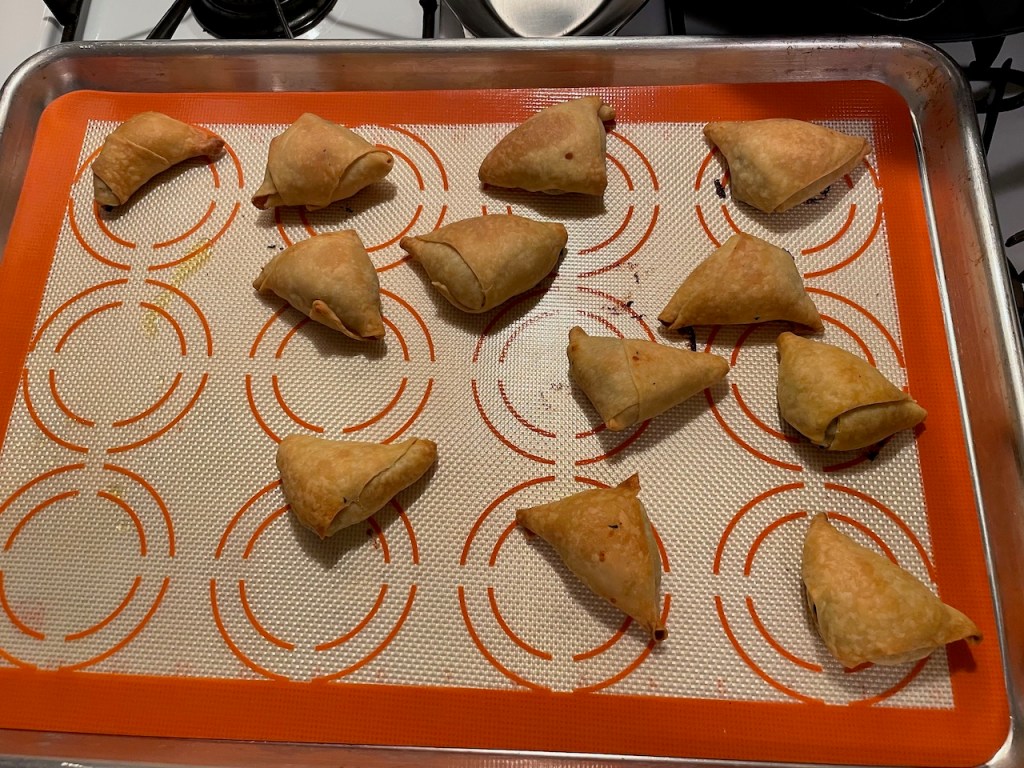
I think this one can be blamed on the Great British Baking Show, whose current season had a “technical challenge” that involved making baklava, including making the phyllo dough from scratch. But, I think also I was motivated by a big pile of fresh spinach that Chris gave me from a huge bag that she had bought at Wilson’s Farm.
I started doing some research online about it, and was frustrated by the lack of clear instructions. The New York Times has a recipe for phyllo dough, but stops before saying what to do with the dough. There is one use for it that they show (something called Hortopita), but I wanted to get into more options.
Of course, I did also check out the Paul Hollywood baklava recipe that was used for the GBBS technical challenge, but was thrown a bit by the use of “corn flour” as a separator between the layers.
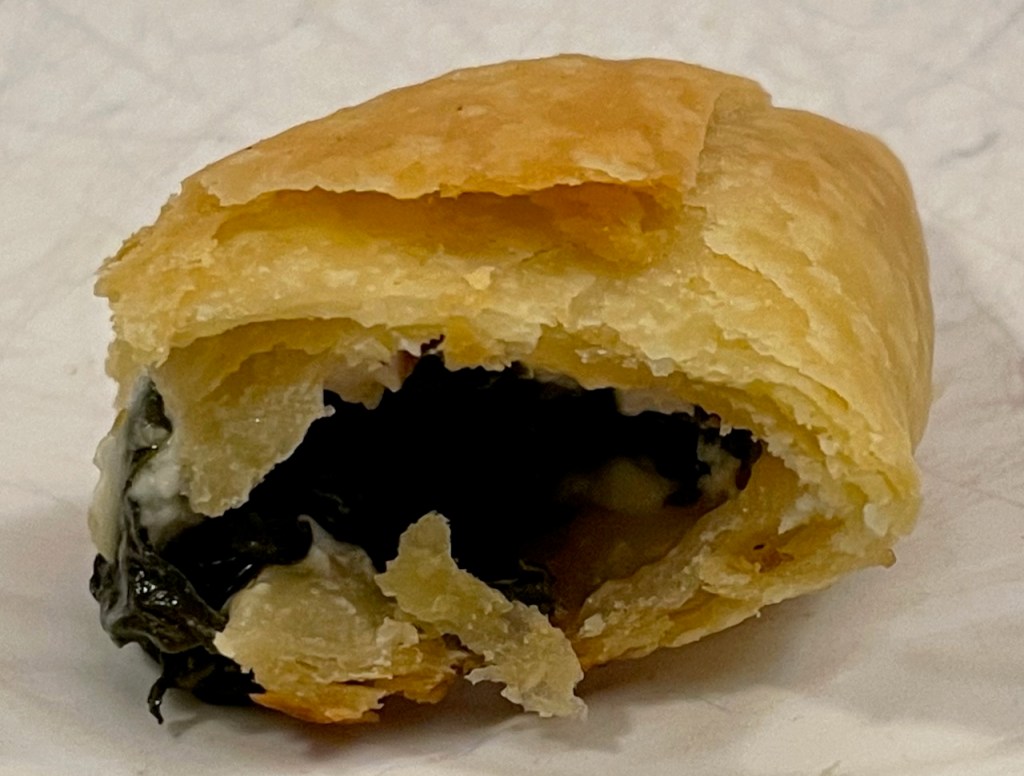
So, I did a bit of “winging it” and made spanakopita triangles. I cleaned and de-stemmed the spinach, then cooked it with diced shallot, garlic, and olive oil. When it was cooled to room temperature, I squeezed out any liquid, drained it on some paper towels to get out any remaining liquid, and stirred in some crumbled feta.
I made the phyllo dough using the NYT recipe, which involved ordering “finely ground durum flour” from King Arthur online. I rolled the dough as thin as I could, cut it into strips, buttered the strips, and then put a blob of spinach on each strip of dough and folded it up into little triangles.
These were great!I wondered if I would have better luck using a pasta roller, so my next batch (I don’t have photos, alas) went through the pasta roller and yielded thinner strips. Of course, I first experienced the sad fiasco where I rolled some dough thinner and thinner, only to then have it merge back into a blob because I hadn’t floured it enough as I went! I’m basically a pasta machine noob, and it showed. Once I got the hang of it, things went better.
The next phyllo project would be baklava, but first the croissant adventures begin…
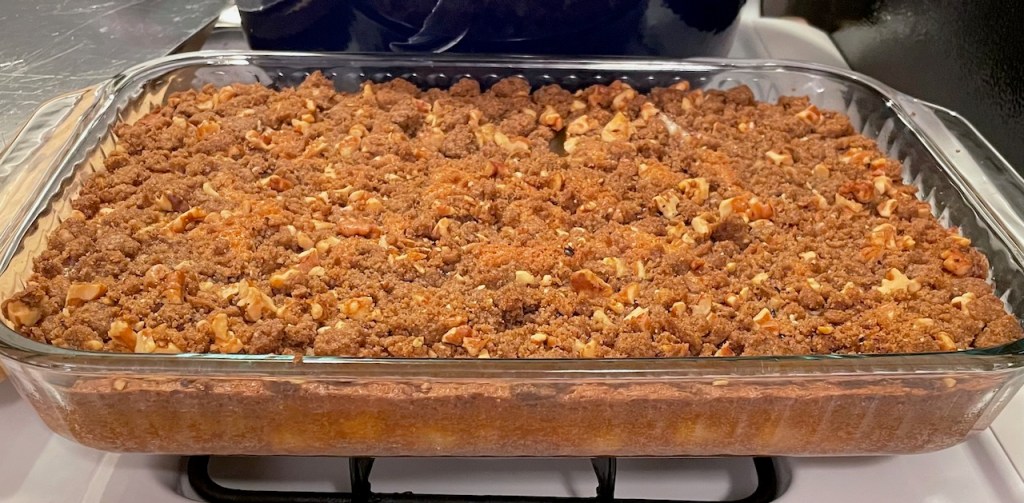
This cake was inspired by a Milk Street article about a Plum Crumb Cake from Greg and Lucy Malouf’s book “Suqar”. Since it’s October, it’s more apple season than plum, so I changed the recipe into an apple crumb cake by:
switching the plums out for apples
switching the cardamom/coriander/allspice out for cinnamon
switching the almonds out for walnuts
eliminating the almond extract (just used vanilla)
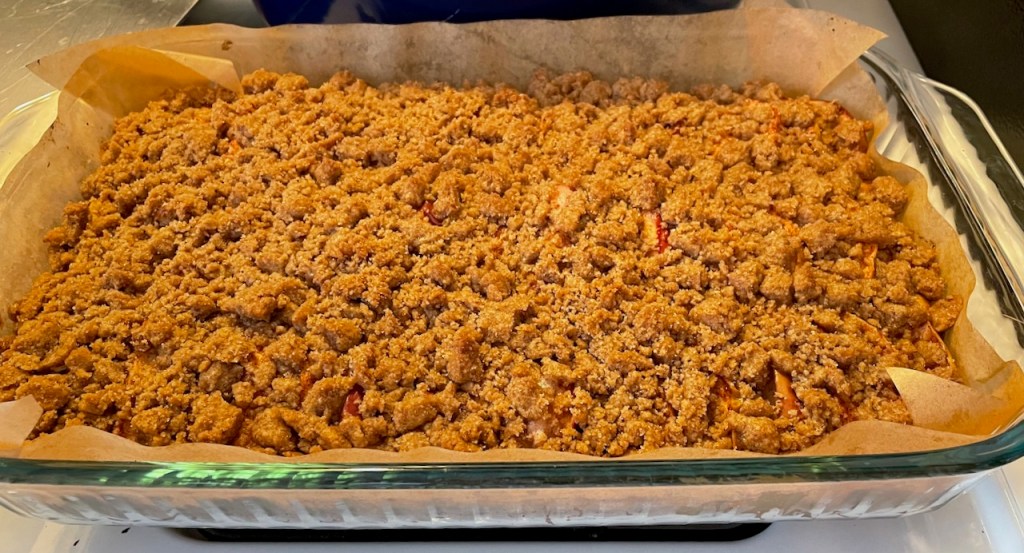
Overall, this worked. I liked the proportion of crumble to cake, and the technique of freezing the crumble and applying it partway through baking was brilliant. But then, I saw Stef and she gave me a piece of her Smitten Kitchen Apple Crumb Cake, and it put mine to shame! It was so much better. It had a higher proportion of crumb topping to cake and the topping was just better.
So, for Take 2, I used the Smitten Kitchen proportions for the crumb topping (no nuts, more butter, more flour) while still using the Milk Street / Malouf technique of freezing the crumble and adding it partway through baking. You can see I also added parchment. This cake was more successful overall, but, here’s a shocker: I overbaked it and the bottom became too dry.
I suppose this is as good a place as any to note that, through my sourdough bread adventures, I have found a solution for the problem of baked goods getting too dark on the bottom before they’re ready overall. The bread community recommends putting the bread pan on top of a broiler pan (the two-part kind that has a top layer with slots and a bottom pan to catch drippings), essentially adding an “air gap” between the baking item and the heat. Instead of using a roasting pan, I have been using an old “AirBake” cookie sheet, which I otherwise never use (I really hate this pan for baking as it intentionally screws up browning). So, when the bottom is getting done but the top isn’t ready, I just slide the AirBake underneath and the problem is solved.
Of course, one needs to recognize that one needs to do this, or it isn’t helpful. Sigh.
I should put a little information here about the apples. In Take 1, I tried three different kinds of apples (McIntosh, Fuji, and Gala) to see what I liked. In the end, it didn’t matter so much. What mattered more is that I wished I had peeled the apples. The original plum cake recipe had beautiful color from the plum skins, but this didn’t translate well to apples, whose skins are more tough. In Take 2, I peeled some McIntosh and that worked. Unlike with a pie, it was actually nice for the apples to get mushy in the cake.
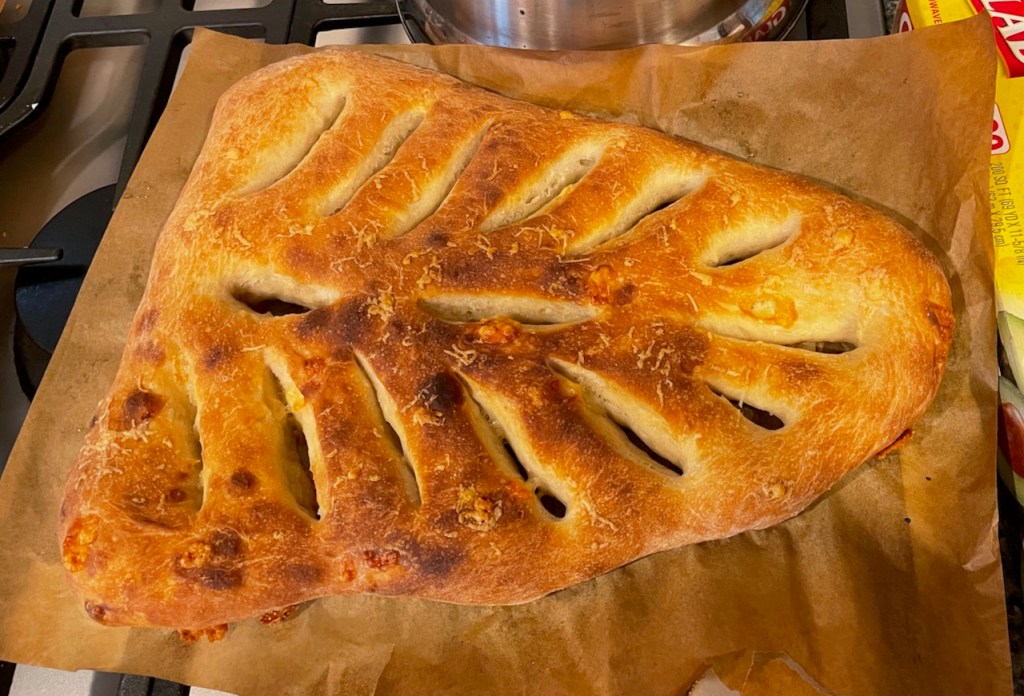
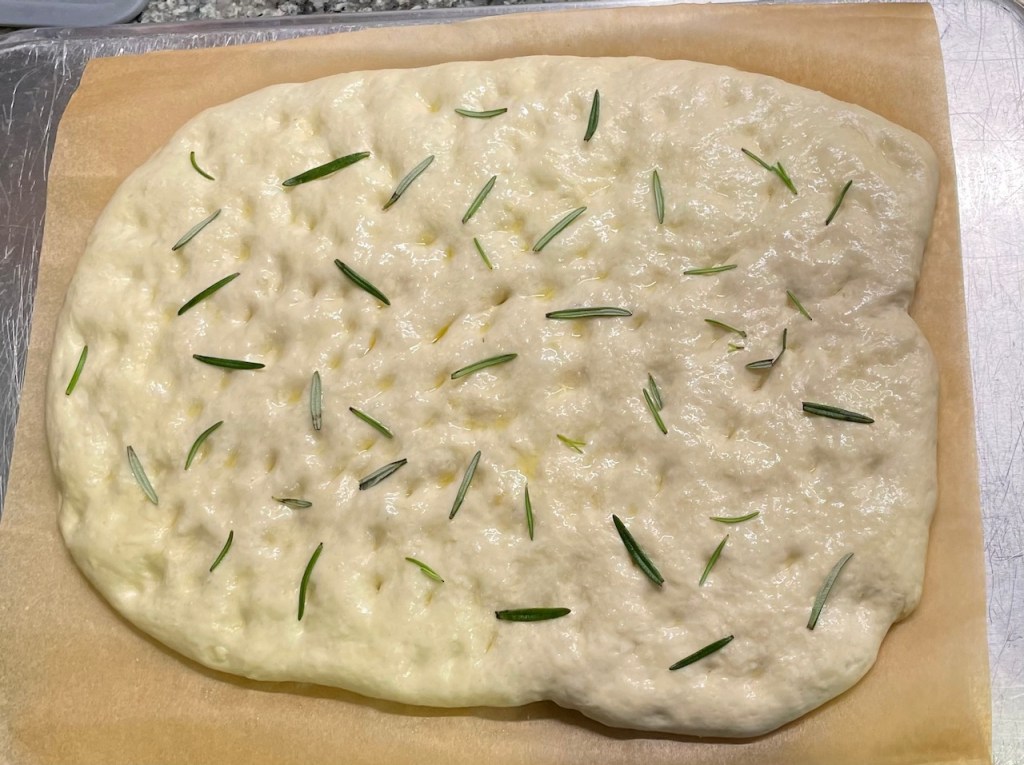
I was fortunate to be able to join in on a King Arthur baking class with Christine. The class covered fougasse and focaccia, and was a remote, interactive class. It was really fun, and we learned how to make these two lovely breads. I forgot to take a post-bake focaccia photo, so here’s a pre-bake one.
I wished that I had put more asiago cheese on/in the fougasse, and I wished that I had put more salt on/in the focaccia (also, all that rosemary fell off!).
The two loaves are very different, with the focaccia being a much lighter and more tender loaf and the fougasse being more robust. Both were wonderful!
Suffice to say that my Spring and Summer became… er… busy. And, perhaps that busy-ness left me somewhat broken in spirit by the end of the summer. It wasn’t until late-September that I even felt like baking. I mean, it took until late-September for me to pick myself off of the floor enough to actually do laundry and eat something other than matzoh spread with peanut butter (both of which happened to already be lying about the house). (Actually, I ran out of peanut butter at some point and resorted to smearing butter on the matzoh.)
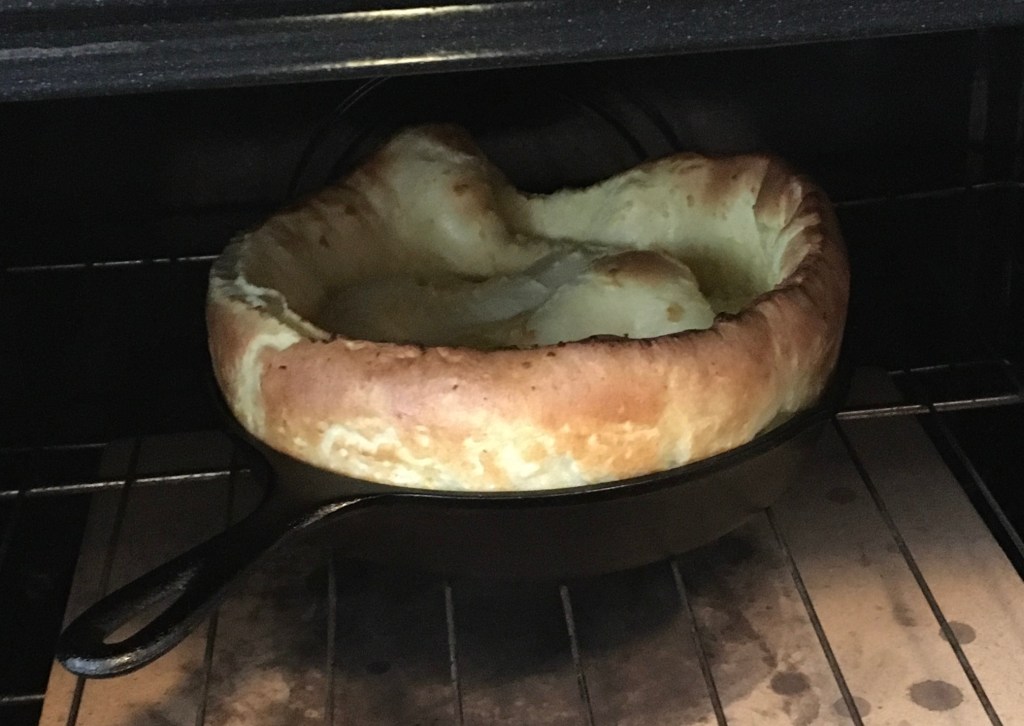
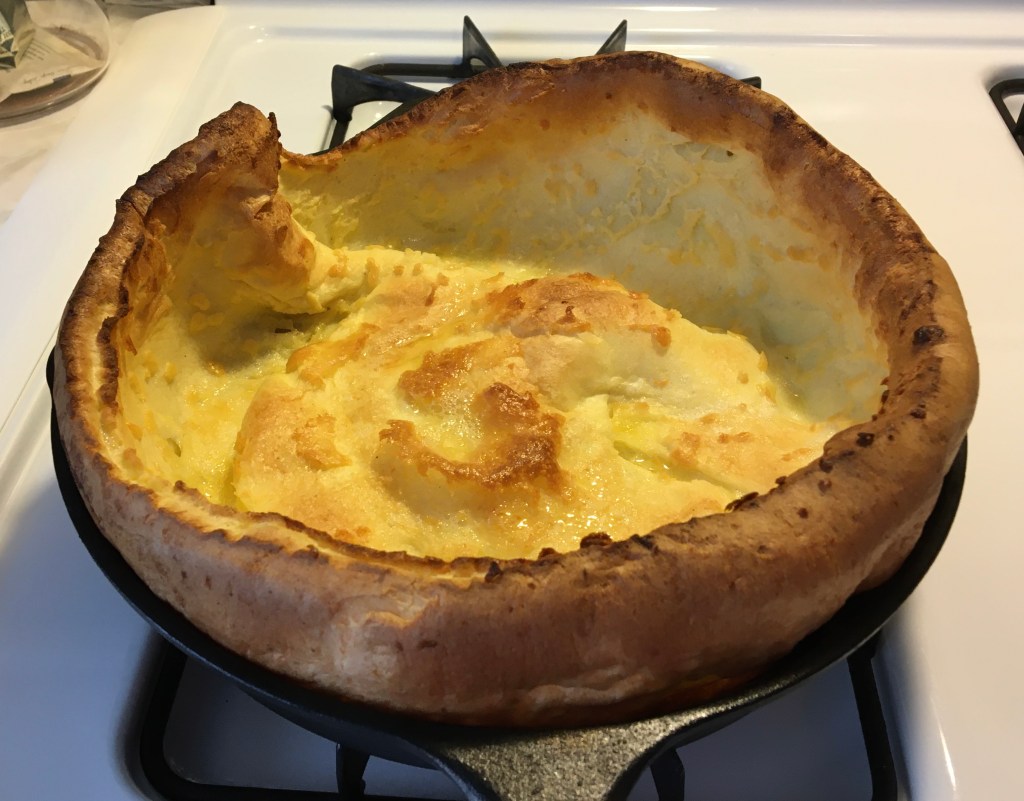
This recipe is the one that drew me back. Cook’s Illustrated does it again with a lovely article about Kouign Amann, and I felt motivated enough to both thaw butter and wake up my sourdough starter. Both a Kouign Amann and a sourdough loaf were produced on the same day. And maybe some laundry got done too.
I’m a noob with laminated dough, so this was the start of a learning curve that I’m still climbing. Some notes from this first attempt:
I could tell that the butter broke into pieces within the dough on some of the earliest turns. The instructions to chill the dough/butter packet is complicated to me, because this instruction consistently causes the butter to get too cold to roll out. It took several weeks to find some solutions to this, but that story is for other posts.
For this first attempt, you can see in the photo that I didn’t get the pretty scored diamonds that Cook’s has in their photo. This is because my dough became, essentially, butter-fried brioche, with the butter all mixed in and melting out into the pan. I mean, “butter-fried brioche” is still a wonder to eat, but it wasn’t what this recipe was going for.
The dough in this recipe is rather high hydration, so it’s more liquid-y than dough-y. I would have been happier if they would have said so in the recipe instead of using words like “smooth and elastic” and “roll out” as opposed to “soft and bubbly” and “stretch out”. Their comments on their website clarified that it’s a liquid-y dough. BTW, this dough consistency adds to the problem with the butter breaking. The chilled butter is just too different in texture from a liquid-y dough. In my view, the butter needs to be rather soft to be folded with the high-hydration dough.
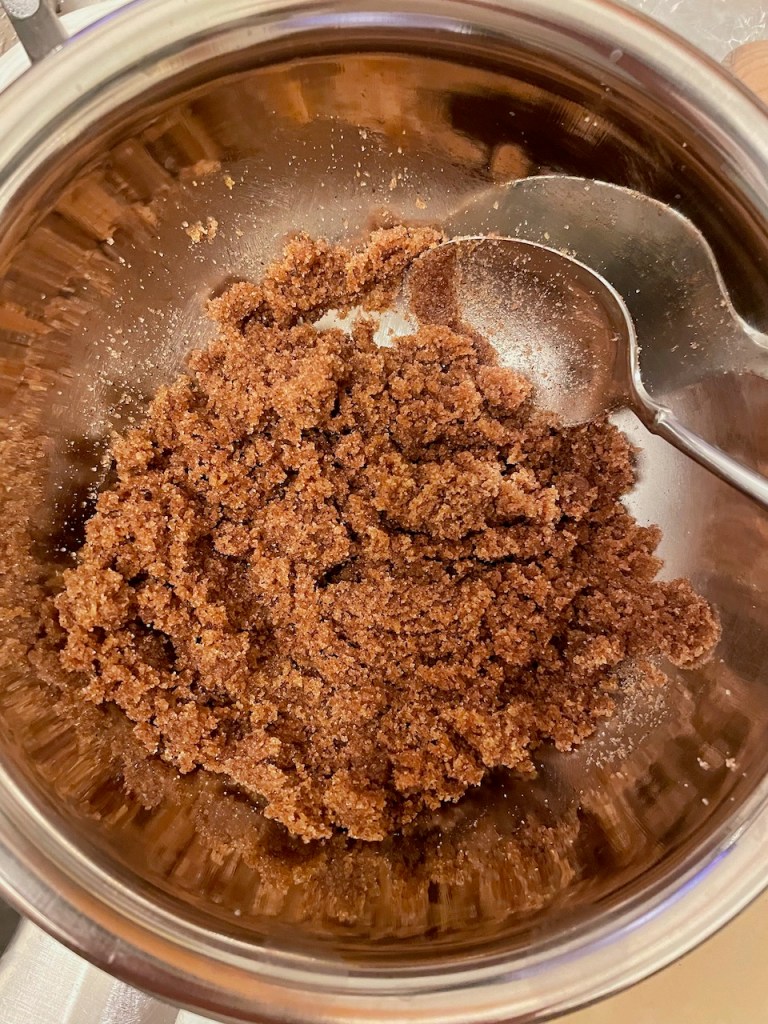
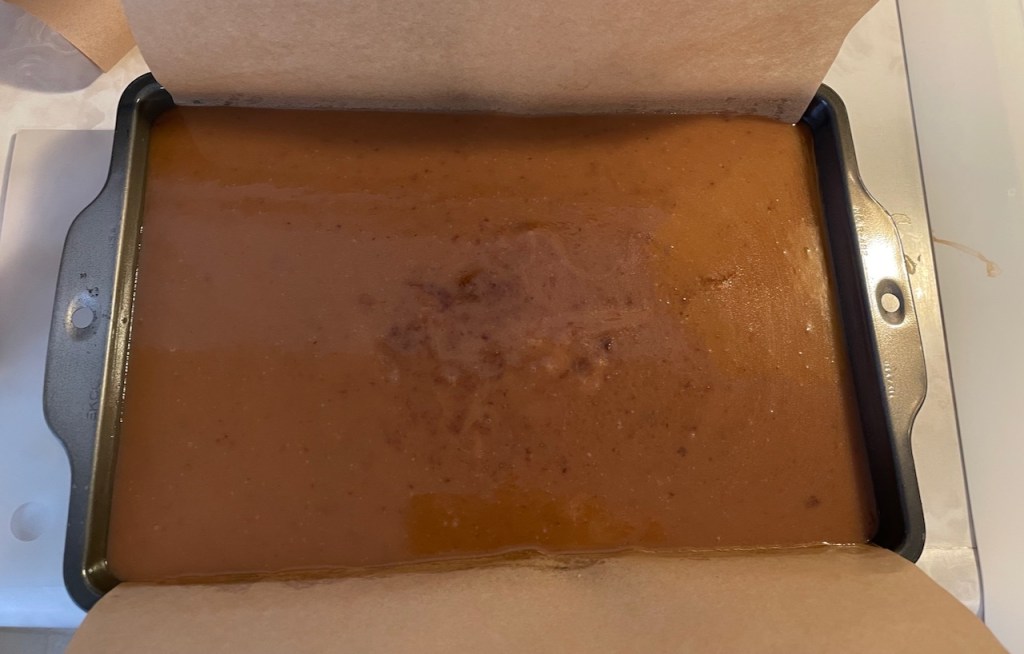
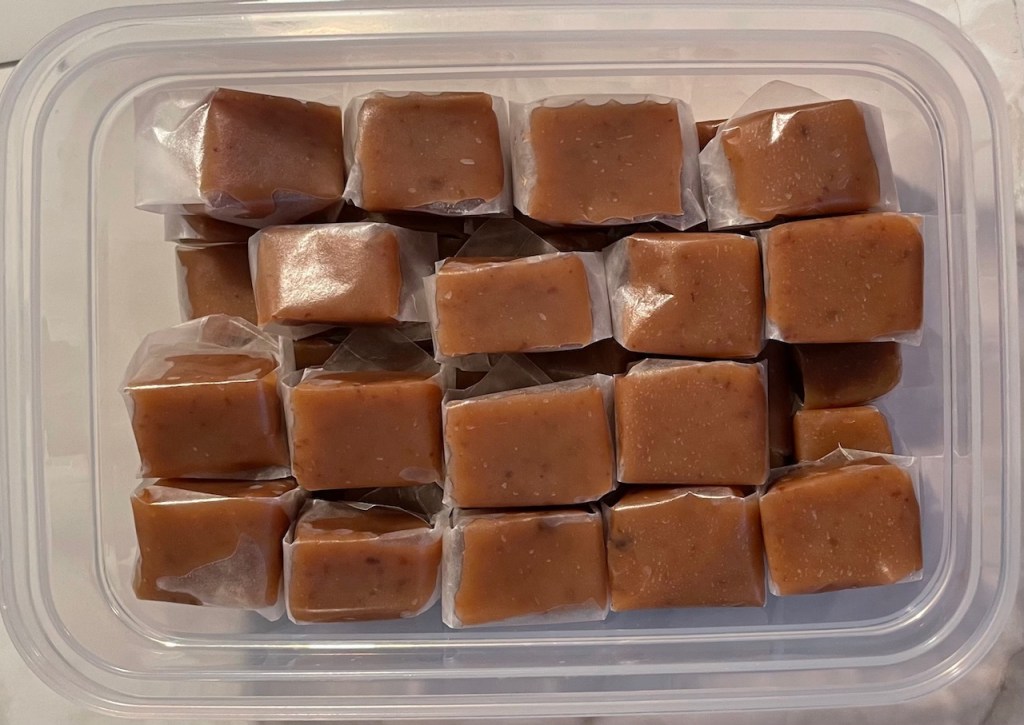
Bev and Ray generously sent me a tin of their amazing handmade caramels, and were additionally generous in sharing the recipe with me. I haven’t tried anything in the candy-making arena in over 15 years, since before I had a gas stove. In my prior residence, I did try to make caramel frosting on an electric stove and was constantly frustrated by the temperature bouncing up and down with the electric stove coil cycling on and off. These caramels were a good incentive to try again with the gas stove (and the amazing ChefAlarm thermometer, which Bev also uses and recommends!)
First observation is that this recipe calls for many, many, forms of sugar (and why shouldn’t it?). Second observation is that absolutely no-one will be surprised to hear that I somehow managed to overcook these. There was a little bit of burnt caramel on the bottom of the pan and I mistakenly scraped that up and it got mixed in. You can see the patch of dark stuff in the middle of the pan. I actually liked the addition of the burnt caramel flavor, but the issue is that the burnt part was also a bit harder, so the texture was off. I managed to contain the burnt part to one area of the finished product, so there were many caramels that were fine.
So, in my mental list of things that really don’t work with my tendency towards “bien cuit”, caramels are now included.
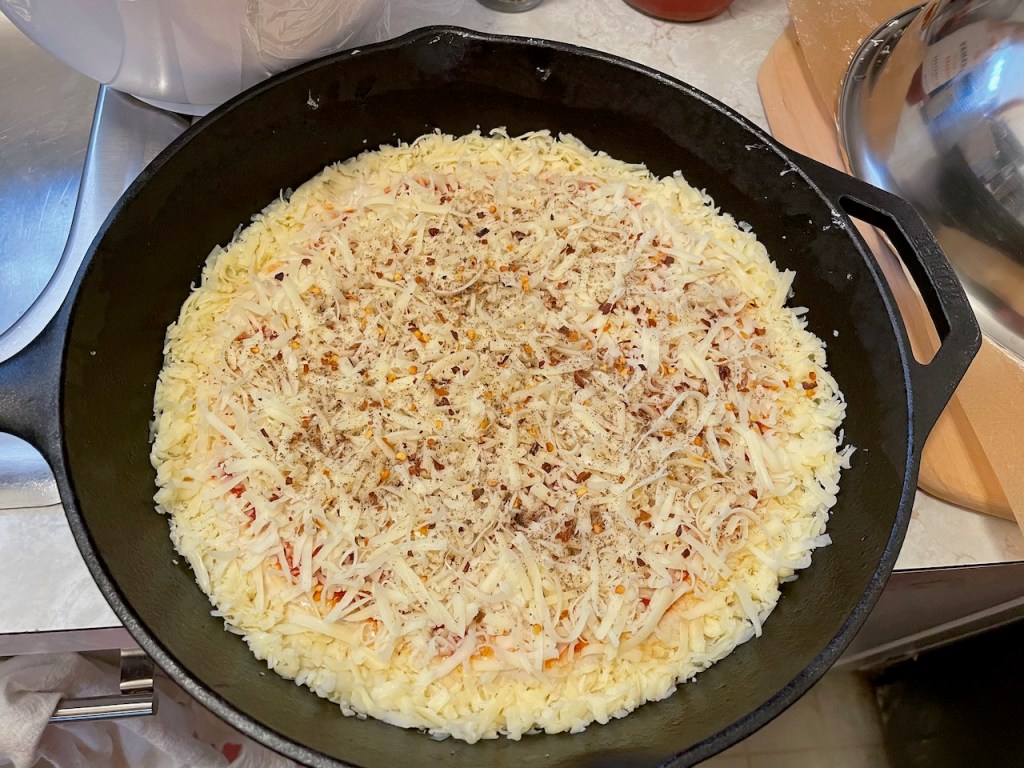
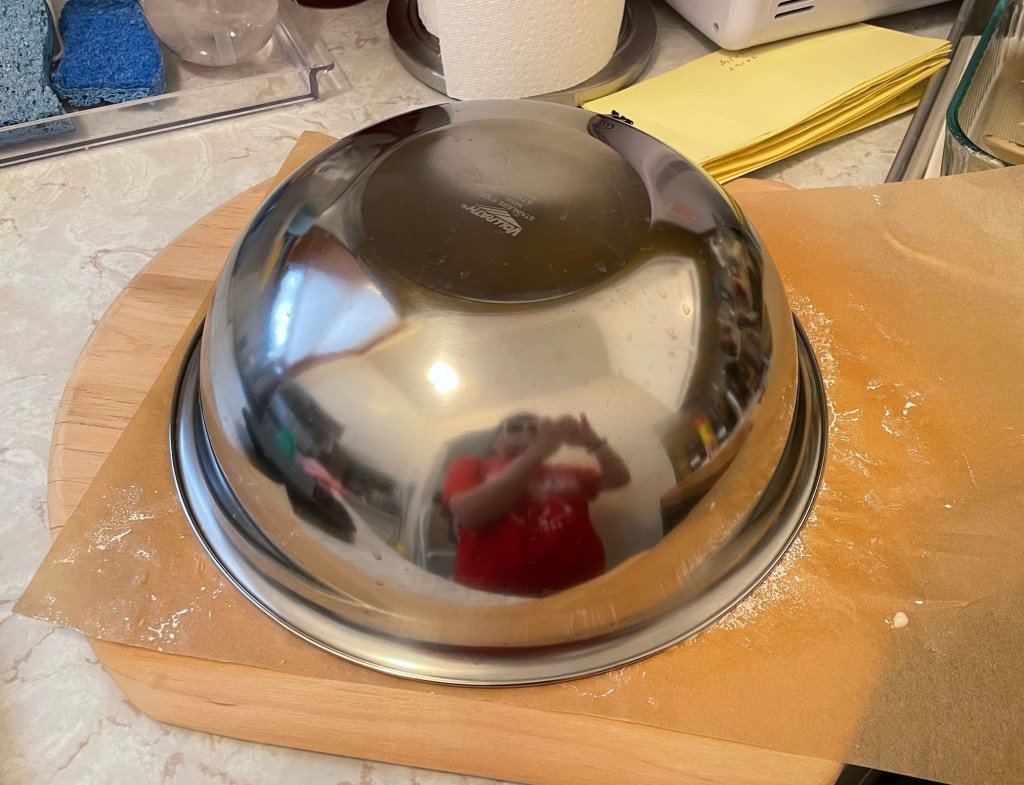
Inspired by several things, notably: Cook’s Illustrated article/recipe about Cast Iron Pan Pizza, and Dan’s adventures with “South Shore Bar Pizza” (and his amazing Facebook photos!), I decided to wing it and try to make a sourdough version.
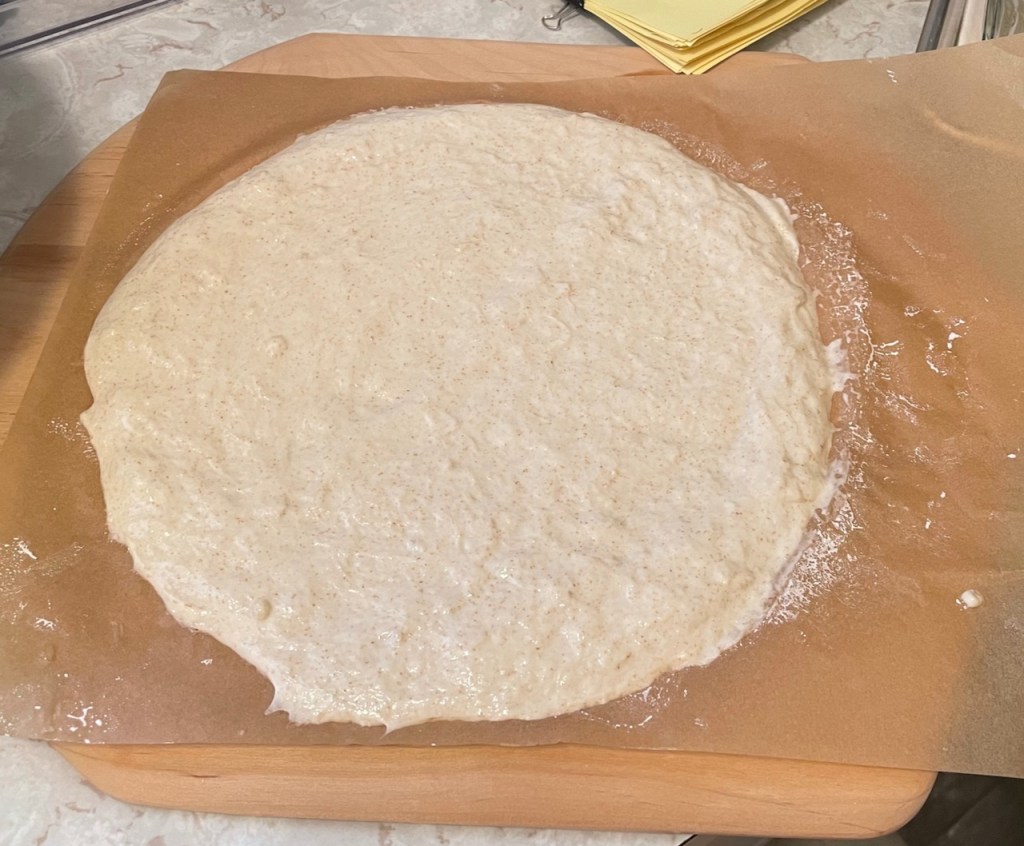
I started with a one-loaf batch of Tartine bread, but increased the proportion of bread flour slightly (+25g), then divided it into two parts to make two pan pizzas.
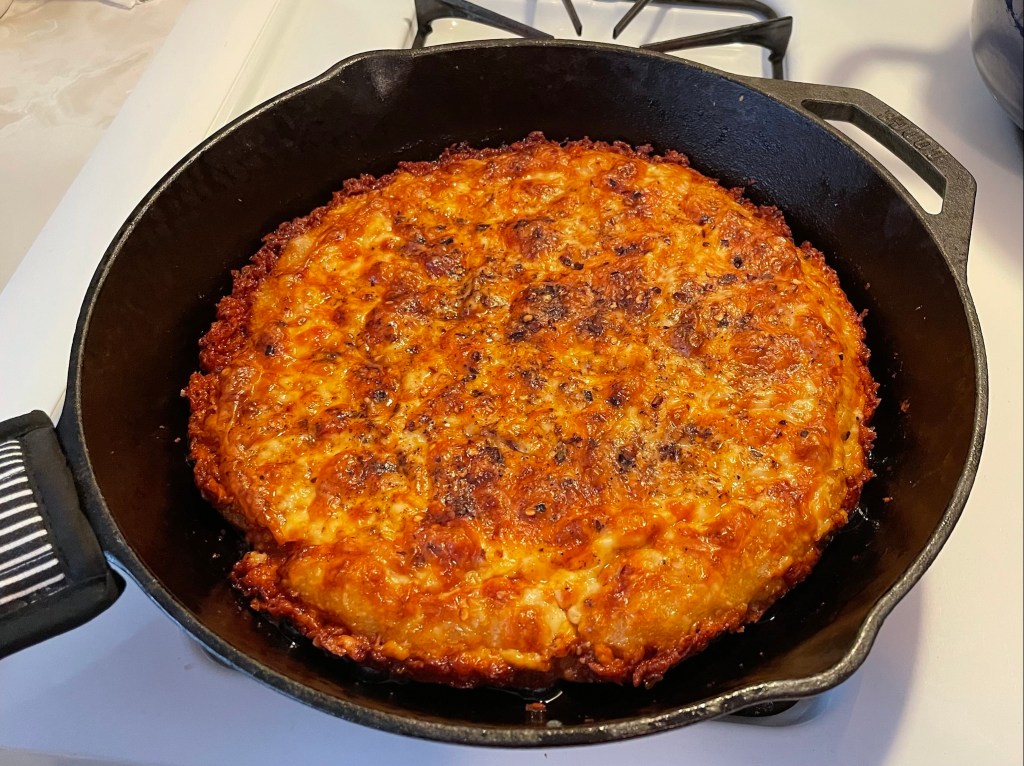
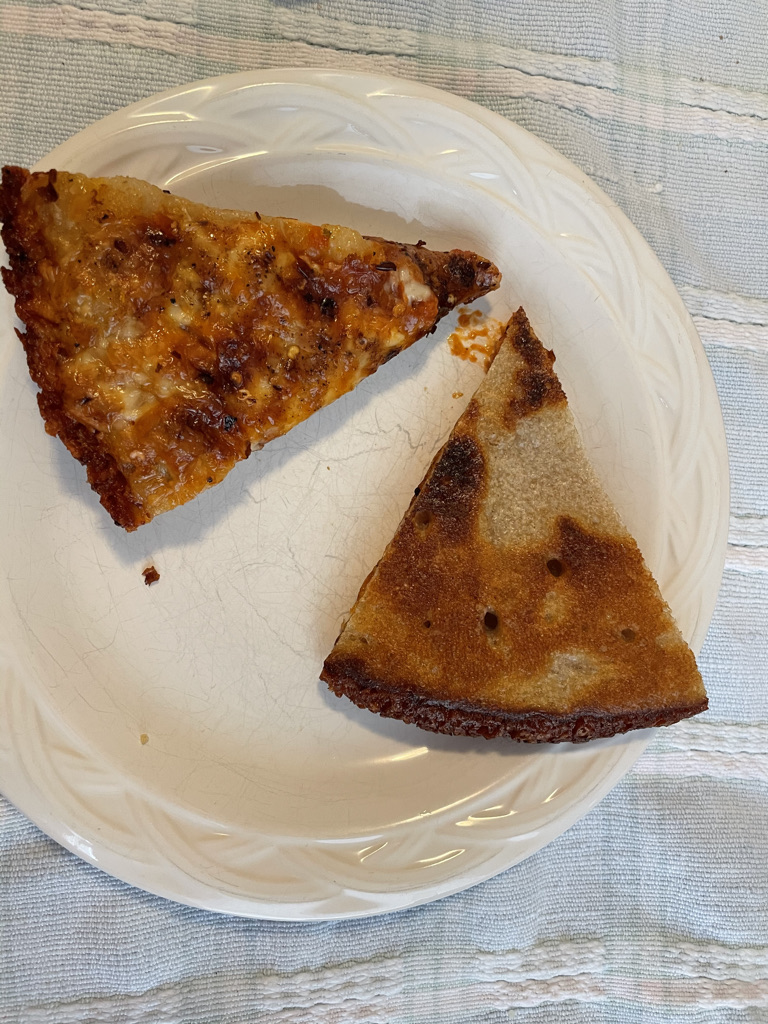
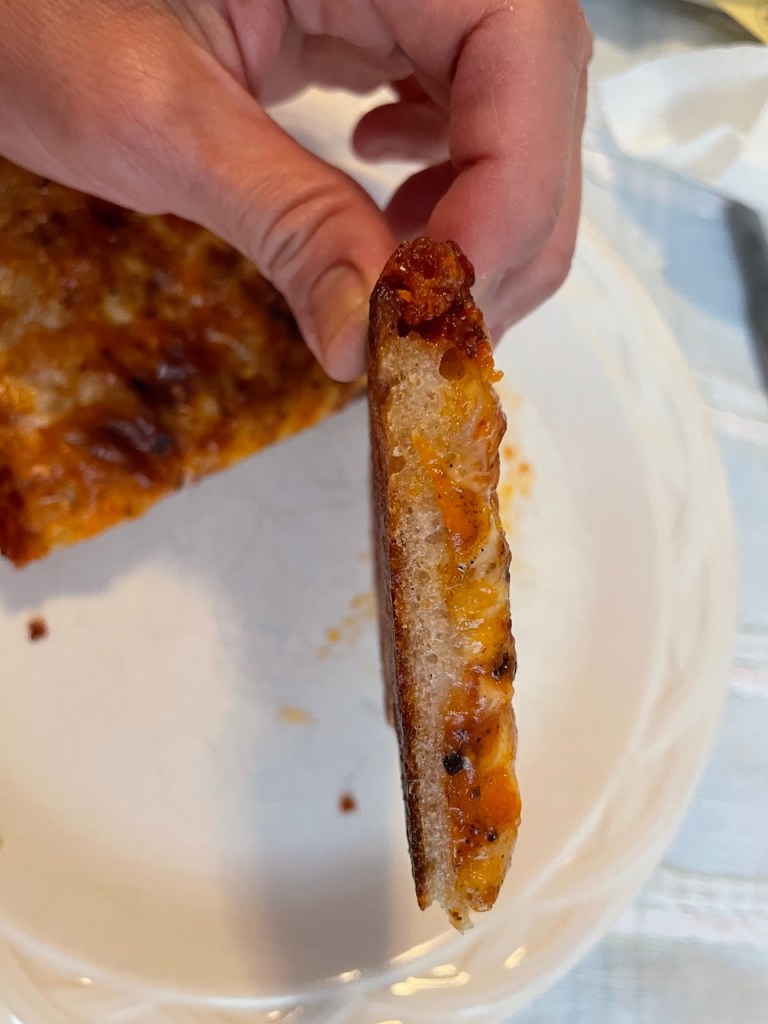
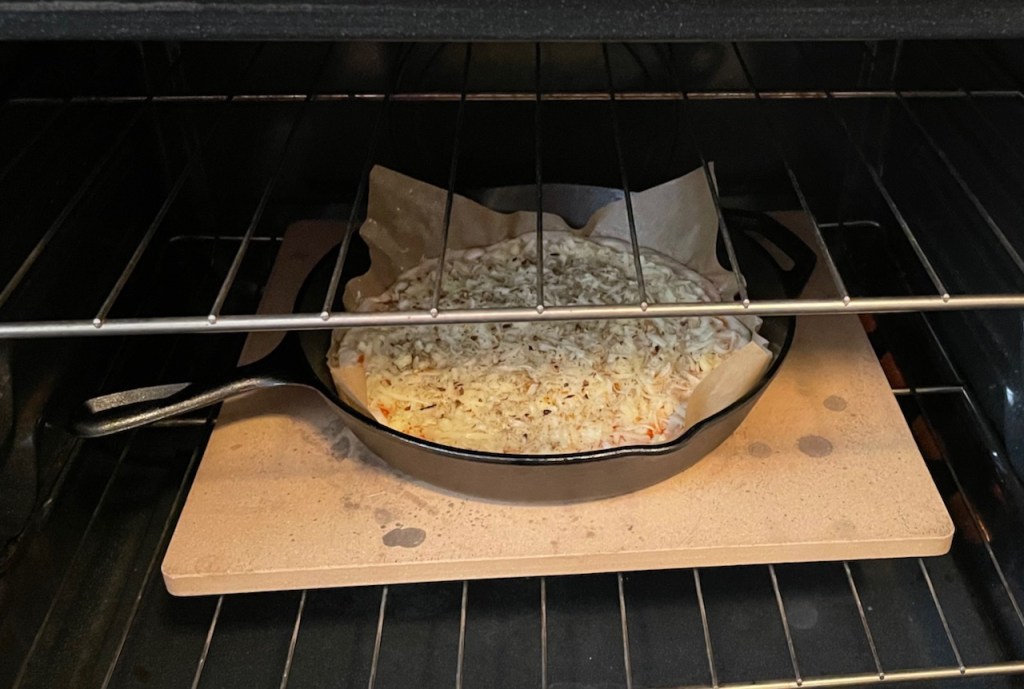
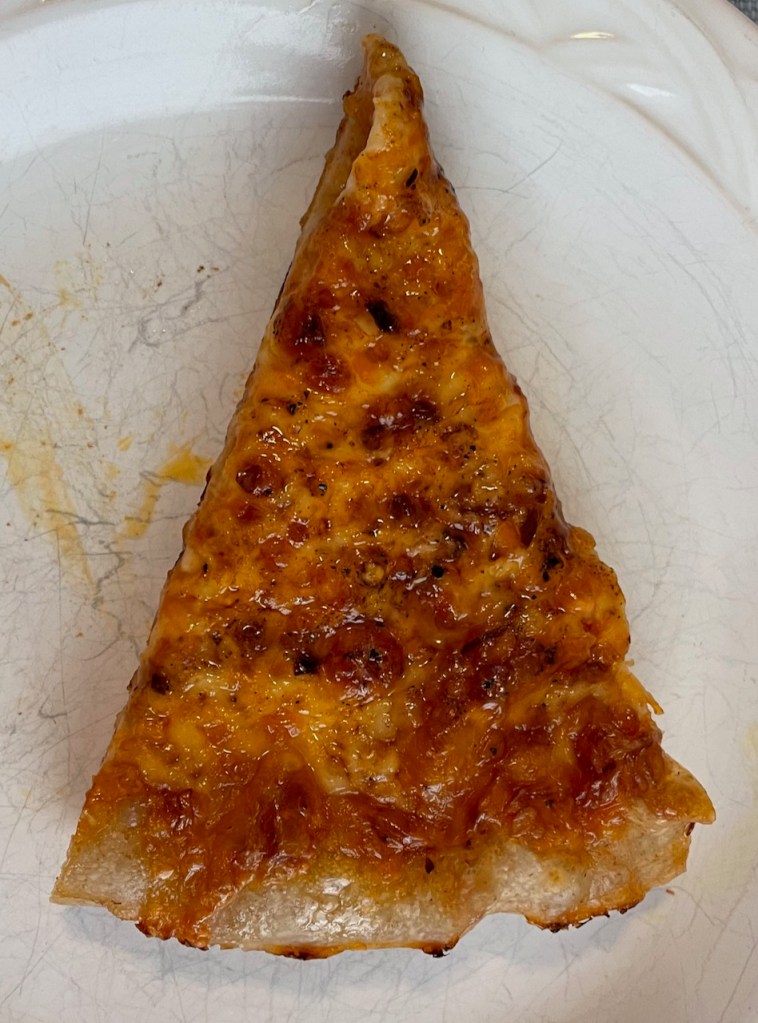
I was interested in Cook’s Illustrated’s suggestion to build the pizza in an unheated cast iron skillet and had received conflicting advice from a friend that the pan should be preheated, so I handled the two pizzas differently to see what would happen. Here’s the first one, built in an unheated pan then baked with the pan placed directly on the preheated baking stone. For both pizzas, I followed the Cook’s advice to finish the bottom of the pizza by placing the pan (with pizza in it, of course) on the stovetop for 1-2 minutes. Note the frico cheese edge, which was excellent, but I overbaked this by about 5 minutes (anyone else sensing that this is a theme for me??) so the frico got a little crunchier than would be ideal.
And here’s the second pizza. I built it on a piece of parchment on a pizza peel. I was just barely able to fit it under my largest bowl for the rest, and this was the exact size of the cast iron pan. The high-hydration dough definitely adheres to the parchment, but since the whole thing (including parchment) will get transferred to the cast iron skillet, the sticking doesn’t matter at this point. The parchment was easy to remove before putting the pizza on the stovetop for finishing. I decided not to make the frico on this one, but I guess I could have. It might be a little perilous to put the cheese around the edge with the pan already really hot, but it should be possible.
So the bottom line is that both methods worked! And, making two pizzas kinda dictates that a mixed method is necessary (since the cast iron pan will be cool for the first one and already hot for the second one).
Throughout my Tartine Sourdough Bread adventure it has proven consistently true that whenever I start to get confident that I might know what I’m doing, something happens to remind me that I really don’t. Winging it on pizza made with sourdough but without a recipe was pretty bold, but it seems I got away with it this time!
Pate a choux (profiteroles)Pastry creamGanacheEclair
It’s really just not possible to watch the Great British Baking Show at any length and not want to make choux buns. Especially in the earlier seasons, one could easily conclude that choux pastry held the keys to the kingdom. On TV, the stuff really does look magical. It goes into the oven looking like little kiss-shaped things, but it come out looking like big, puffy balloons. Pastry magic!
Also, Cook’s Illustrated ran an article about Choux au Craquelin that pushed me over the edge. Choux had to happen.
I’ve made choux before, and have even taken a one-day pastry class from the queen herself (Joanne Chang) which included choux. It never struck me as that difficult, but it seems that the GBBS contestants are often asked to make choux without the benefit of an actual recipe. For me, and for pretty much any typical home cook, this would not be possible.
I forgot to take notes on these, but I did take pictures (not usually this careless!). I hazily recall being irked that whatever recipe I used called for a 1″ piping tip, but I found that there really is no such thing for the home baker. I have since managed to find one, but it can’t be used with most couplers. This launched a whole piping tip buying project that I won’t bore you with. Another project that I wouldn’t normally have time for.
I note that my eclair looks “informal”, as Prue Leith might say. Paul Hollywood would say that it looks like it’s been dropped on the floor. Nonetheless, I do remember that it was very satisfying to eat.
Though this is a post about Tattie Scones, I’m first going to write about mashed potatoes. Credit must be given to Food52 and The Daily Spud for pointing me towards the experts and the method. The recipe mostly came from Shirley Corriher’s Cookwise, in which she credits Jeffrey Steingarten.
Who knew that there was science to this seemingly simple food (mashed potatoes), but there it is. And I’m a believer. The process is fussy and takes a while, but the results are wonderful. A perfect pandemic cooking project! And, I can report that the leftovers (nuked with another ¼ T of butter) are just as good as the original result. Really nummy.
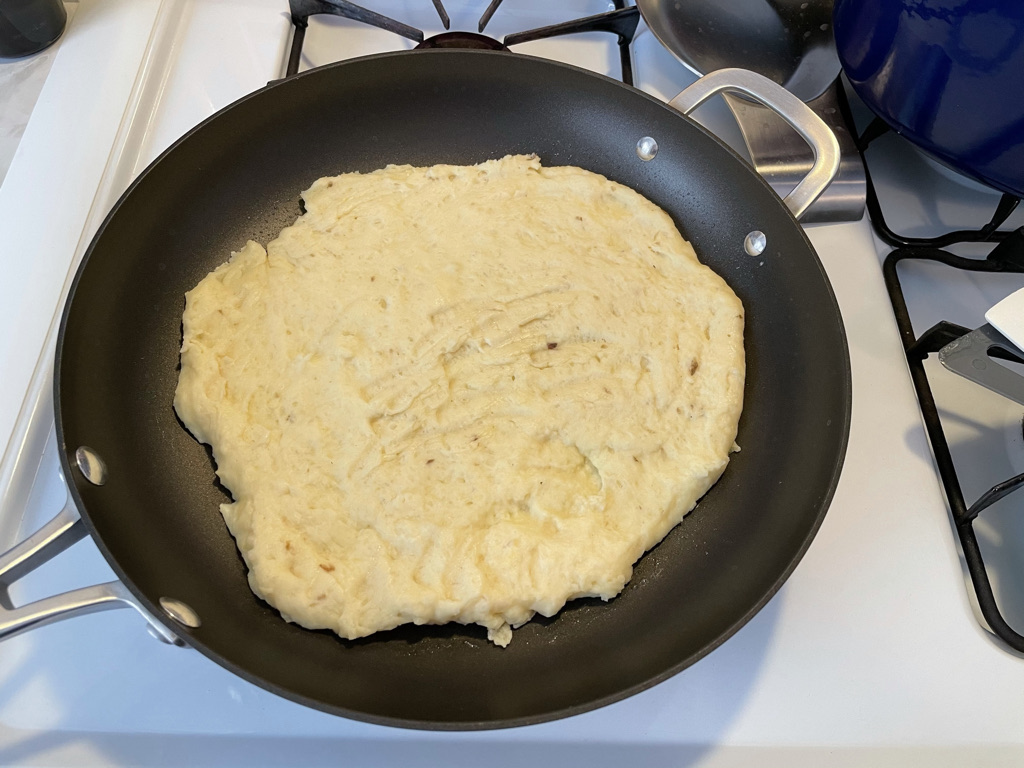
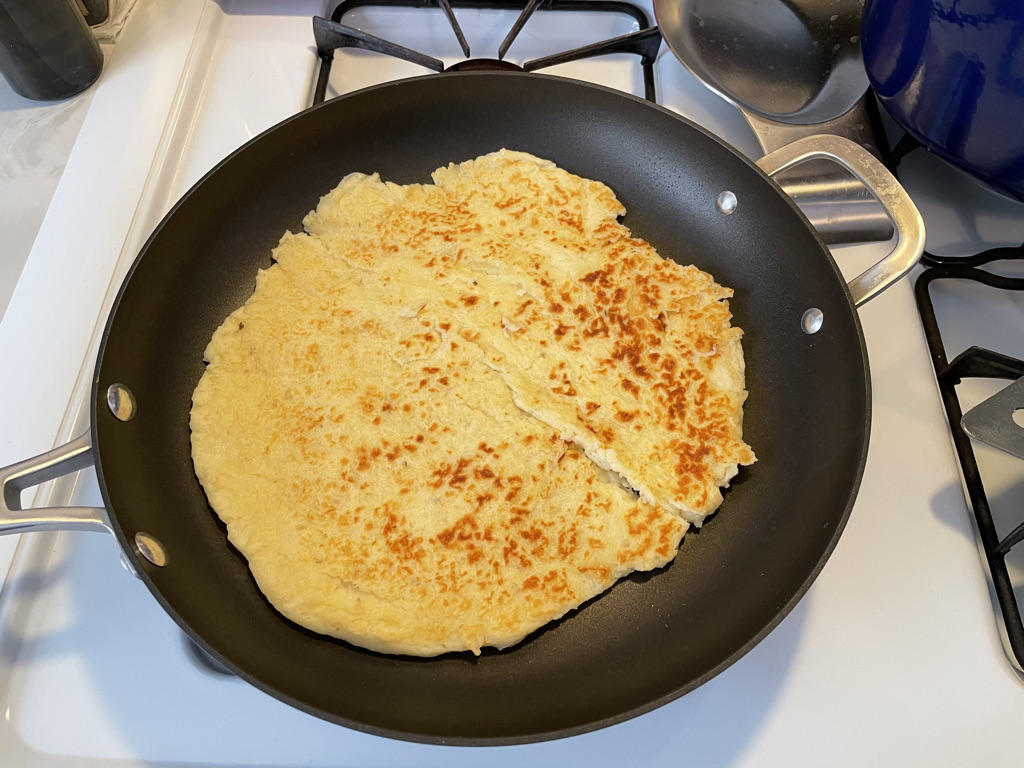
So, then there were leftover mashed potatoes and a timely watching of an old episode of the Great British Baking Show in which James Morton (the Scot) made Tattie Scones during Bread Week. I gave it a whirl, using the SpruceEats recipe, but I already had butter and dairy in the mashed potatoes so I tweaked it accordingly. They came out beautifully, even with a marginally successful (read = “unsuccessful”) pan flip. I had them with some Easter ham (thank you, Mike and Chris!) and was verrrrry happy.
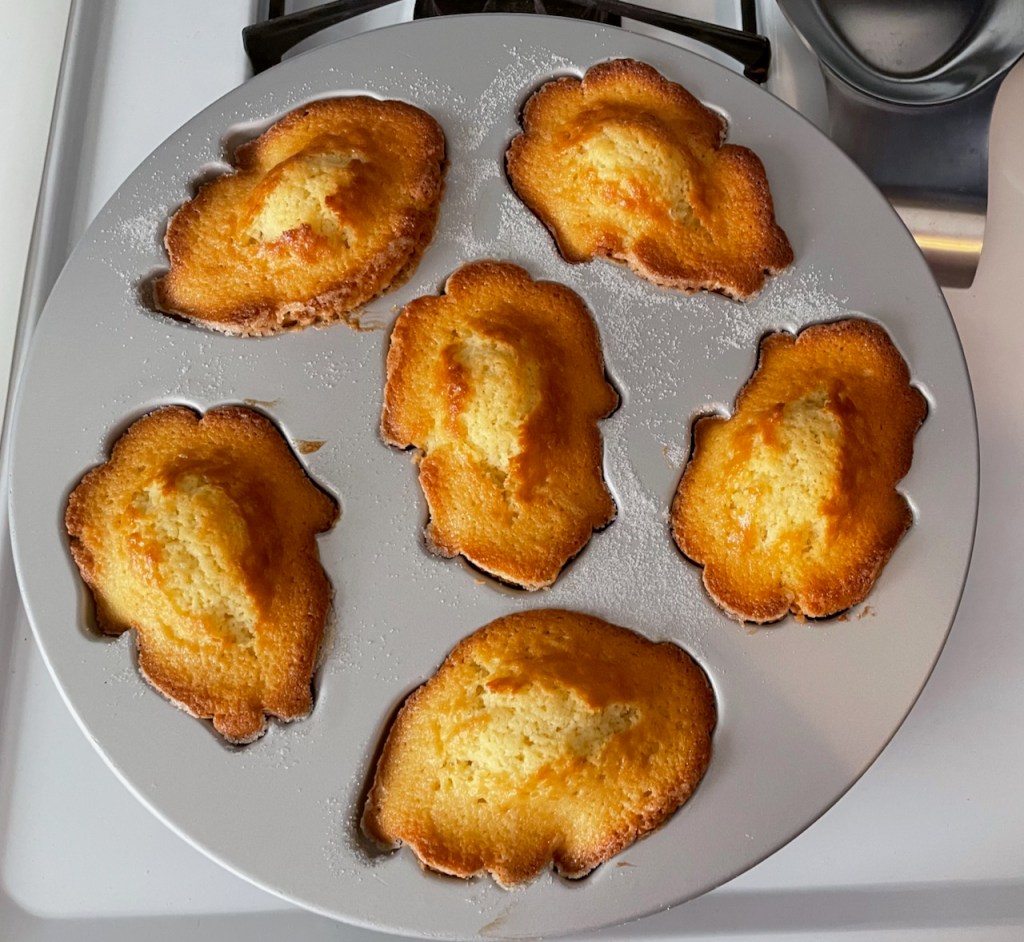
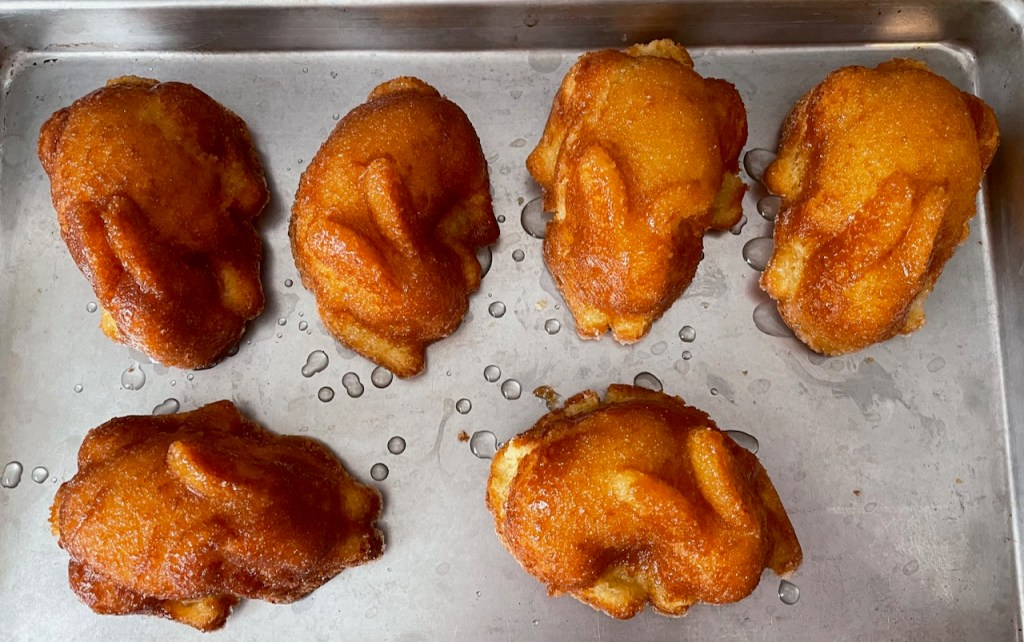
Buying this cake pan was something of a pandemic-depression-induced shopping whim. But that said, it’s also incredibly cute, and I am glad to have had the right occasion for using it. It was a significant headache getting the cakes out of the pan. A light layer of Crisco and fine sugar wasn’t enough, so I either need to buy baking spray or use more Crisco next time.
I haven’t written yet about Maida Heatter, so it’s high time. Christine got me into Maida Heatter’s cookbooks. Maida writes ever so clearly and reassuringly. It’s not uncommon for her to include the words “this is OK” in the recipe, lest you panic upon seeing a crack develop or some other such phenomenon. She’s a real home baker (she produced desserts for her husband’s restaurant from her home); she writes as a home baker and she writes to the home baker. She’s a goddess. I own all of her cookbooks, even ones that have been out of print for years. They all are littered with post-it notes flagging recipes I want to try.
One year, Chris and I baked our way through one of Maida’s cake chapters, alternating who made which recipe and then getting together to “share bakery”. It was delightful.
These bunny cakes used Maida’s “East 62nd Street Lemon Cake” from her Book of Great Desserts. There is a New York Times article about how this cake was part of making her famous, and there’s a link to the recipe in the article.
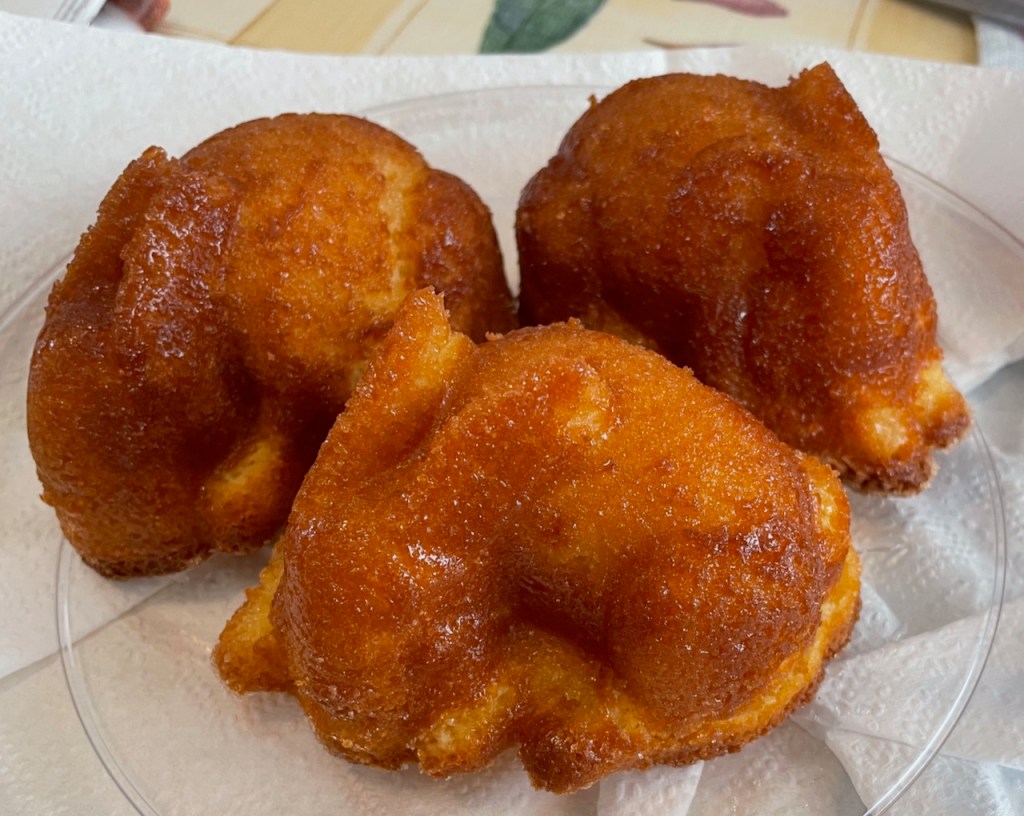
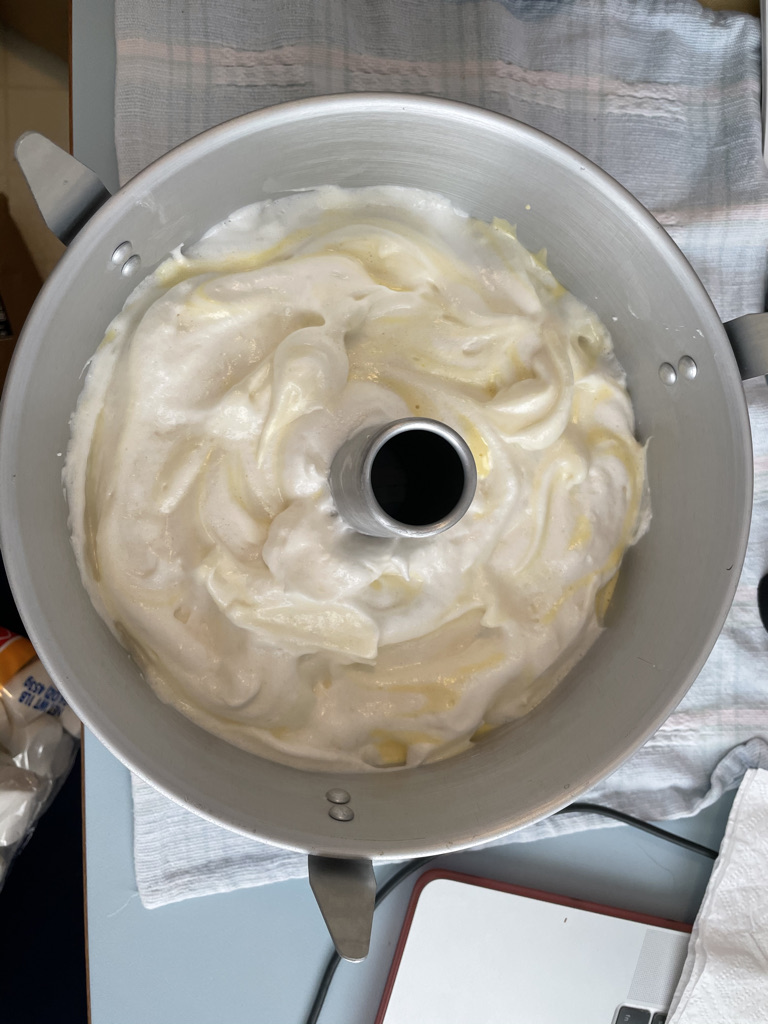
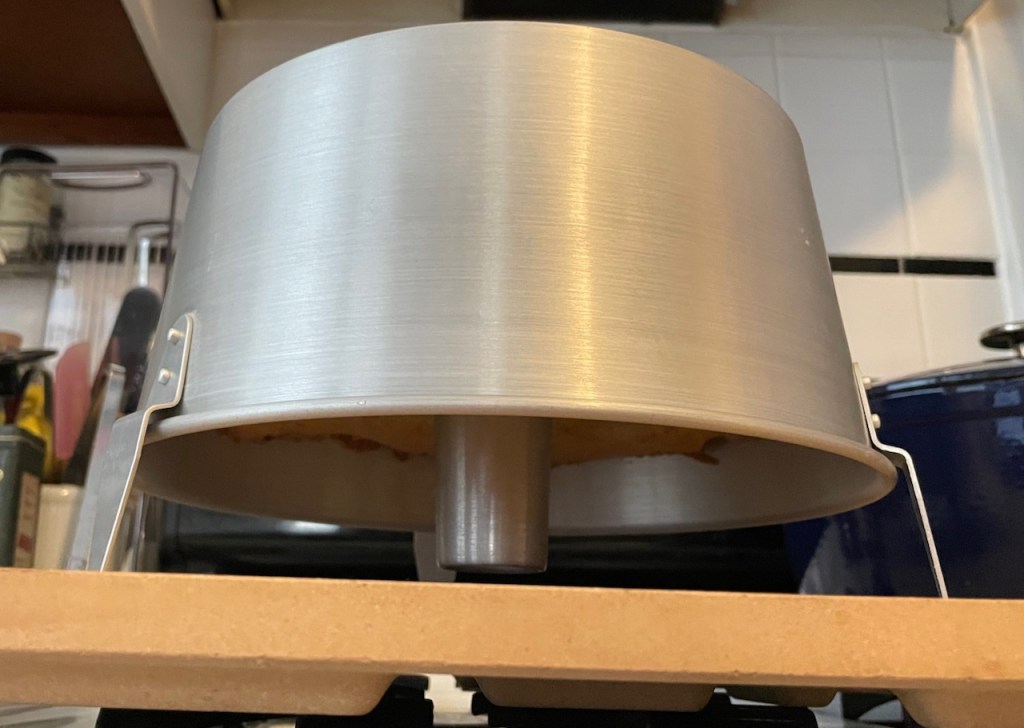
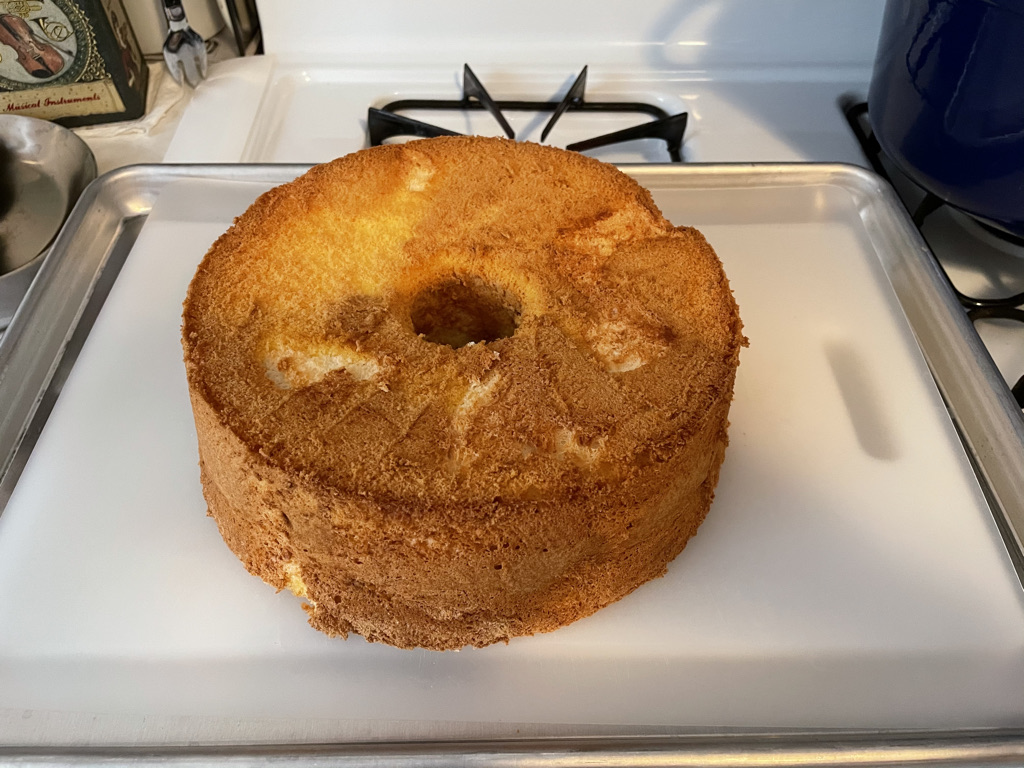
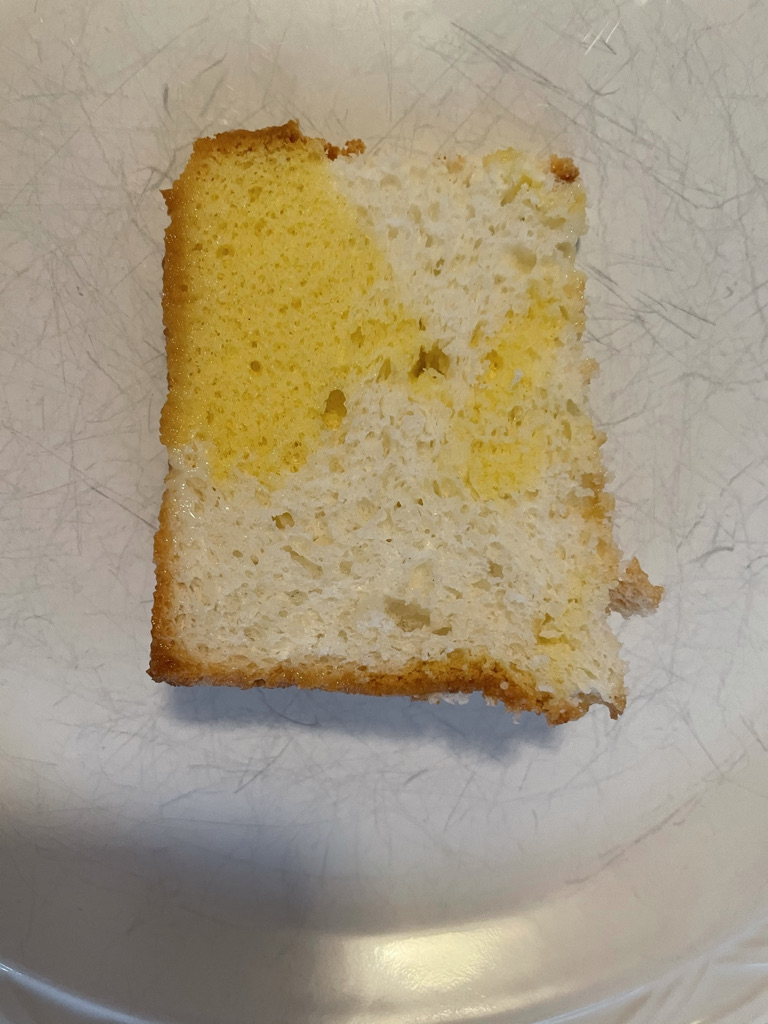
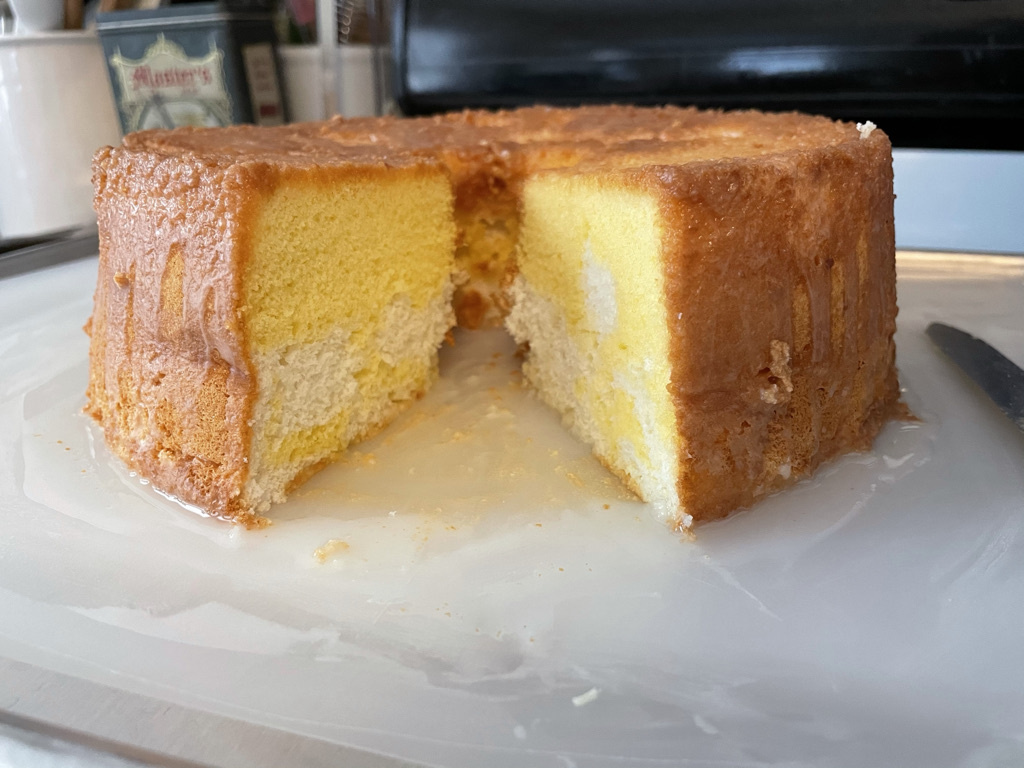
For my birthday, I decided to resurrect a cake from my mother’s standard rotation. Daffodil Cake (many variations exist on the interwebs) is a marbled combination of an Angel Food Cake and a Chiffon Cake, topped with a lemony glaze. It’s very, very SPRINGTIME, and just the right thing for the occasion.
I very often feel great sympathy for the contestants on the Great British Baking Show. I don’t now how they are able to do what they do under such insanely short timeframes. And, I can’t imagine how stressful it must be to have the cameras capturing EVERY thing that they do. Millions of our judgy eyeballs scrutinizing everything!
This cake reminded me of GBBS for a couple of reasons:
I recall some technical challenge where the contestants were not instructed to invert an Angel Food Cake for cooling and it was a test to see who already knew (I knew, thanks mom!).
My Daffodil Cake developed a slight “waist”, and I’m sure that was criticized on someone’s GBBS cake at some point. Perhaps I took the cake out of the pan too soon? Or perhaps the structure of this cake can’t quite manage the volume of glaze that it took in?
I am not an expert cake-baker. I have had only middling results in the past with cakes. That might need to be another project for me during this weird sabbatical. I’d like to master the various types of “sponge” that I’ve seen on GBBS, and really understand what makes cakes come out wonderfully.
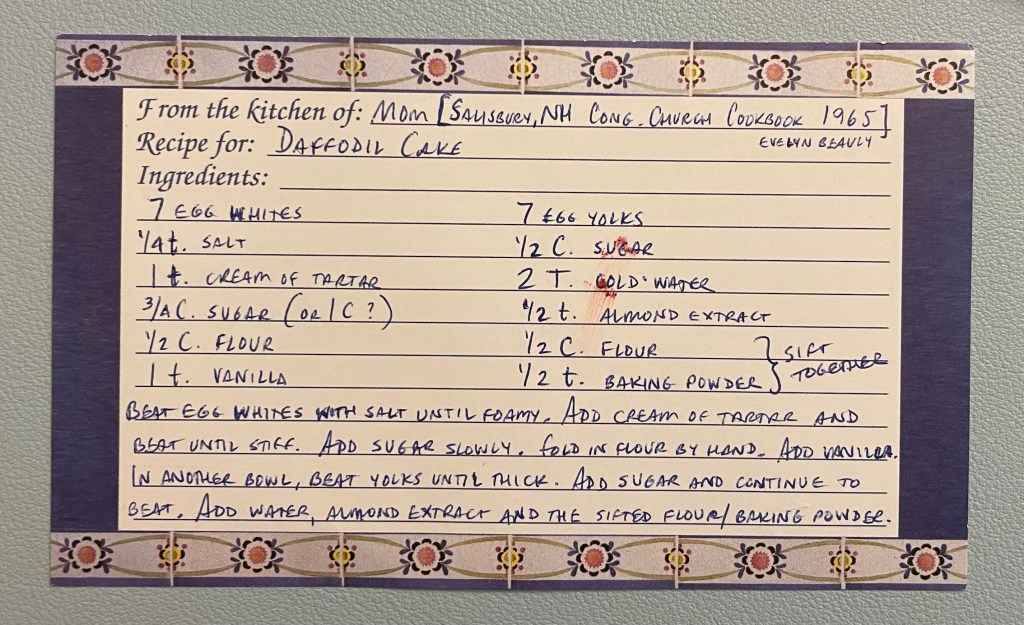
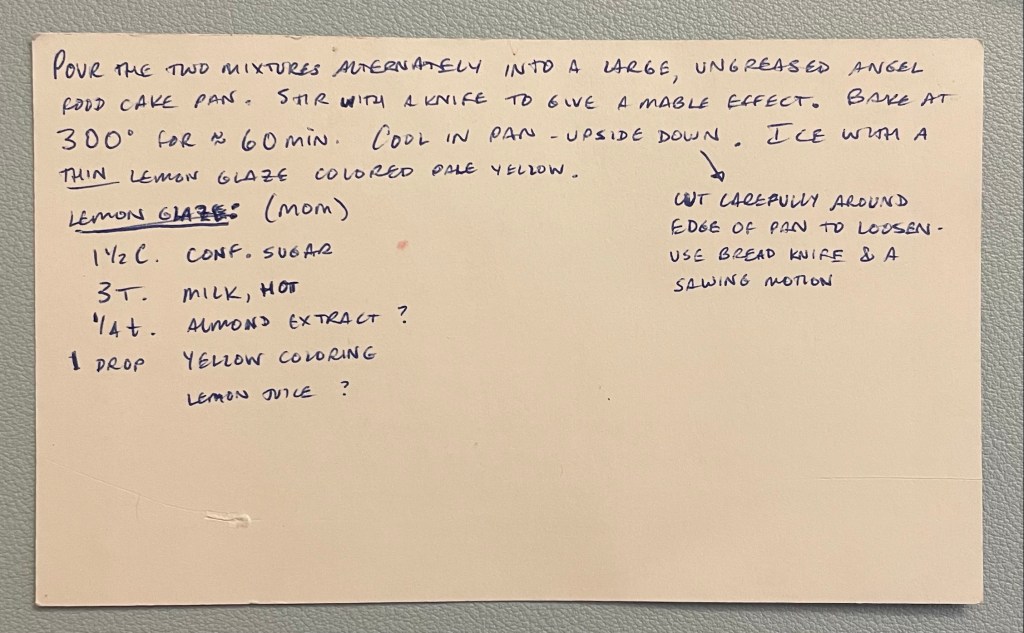
Here’s mom’s Daffodil Cake recipe (copied by me, many years ago), in which she credits Evelyn Beauly in the Salisbury, NH Congregational Church Cookbook, 1965:
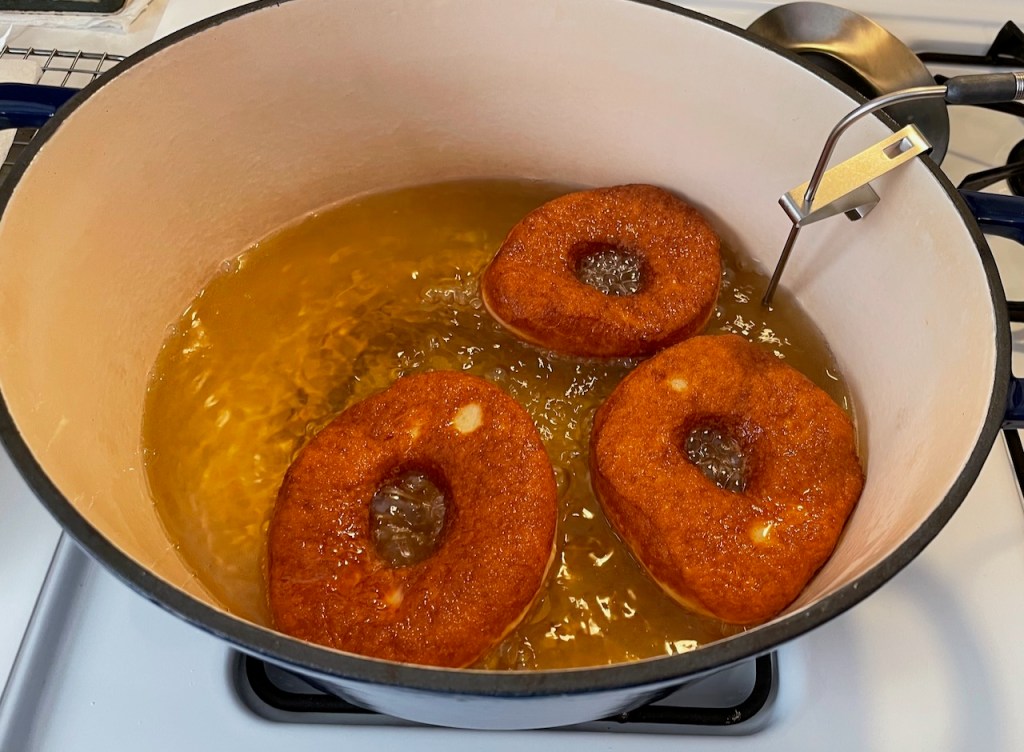
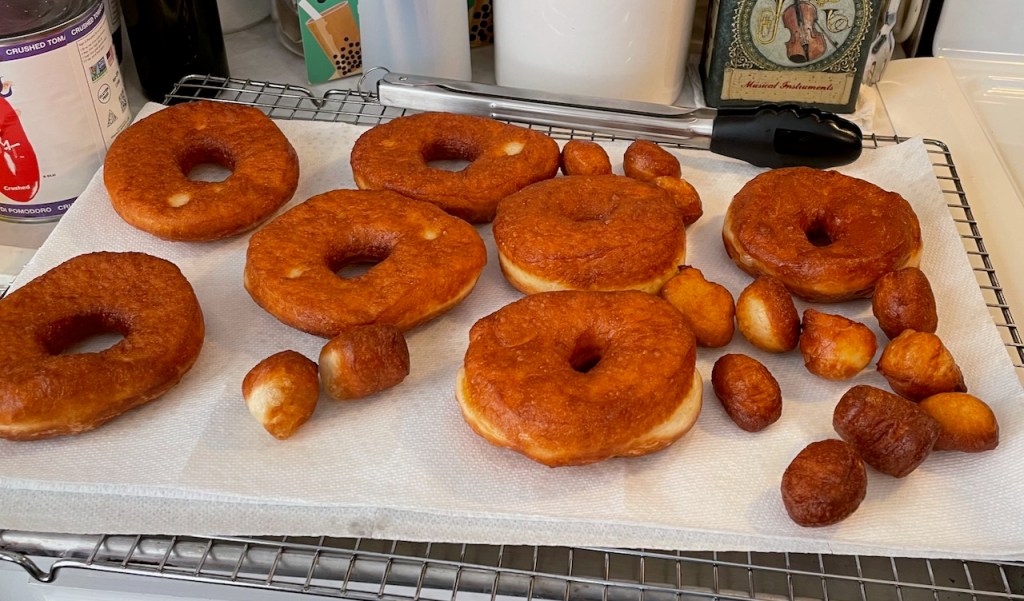
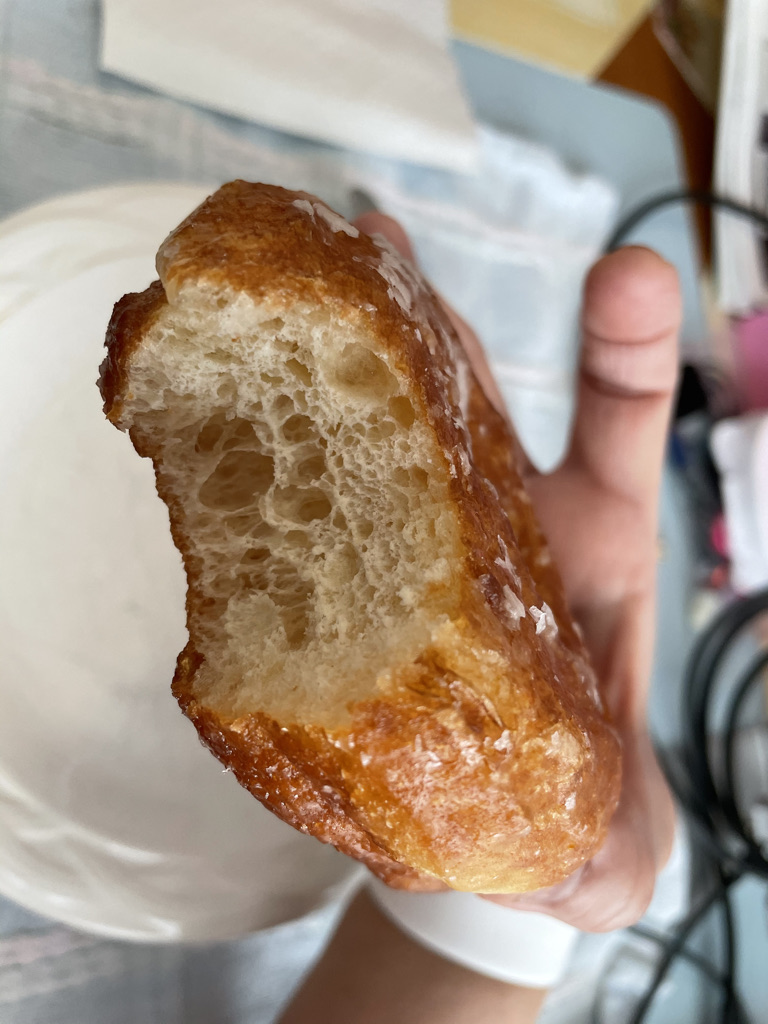
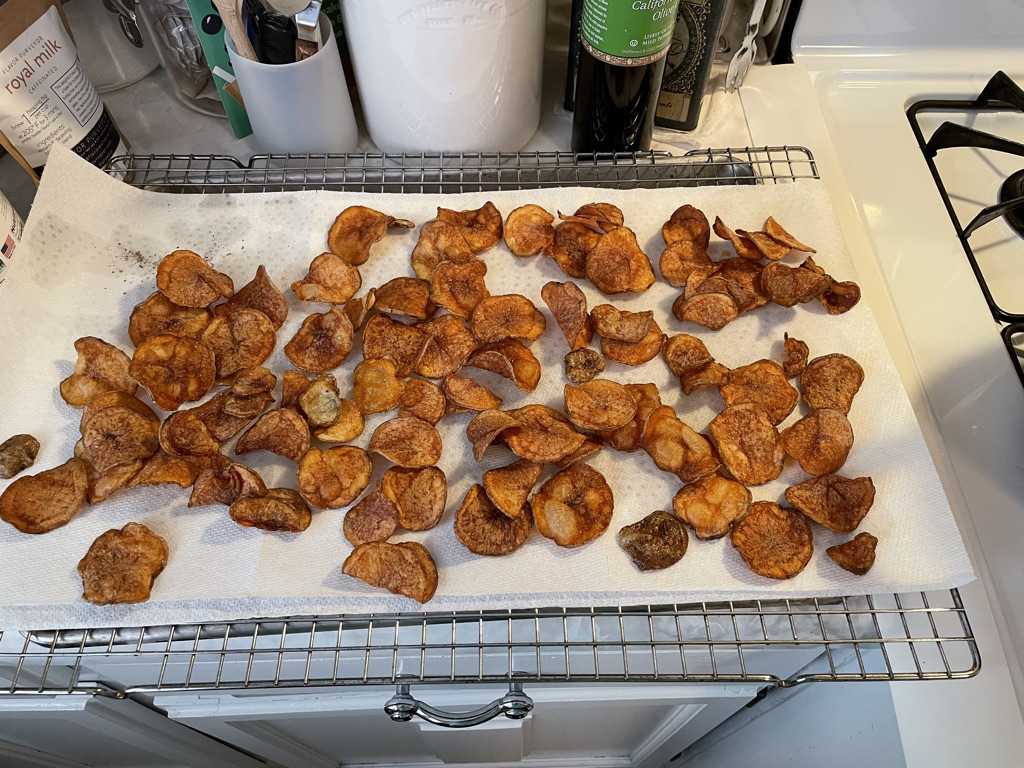
This was another project that was inspired by Cook’s Illustrated. The photos in that article practically give off an aroma of fresh-baked, light and fluffy doughnuts. I couldn’t not make these, especially after finding that deep-frying the kettle potato chips wasn’t so scary.
Some of them were a great success (like the one that I show here with a humongous bite taken out of it), but some were flat and unexciting. I’m slowly getting more accustomed to working with yeast – whether the bought kind or the sourdough kind. Here’s what I’m learning: If the doughnut looks flat and unexciting before going into the hot oil, then it will be flat and unexciting when it comes out of the hot oil. The frying/baking won’t make it be magically fluffy if it wasn’t already there.
In hindsight I wish that I had let some of the doughnuts proof longer. Some were good to go, but many were not. I’m realizing that the “when is something proofed (proved?) enough?” question is pretty much the meaning of life with yeast-risen things.
I had lots of leftover glaze, and meant to get back to this project right away, but it’s been eight months now and it hasn’t happened. [Sigh.]
This is a nostalgia ride for me, inspired in part by Aaron sending me a photo of a batch that he made. This recipe comes directly from my old copy of the Betty Crocker Cookbook. I have looked at versions of this recipe posted online, and none of them match what my cookbook has in it. If you want this recipe, just ask.
I throw in butterscotch morsels rather than nuts (ewww, definitely no nuts in this!). I also browned the butter rather than just melting it. ‘Cause… brown butter… you know. This recipe is easy and delicious.
I wonder if it would be an enhancement to sprinkle a tiny bit of coarse salt on top; an experiment to try next time.
This was from another Cook’s Illustrated article. Sometimes I read their magazine (and Milk Street, the Christopher Kimball spin-off) and I end up just dreaming about the recipes for weeks. This one really stuck with me, and I decided to go for it. I don’t have experience with deep-frying, but this wasn’t too scary! The amazing ThermoWorks ChefAlarm was a comforting source of accurate temperature data.
For all my baking of sweet things, it might surprise you to know that my weakness is actually salty stuff. Salty potato products are at the top of my list of favorite things. It was delightful to have these crunchy, homemade kettle chips!
P.S. I almost bought a new mandoline, and I did a bunch of research, but I didn’t pull the trigger. I have a simple one that my mom gave me decades ago, and it works just fine. I also almost bought a slice-resistant glove, and now I’m not sure why I didn’t. Hmmmm… [add to cart]
My Tartine bread project has spanned most of 2021. There have been many loaves produced: some quite successful and some rather less so. All of it has been edible and yummy, but it’s been both fascinating and frustrating to try to master this particular thing.
One of the issues that still puzzles me to some extent is how to know when the sourdough has proofed enough and not too much. It seems like something that could be described and explained in words, pictures, and/or video, and many have tried, but it still feels elusive to me.
I wrote earlier that I feel the particular qualities of a certain starter will have a big effect on the length of time that proving can take. To learn more about my three starters, I learned how to do time-lapse photography and took a 24-hour time-lapse video (20 seconds) showing when the starters peak, and showing the time and temperature each step of the way.
The three starters are:
TOP: Ken’s sourdough starter from Alaska
MIDDLE: A starter I created using the “pineapple juice method” (h/t Debra Wink in the Fresh Loaf blog community)
BOTTOM: A starter I created just from thin air, using all-purpose flour
During the spring when I made this video, I was in the habit of feeding the three starters once per day. Their behavior was relatively consistent each day, though the temperature in my house varies more it did in this video. Anyway, Ken’s sourdough peaks about 12 hours after being activated/fed.
There was a time at the beginning of my Tartine bread project when I had too much sourdough discard and I was determined not to just throw it out. I found the Leavenly website to be an excellent source of positive support and wonderful discard recipes. Here are my results from their Sourdough English Muffin recipe and their Sourdough Biscuits recipe. So. Much. Yumminess. — BUT: No. More. Room. In. My. Freezer.
I eventually got better at planning my sourdough remains such that I had just the amount I needed to keep the starter going. I also don’t feed my starter every day anymore. I did for a while at the beginning, and this did train my starter into rising more quickly, but it doesn’t seem absolutely necessary, and it’s a big time (and materials) sink.
But, I have to say, these discard recipes make me miss having the discards!
In 2015, my dear friend, Ken, gave me a sourdough starter that he and his wife, Peggy, received on the occasion of their wedding, nearly 60 years prior. There was one time, during Ken’s medical residency, that he let the sourdough die out, but he was able to re-acquire it from his original source. The actual lineage of the starter can be traced back to Alaska.
Ken also gave me some recipes and an article from the New York Times about making sourdough in a dutch oven. I wasn’t at all experienced with bread-baking, so I just followed the recipes as best as I could. The results were delicious and made me very happy, but then I tasted what sourdough bread could really be like, and that set me off in pursuit of the magic.
The culprit was a piece of bread that came with a pandemic take-out order from Cambridge’s Giulia Restaurant. I didn’t know bread could be like this! It was crusty on the outside, but tender and airy on the inside. The interior was light, but not at all squishy; it had lovely, big holes. Of course, the rest of the meal was incredible, but I couldn’t stop thinking about the bread.
For this particular quest, it doesn’t take much time on google to find oneself at the altar of Chad Robertson of Tartine Bakery and his wonderful book, Tartine Bread. I drank up every bit of wisdom, lore, and poetry that Chad had to offer, bought some stuff (flour, for starters), and got to work.
Coincidentally, my other habit (binge streaming anything and everything) happened to merge with the baking one when I watched Jon Favreau’s charming movie “Chef” and his related documentary series “Chef Show“. Amazingly, one of the Chef Show episodes features Chad Robertson, and he gives Jon a lesson about how to form the loaves. I’ve watched those few minutes of that episode many, many times.
I think, in hindsight, that I was quite lucky in my first attempt (photos above). To some extent, I feel that I have never quite obtained the same openness that I got in that first loaf, but I’m getting there. Weirdly, that very first loaf experienced what I thought was a catastrophic problem when it stuck like crazy to the bowl it was proofed in. When I went to turn it onto the baking dish the loaf basically got pulled apart into a stringy mess. I had to rip it off of the proofing bowl and stuff it into the dutch oven. It was a massacre. But, look at the sharp and dramatic ear! Look at the air holes! It’s otherwise a tremendous success. I don’t know what this teaches me, but it has hovered over me for the past year.
The number of variables and the extent to which hands-on familiarity and knowledge make or break the results, made the sourdough quest exactly the kind of obsession, er, project that I needed. I surfed many internet resources and tried many different ideas and techniques. I successfully started two different sourdoughs – but my favorite is still the Alaskan one from Ken.
For anyone looking for Chad Robertson’s Tartine Bread recipe and method, I highly recommend reading his book. It’s completely worth it (and would be even if it weren’t relatively inexpensive and short!). The New York Times did an article about Chad, Tartine, and this bread (including the recipe), but I think it’s best coming directly from the source. As a “believer”, I would say that, wouldn’t I?
Some hundred loaves later, here’s where I’m at:
The varying advice and “sure thing” blogs and videos all seem somewhat oversimplified regarding the variable of the behavior of your particular sourdough organism. Different sourdoughs, in my opinion, will behave differently, and one sourdough will behave differently in different circumstances (weather, mostly).
So, this means – as Chad writes – that one needs to become experienced and expert in knowing when a dough is ready for the next stage of the process. Simple timings and steps won’t really tell you when to stop proofing or when you’ve developed enough gluten. It seems that true experts know how the dough looks, smells, and feels when it’s “right”. For myself, I’m getting better, but I don’t feel confident.
I still consider Chad’s recipe and instructions to be ideal. I see no need to vary from them, and all my attempts to follow other recipes were all definite downgrades. I am a believer.
I have been convinced (by trailrunner on the excellent FreshLoaf blog community) that the baking vessel does not have to be a super-heavy cast iron dutch oven. Dealing with a pre-heated, heavy, cast iron pan is perilous. It turns out that using much-lighter (and much cheaper!) GraniteWare produces the same results as cast iron! I also tried a plain aluminum lidded pan and got really bad results, so this doesn’t seem to work with just any old covered pan.
Doing too much streching-and-folding yields a loaf with a dense, gummier inside – I think regardless of the proving duration or readiness. There was a time when I thought that building more gluten would help generate more airiness, but I think this was exactly the wrong idea. There needs to be enough gluten to support the air bubbles, but it’s the proofing (and the sourdough critters) that make the air bubbles.
Every single time I tried to chill the dough immediately before baking, I had just terribly tough and gummy results. I honestly don’t understand how this works for anyone. If I refrigerate during the final proof, I have to let the dough come completely to room temperature and continue proofing at room temp before baking.
Some people seem to prefer bread that has fewer air holes, so I did end up giving away several loaves once my enthusiasm for the research exceeded my eating and freezer capacities. There was a point early on in this project when my freezer door couldn’t be opened without loaves of sourdough falling on me.
Eating fresh-from-the-oven sourdough bread is heavenly. A thin swipe of Kerrygold butter and a light layer of Bonne Maman raspberry preserves (not too much to mask the flavor of the bread)… mmmmmmm
I salivated over this Cook’s Illustrated article and recipe for weeks before I was able to gather the necessary ingredients (was there a pandemic run on coconut for some reason??). I had a very hard time stopping myself from just chain-eating these. They are very, very addictive!
You can see in the photo that the two trays baked for different lengths of time. The left-hand tray (12 minutes) is more blonde and the cookies were more chewy. The right-hand tray (14 minutes) is more caramelized and the cookies were more crunchy and “toothsome”. I think the mouth feel of the chewy cookie was much better, so for me it’s important not to overbake these.
It’s safe to say that I have a tendency to “strongly” bake things (I just learned that there’s a French pastry term for this: “bein cuit”). I like deep brown pastry, for example. But, there are cases where this is not a helpful inclination, and I think this cookie is an example. I mean, I don’t apply “bien cuit” to the Ikeda Christmas Cookies, though I do let them get brown on the edges where some recipes might call for taking them out prior to any browning (to preserve the color of the Candy Canes, for example).
Anyway, the goal of deep browning definitely does not apply to everything, and cookies are probably a categorical example.
The pandemic has afforded me the possibility of making the Ikeda Christmas Cookies two years in a row! Here are some thoughts:
I baked the Sugar Cookies without any kind of pan liner, using my very thin, metal spatulas. I suspect this is best for clean, even browning of these very thin cookies.
When making the Candy Cane Cookies, why do I always end up with more red dough than white dough? I’m reasonably sure there is some optical trick that makes me roll the red thinner than the white. You can see in the box of finished cookies where there’s a tiny red & white Candy Cane (blue arrow) and several all-red Candy Canes. I’m hoping that my new analytical balance will settle this matter next year!
Look at all these wonderful cutters that I’ve accumulated over the decades! Many are thoughtful gifts from kind friends and family members, and some are inherited from my mom. The Ikeda sisters worked on these cookies at mom’s elbow for many years as little kids, and after we finished baking we would deliver them around the neighborhood.
Finally: This was my attempt at making a coronavirus cookie… [sigh] And, this is a view of my Sugar Cookie workstation, offering a glimpse of my pandemic work environment and this year’s cookie-making binge-streaming fodder.
Fresh mochi is a Japanese New Year’s tradition, and since there aren’t any good local sources for it here in the Boston area, I now make it myself. The mochi machine is really fun to watch, and I made this video of a key moment in the process… It’s a short (30 seconds) video, and if you watch with the sound on you will hear that things got even more exciting right at the end!
For complicated reasons, I drove out to Wisconsin and spent several weeks with mom, Jennifer, Michael, and Mac, despite Wisconsin being in a covid surge at that time. It was meaningful to be there with them, and I spent much of my time there sewing and baking. Here are the two pies I made: my classic apple pie and Joanne Chang’s Rich Chocolate Cream Pie.
A few thoughts on these pies:
I have a consistent issue with my apple pies where the level of the apples sinks after the top crust has set, causing a big gap between the fruit and the top crust. You can see that in the photo. Even with macerating the apples in sugar for 30 minutes, it’s not enough to solve this issue. Next attempt will probably involve pre-cooking the apples.
I am very happy with my pie crust recipe, and keep returning to it despite trying several other recipes and techniques. The basic idea is that I use the New York Times all-butter crust recipe, but I use Joanne Chang’s “fraisage” technique. I did have success using Shirley Corriher’s technique of using a rolling pin to do the fraisage, but that method caused a tremendous mess in my kitchen, so I now stick with the regular fraisage by hand.
I seem to have been willing to make a fancy edge on the chocolate pie, perhaps because I didn’t have a fluted tart shell? I always follow the stated pâte sucrée recipe for this chocolate pie, and love it. It also appears that I made chocolate crumbs rather than curls!
It’s probably worth fessing up that I once made this pie and forgot to put the egg yolks and sugar into the chocolate custard filling. The resulting pudding/ganache (rather than custard) was still delicious (and one or two people preferred it!), so I now routinely cut back the number of yolks to 2 (from 4) and the sugar to 2 Tbs (from 1/3 cup). I do keep forgetting to bump up the cream and chocolate a bit to compensate for the loss in volume, but it’s not a big deal.
This isn’t a post about baking so much as a post about why I have time to bake so much.
For various reasons, I’m at higher risk of having a more serious case of COVID-19 if I should catch it. When school started in early September 2020, it was remote and I started the year teaching remotely. But, my school is considered “high needs” because its student body is 100% English Language Learners. There was significant public and governmental pressure for high-needs schools to get students back for in-person learning as soon as possible, so that meant my school was among the first to open.
Though about half of the students opted to continue learning remotely, there were enough that teachers needed to report for in-person (“hybrid”) classes in October. My medical history made it unsafe for me to go back, so I took a pandemic-related unpaid leave.
It has been incredibly painful and weird to not be teaching. For eight years, teaching is what I do and who I am. Even chamber music has had to take a knee for now. One bright light has been the baking. And now, back to that…
I’m of the opinion that it’s important for scientists to publish studies that are “failures” (for many reasons, but that would be a different kind of blog post, right?), and I have to face that the same principle applies to my baking failures. I made these cinnamon rolls today, based on this Smitten Kitchen article and recipe (which, in turn, is based on a Bon Appetit 2008 issue). Through no fault of the recipe, I seriously overbaked these. I mean, they were just completely hammered. I can hear Paul Hollywood saying, “Overworked, overbaked, dry as a bone.” Of course, I still ate them, and they were still delicious, but definitely an overall failure.
Here’s what I learned and what I want to remember for next time:
I think they could have come out as much as 10 minutes earlier
I used a non-cream-cheese glaze, which I happen to like, but was necessitated by my not having cream cheese and my not wanting to run out to get it (side note: I haven’t been going to any grocery stores during the pandemic, preferring instead to have necessities delivered)
I believe the technique of using a thread (or dental floss) to cut these is a seriously bad idea. It seemed, as I was doing it, that bits of filling were somehow jumping all over the kitchen. I didn’t think I was applying that much tension, but I kept hearing sounds of flying cinnamon sugar all over the kitchen. On the other hand, I don’t know how much better or worse it would be to try to cut them, so that remains to be determined.
[Lastly, I’m happy to have a reason to post a photo of the beautiful baking dish that Stef gave me from Bennington Potters!]
I like to read cookbooks and cooking magazines. An especially enticing article in Christopher Kimball’s Milk Street Magazine got me temporarily obsessed with making quiche. I even bought a deep quiche/tart pan specifically for this purpose. I did the math and a 1/12 slice of this deliciousness was ~540 calories (including both creme fraiche and heavy cream!). As Prue Leith would say, though, it was worth every one of those 540 calories.
However, Prue would also have noticed and disapproved of the soggy bottom at the center of the quiche. As instructed in the recipe, the tart pan (with foil and on a sheet pan because of leakage) was put directly onto the pizza stone that lives in my oven, but still yielded this soggy center. The next step would be to partially blind bake the crust, and/or place the tart pan with foil (no sheet pan) directly on the stone.
Over the next few weeks I did make subsequent versions that cut back on the cream and creme fraiche (increasing milk), that tried my own pie crust recipe, and that tried my new Breville oven. But, the learning from all this was:
Don’t use the Breville, because the bottom didn’t get hot enough (needs the stone)
Don’t use my pie crust (too fragile)
It’s fine to swap out the richer dairy for milk
DO blind bake for 15-20 minutes, with LOTS of pie weights
Place the tart pan directly on the stone, but with foil for leakage (no sheet pan)
While teaching remotely, I apparently found the time and energy to produce this amazing thing. I followed the New York Times recipe, and it was both easy and delicious. Sort-of like a gigantic popover. I wanted to wrap myself up in it…
Every year, Mike and Chris buy a big ham on Easter Sunday and then share a bunch of it with me. I then take the ham and, among other things, make a big dish of macaroni and cheese with ham. Here’s the 2020 edition. I like to make my mac & cheese quite spicy, with sriracha and a heavy-handed mix of powdered chili peppers.
Viennese Crescents (pre-bake)Viennese Crescents (final)Wreaths (pre-bake)Wreaths (in process)Wreaths (final)Candy CanesCandy Canes (pre-bake)Sugar Cookiesfor Mac (the Black Lab)Sugar CookiesCandy Canes
Being a teacher, which I have loved, is a profoundly exhausting and all-consuming profession. Not that working in bio-tech was a picnic, of course, but I have never felt as fulfilled or exhausted as I have as a teacher. On weekends and holidays – or even just at the end of each teaching day – I’d just sort-of collapse and need to let my mind and body recover.
This didn’t leave much energy or time for the significant production that is the Ikeda Christmas Cookie scene. But in 2019 the school calendar happened to play out in a way that resulted in a rare two-week Christmas vacation, allowing me time to recover and then to bake like crazy. It was wonderful to get back to it, and to find the muscle-memory still intact, and to introduce a little bit of innovation.
I now own enough silicone pan liners that I’m using them all the time. Unlike “air bake” pans, I think the silicone liners manage to avoid delaying browning – mostly. They definitely avoid sticking and are simpler than parchment, but I wonder if parchment would have been preferable for the sugar cookies, in terms of browning. With 2021 hindsight, and now that I own a box of pre-cut parchment, maybe I’ll opt for that this year?
In an attempt to make the cookies as uniform as possible, I tried using my food scale to help, but the masses involved were too small and exceeded this scale’s ability to cope. So, I bought a lab scale that is specifically for smaller masses (no more than 200g) and I can’t wait to use it for the next Christmas Cookie production.
Anyway, this gallery gives you an idea of the production that is involved. The Viennese Crescents trace back to a 1955 New York Times article that my mother must have discovered. They are, by my taste, the best tasting of the Ikeda Christmas Cookies, and also the easiest to make.
The Wreaths are my next favorite to eat, and though they are very time-consuming to make, I love working with the eggy, delicate dough. I don’t know the provenance of that recipe, but I do vividly recall my mom explaining that the sugar needed to be fine green sugar and chunkier red sugar – so that the red sugar would look like holly berries on the wreaths. This is but one of many aspects of the compulsive Ikeda tendencies surrounding this affair.
The Candy Canes, which are a recipe that didn’t come from mom (!) are, without question, the most time-consuming to create. I love their look more than their flavor, but I know some who prefer this cookie over the others. I once spent two hours preparing a tray of these at some ungodly hour of the morning only to then go and burn them. I cried, went to bed, then kept going the next day.
The secret to the sugar cookies, which I learned from mom, is to roll them excruciatingly thin, and this is aided by dusting the rolling surface with flour mixed with sugar. This keeps the dough from getting bogged down (toughened) with too much flour. The compulsive need to put eyes on every cutout shape that should have eyes is entirely my own mental illness. Can’t blame mom for that one!
[A keen eye might notice that one of the photos shows what I was streaming on the iPad while I was baking… ]
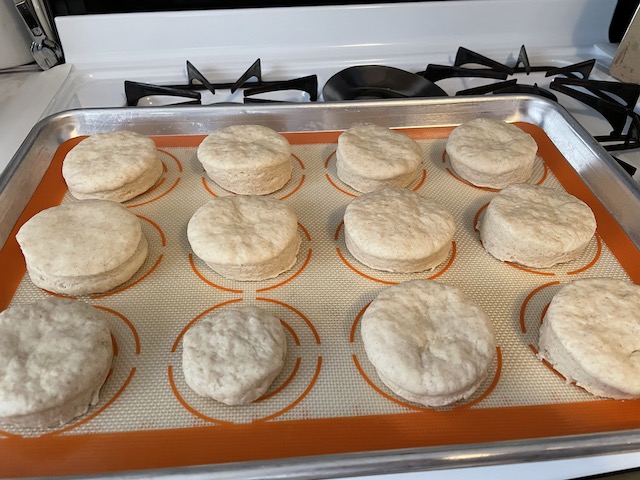
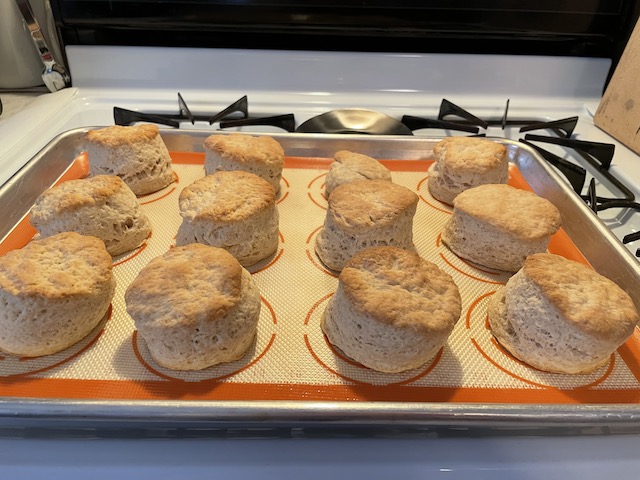
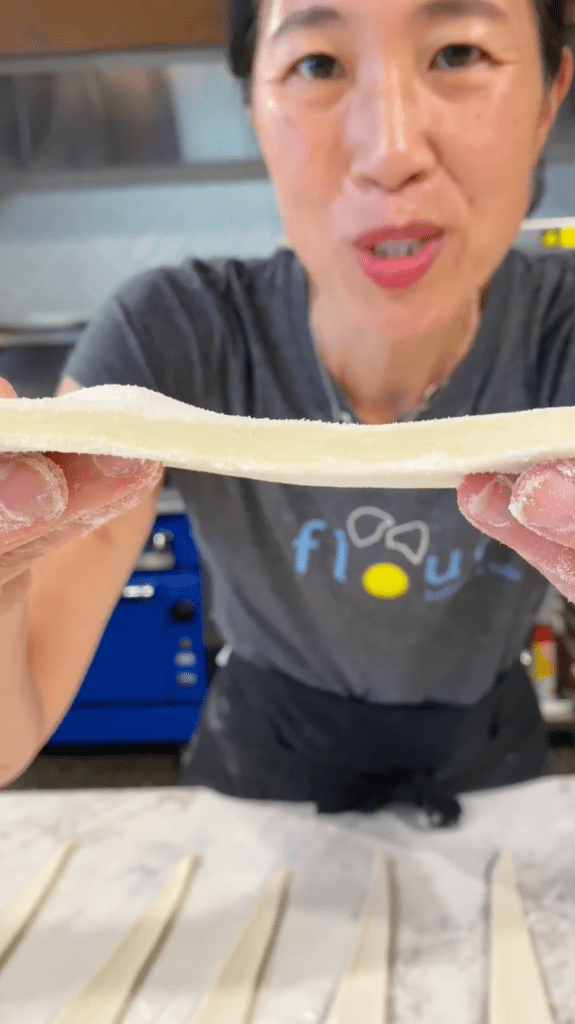
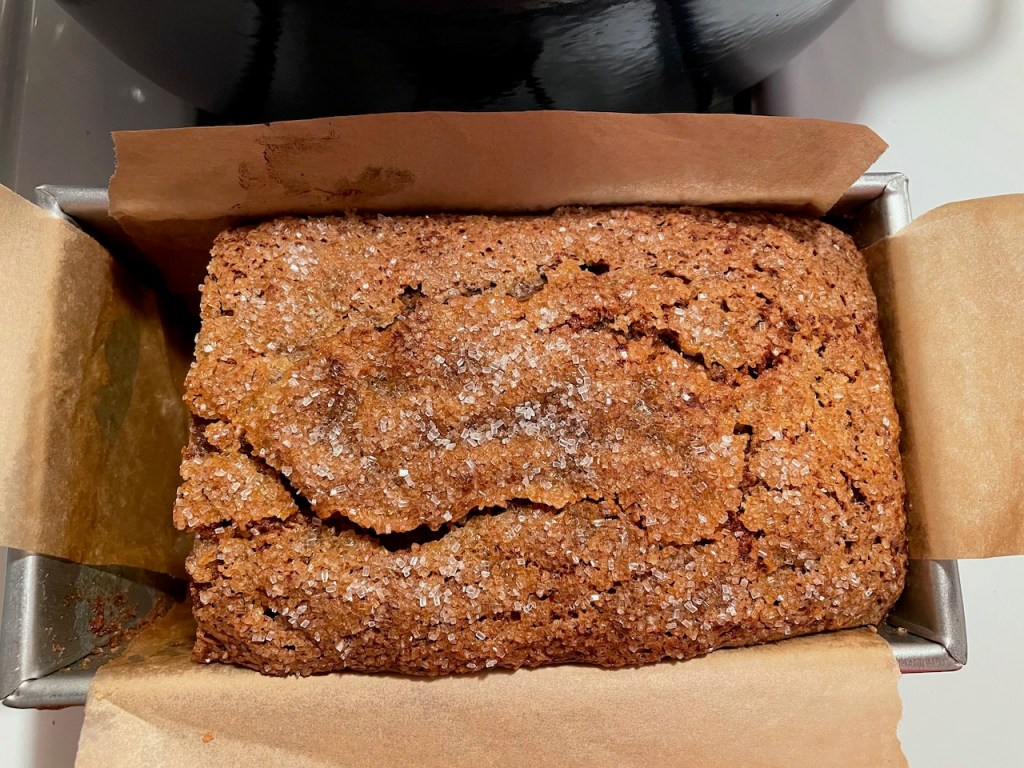
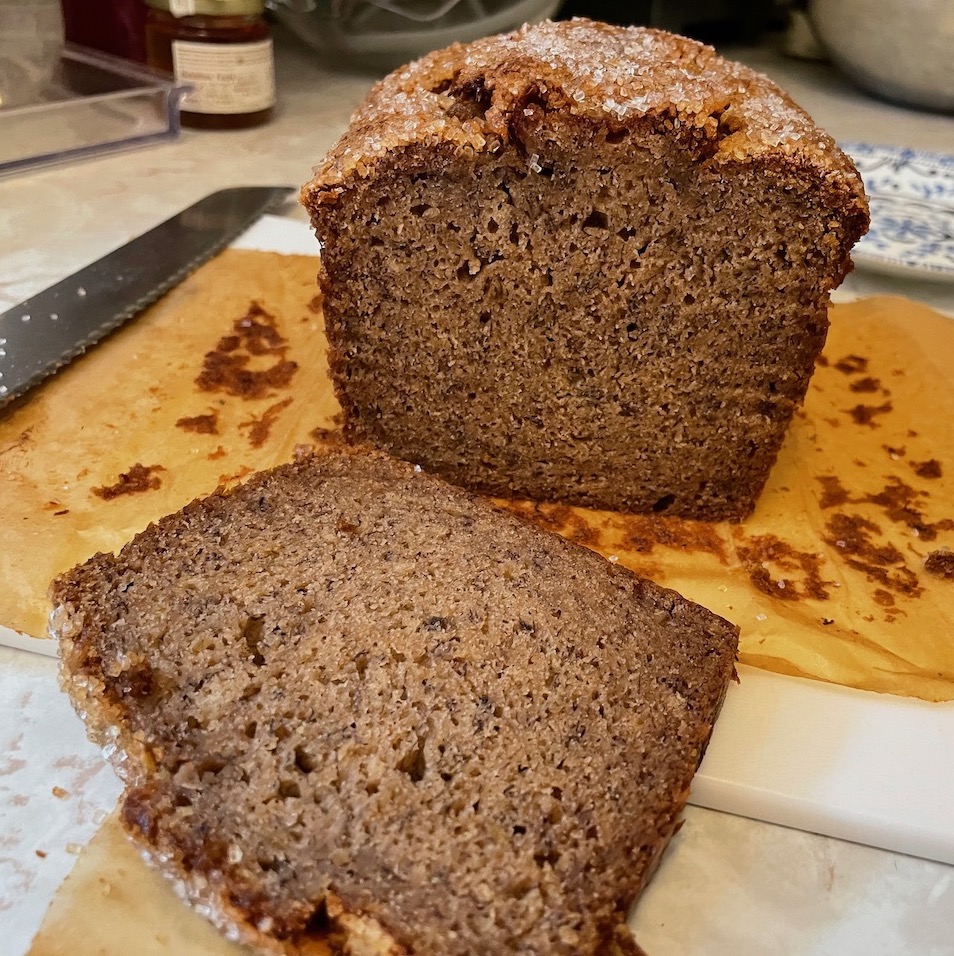

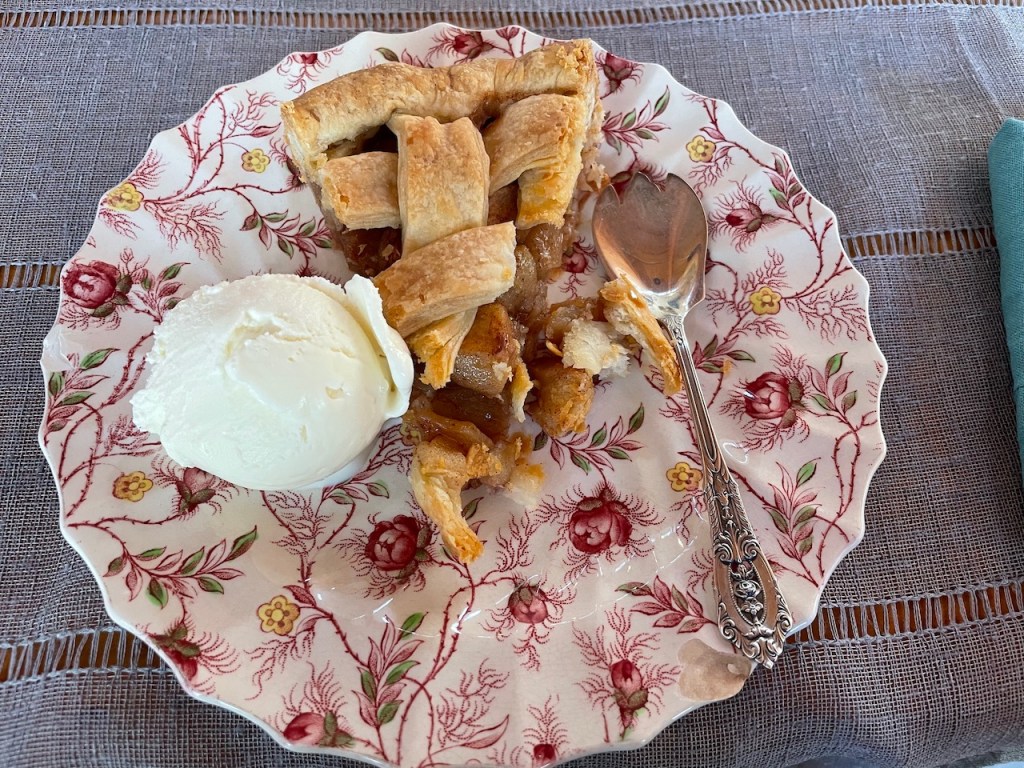
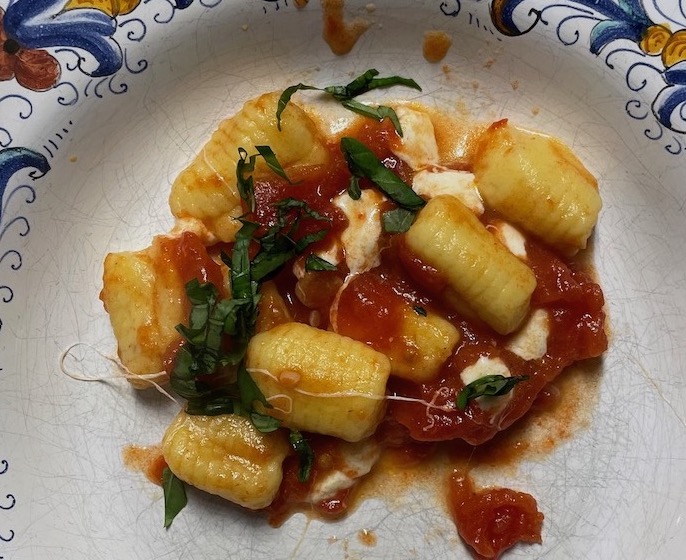

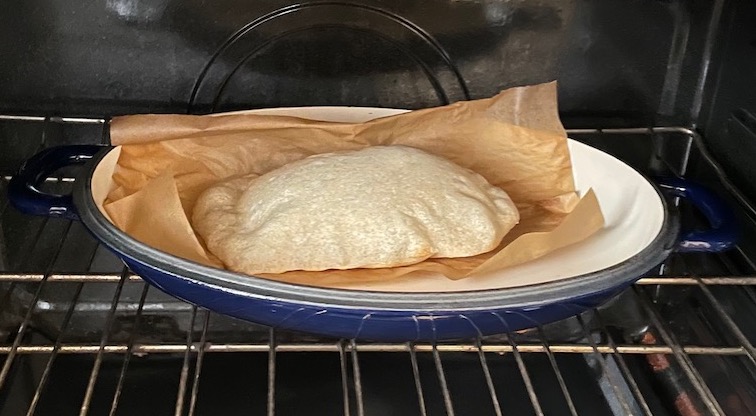
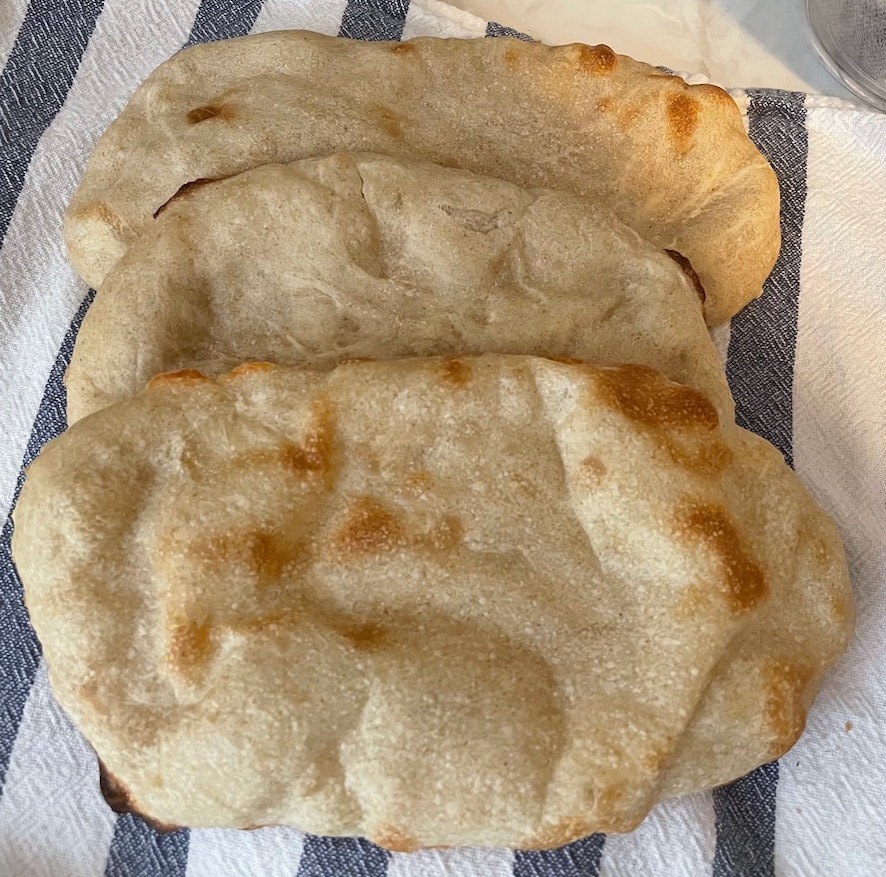
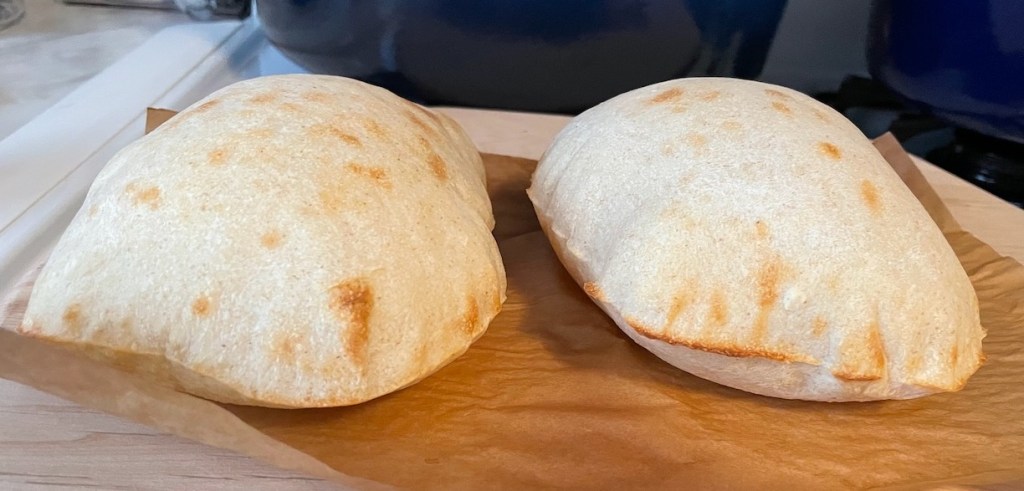
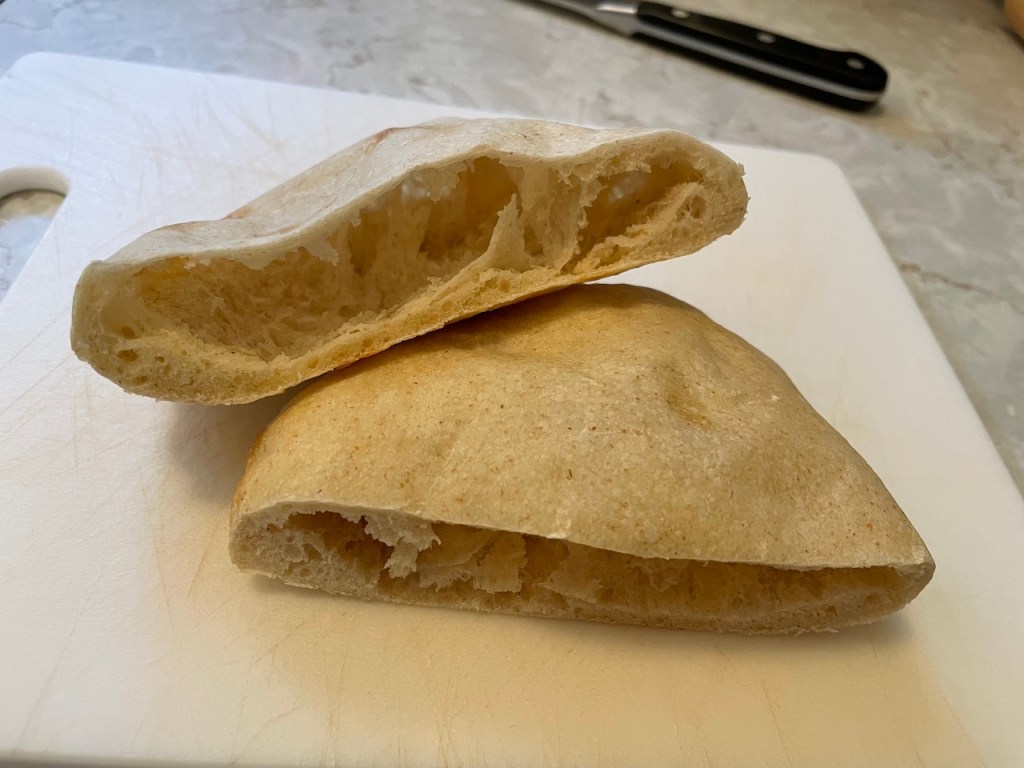
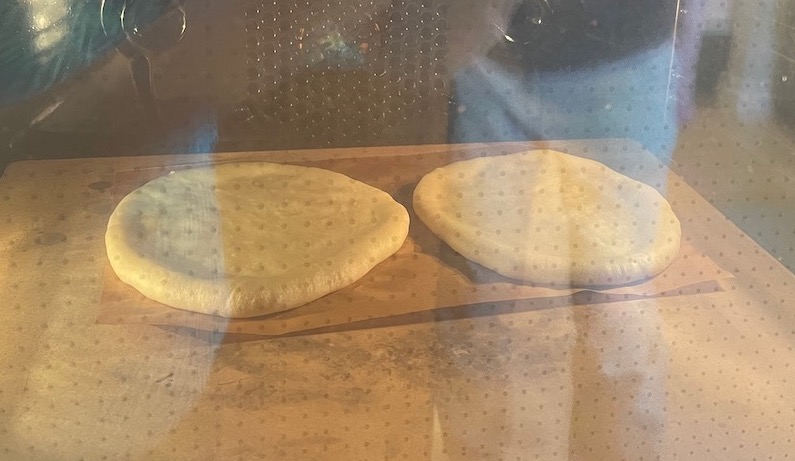
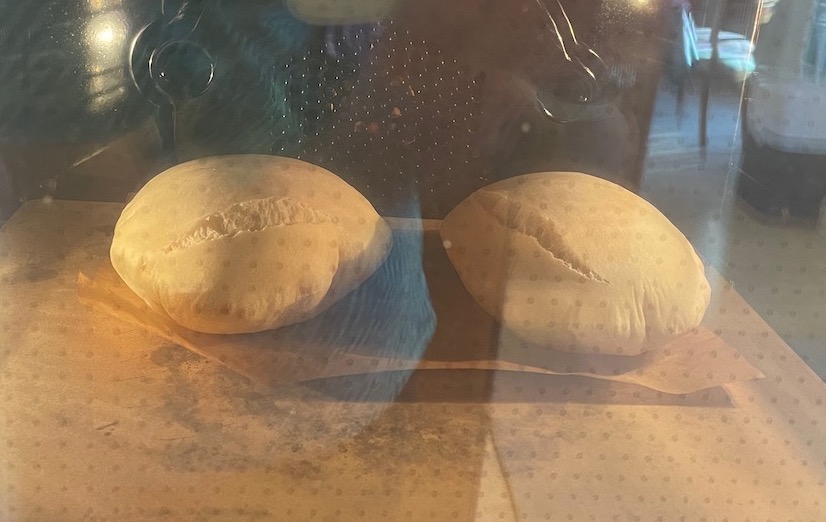
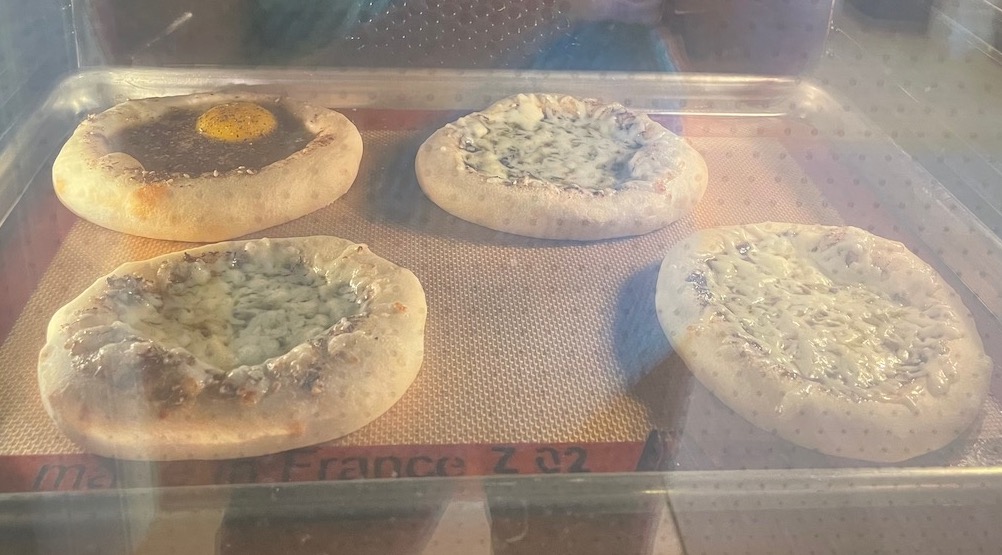
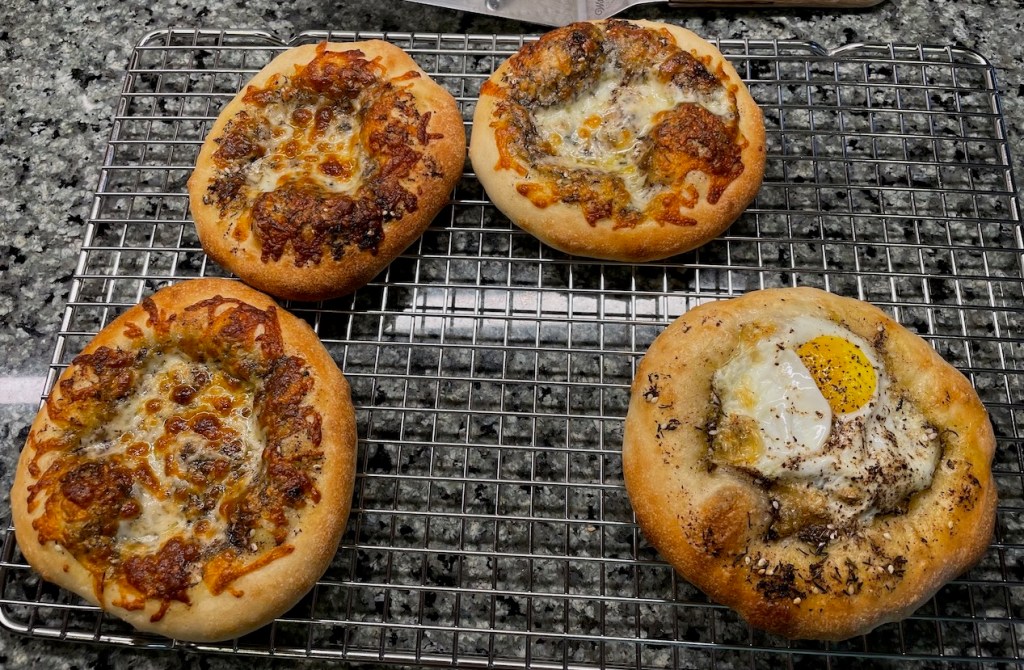
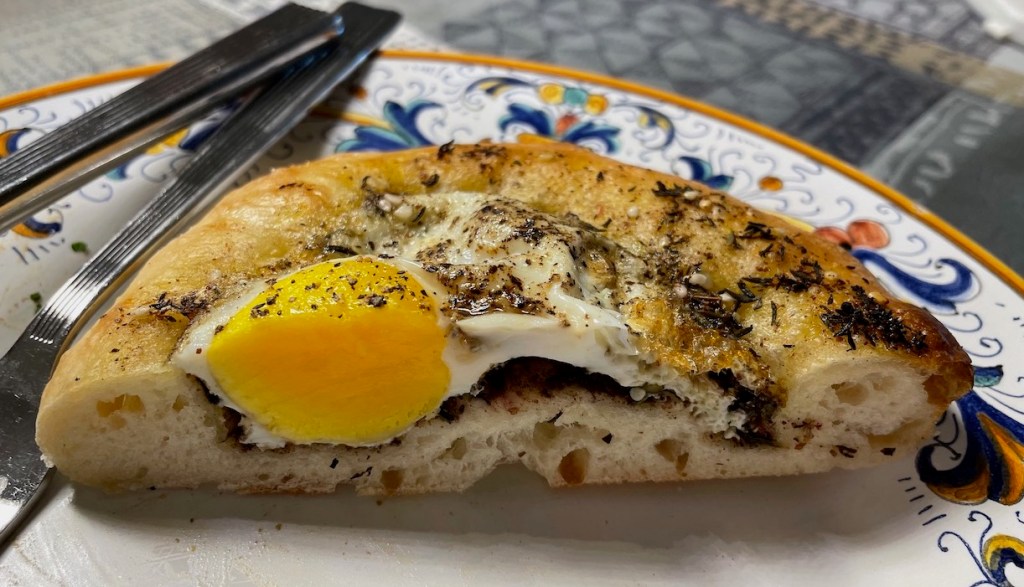

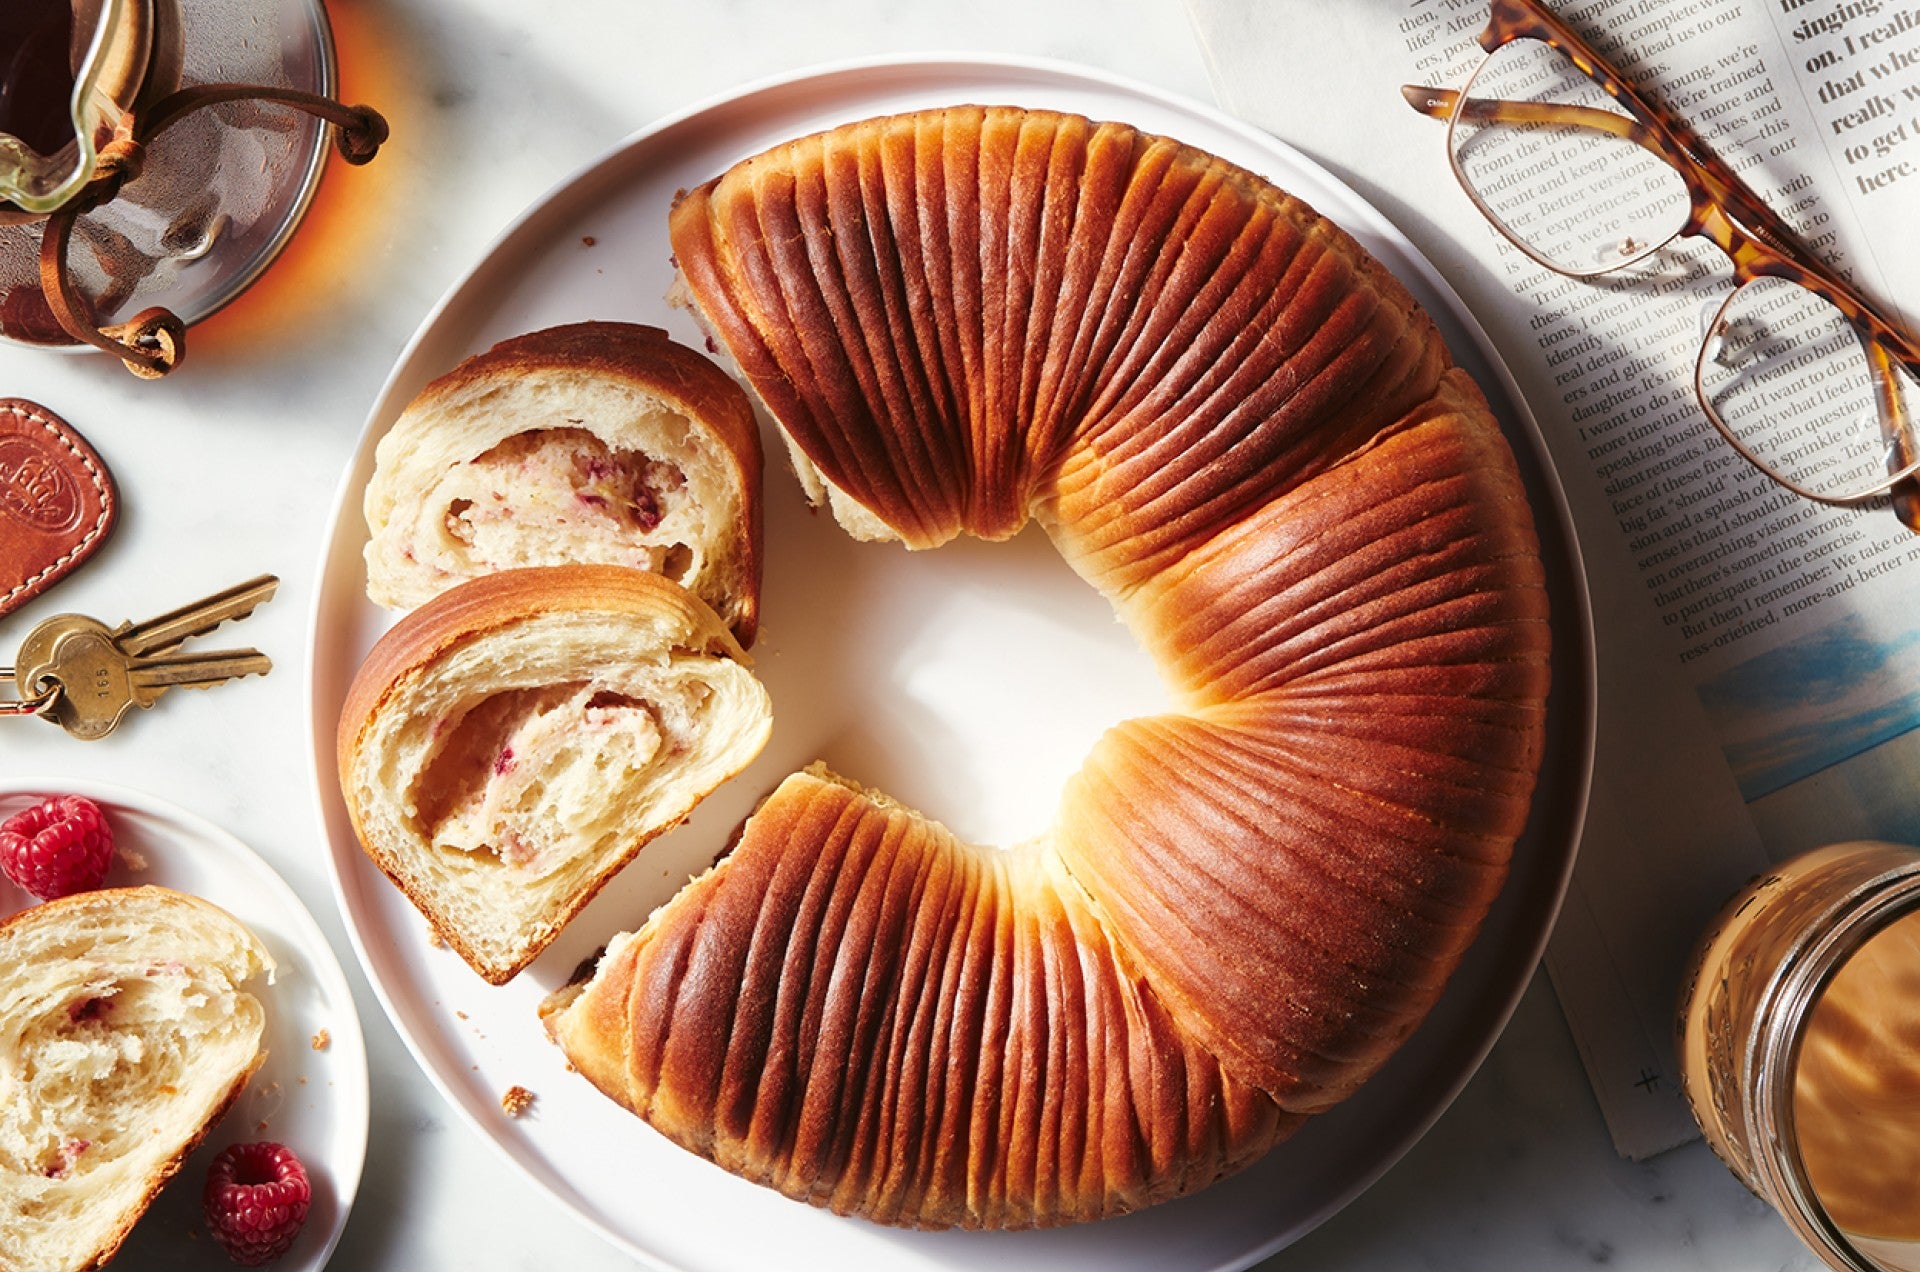
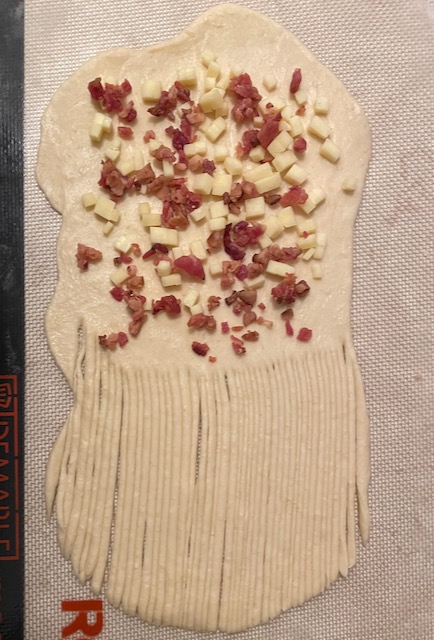
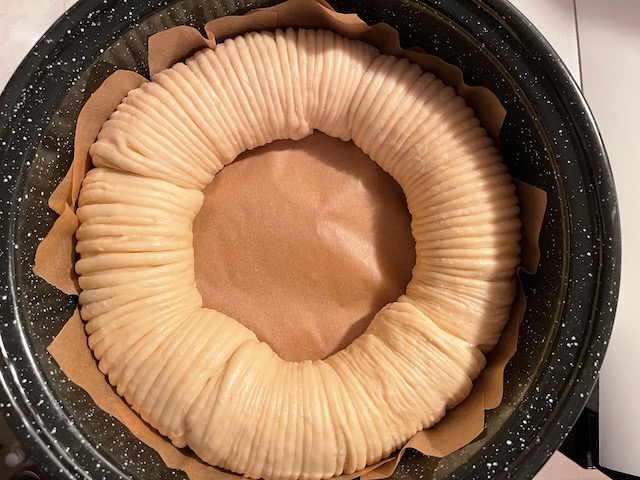

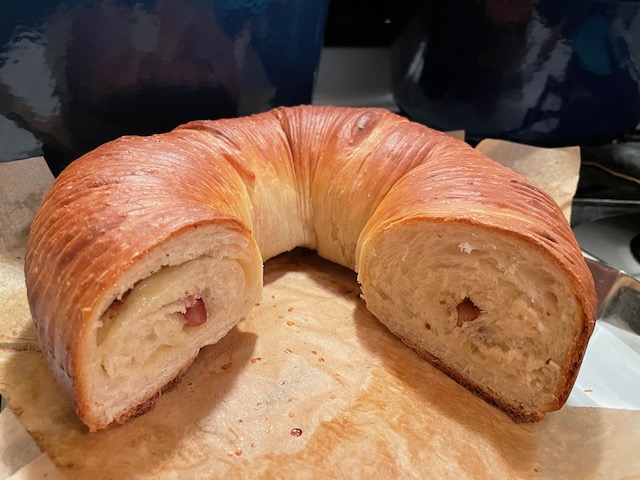
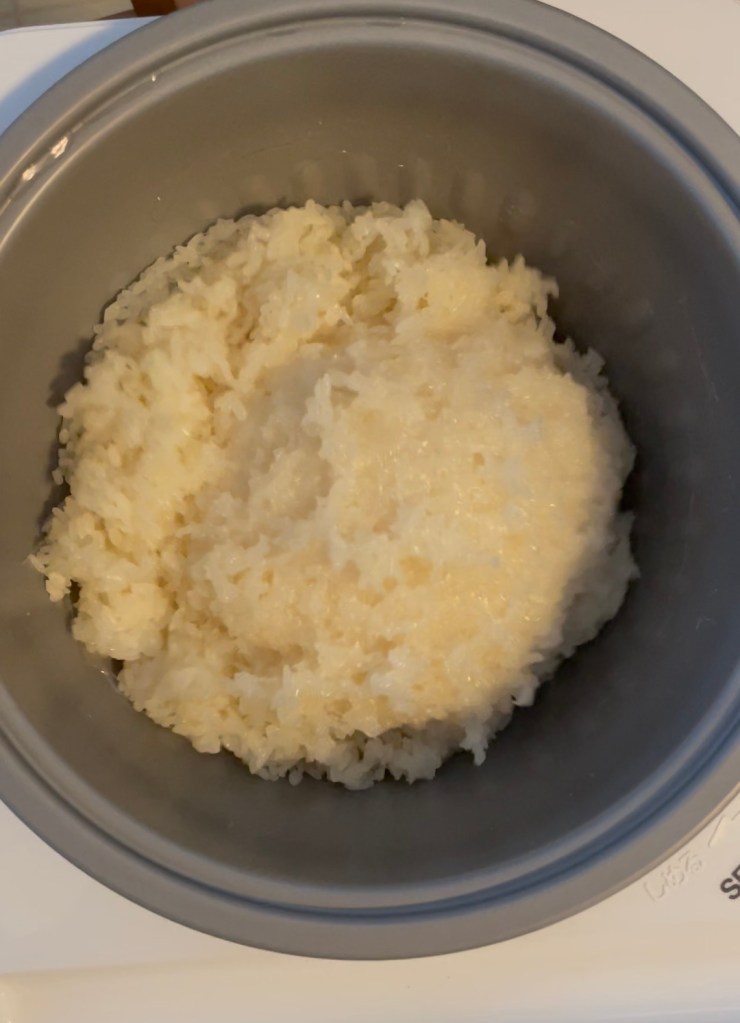
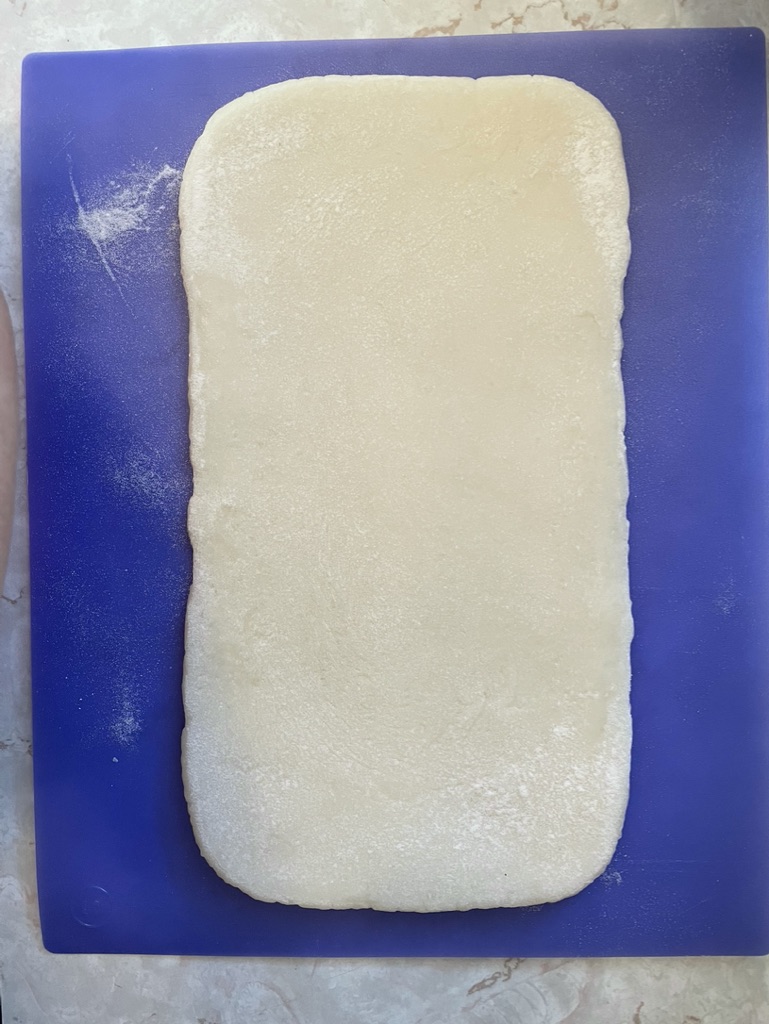
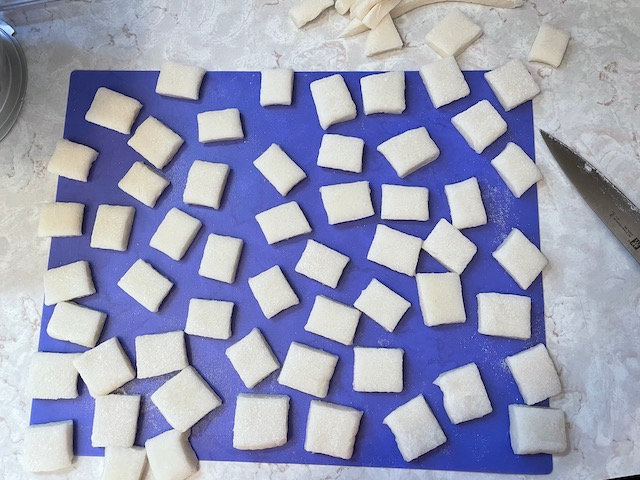

:max_bytes(150000):strip_icc():format(webp)/Norimaki-Mochi---1-56a541673df78cf77287599b.jpg)